| [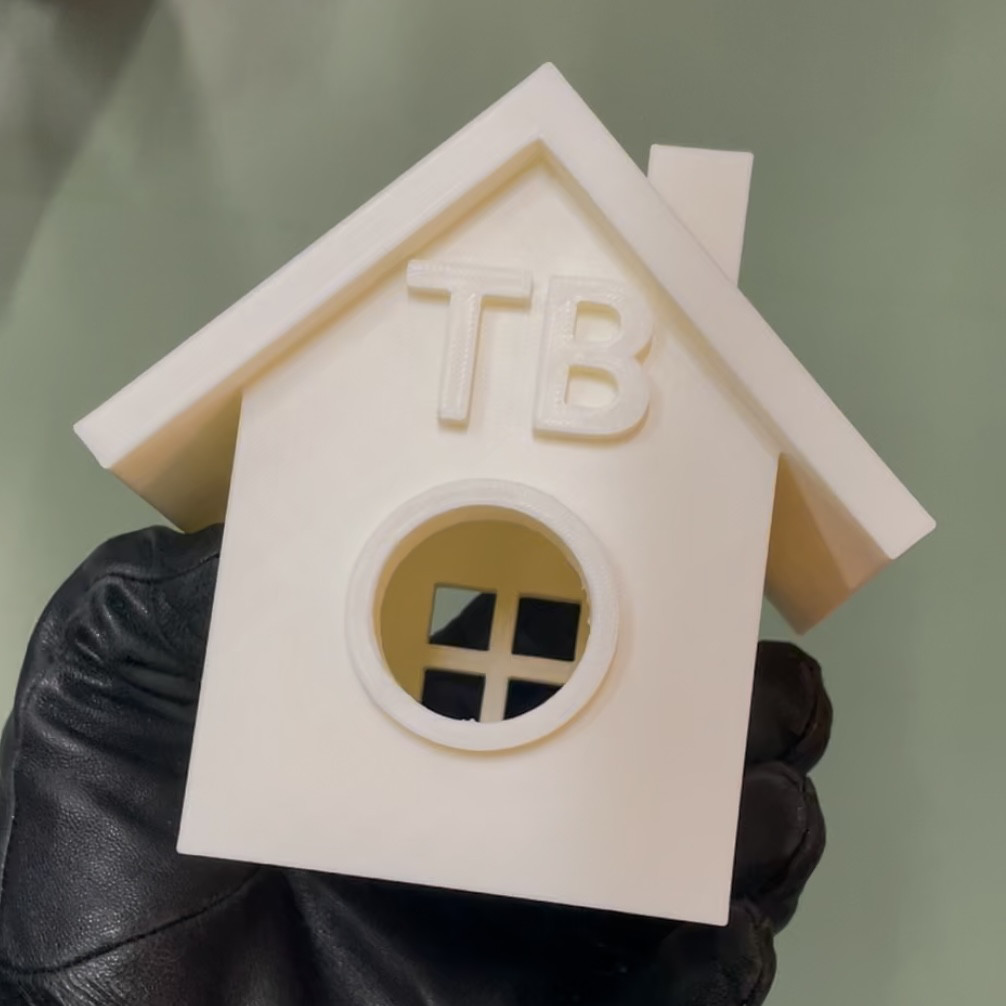](https://wiki.fablab.sorbonne-universite.fr/BookStack/uploads/images/gallery/2024-12/img-6985.jpg) | 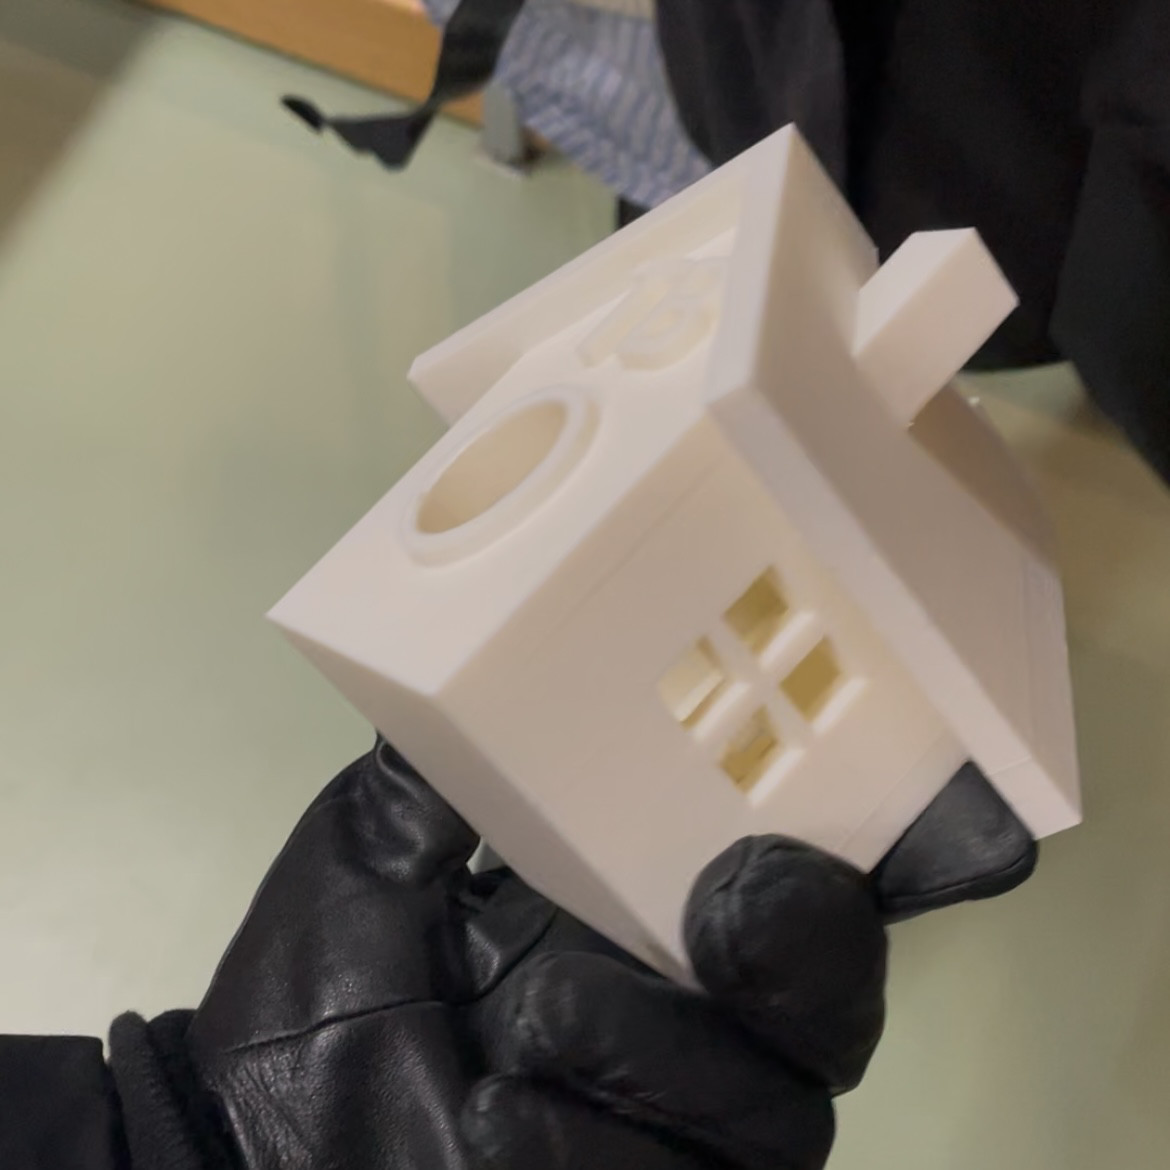 |
| [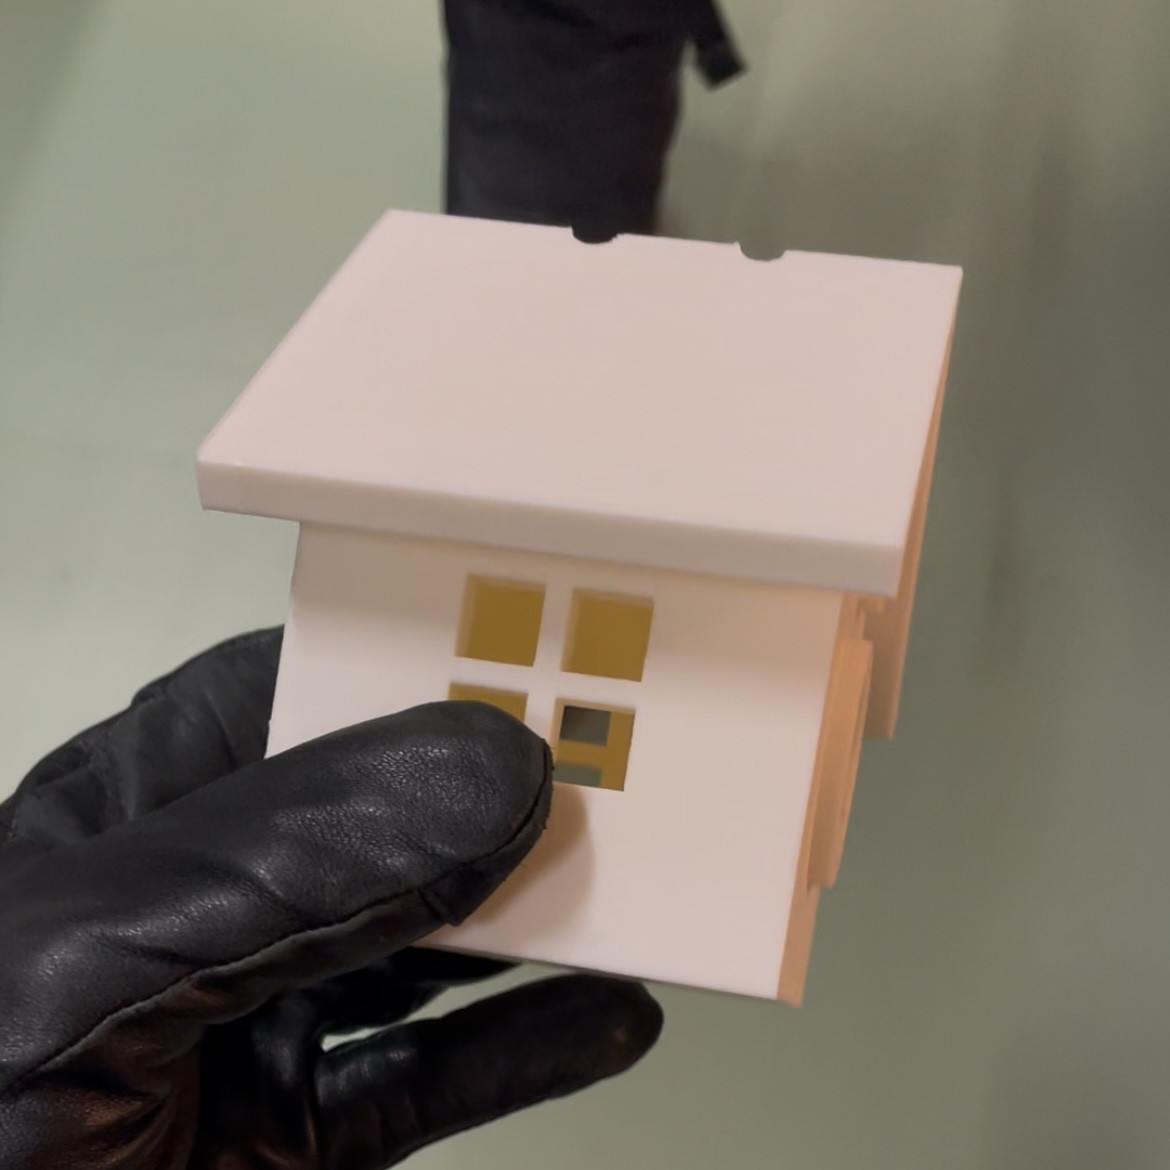](https://wiki.fablab.sorbonne-universite.fr/BookStack/uploads/images/gallery/2024-12/img-6986.jpg) | 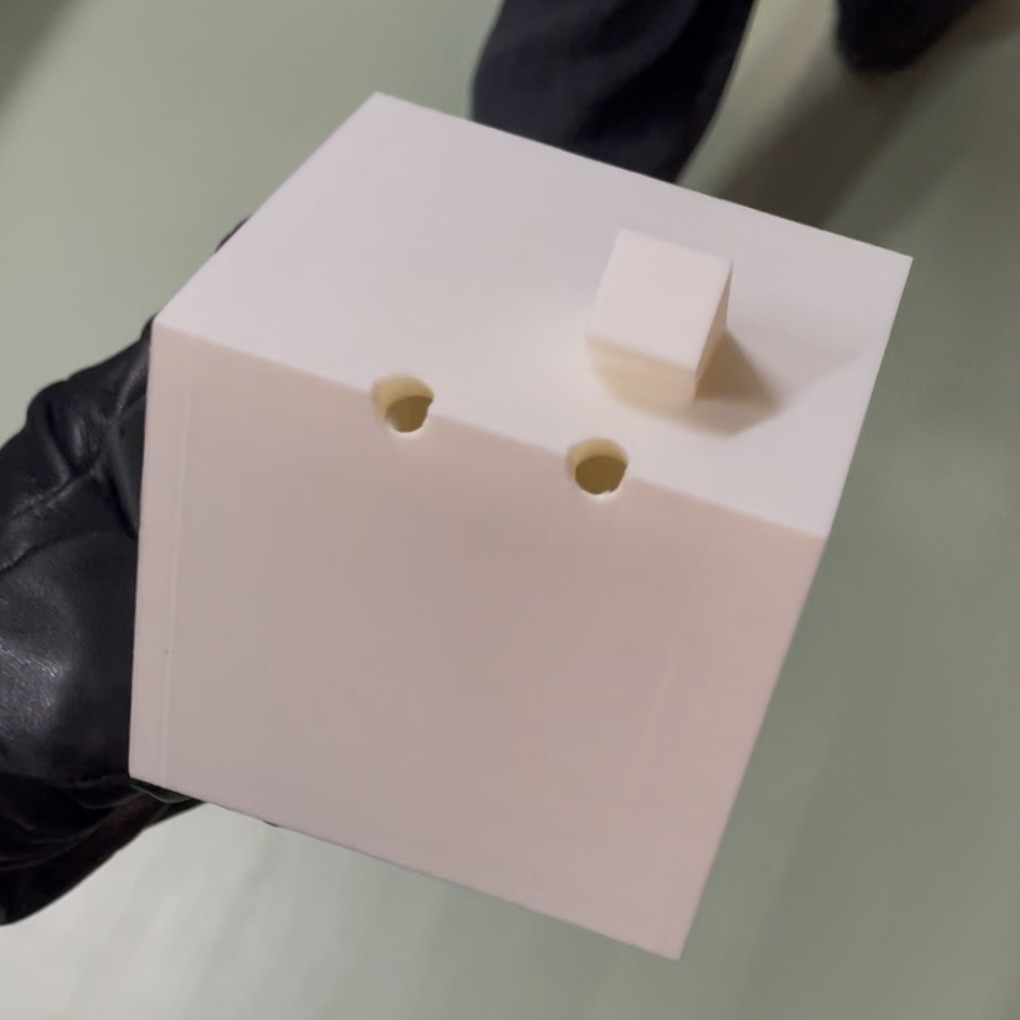 |
| [](https://wiki.fablab.sorbonne-universite.fr/BookStack/uploads/images/gallery/2024-12/img-7771.png) | [](https://wiki.fablab.sorbonne-universite.fr/BookStack/uploads/images/gallery/2024-12/img-7772.png) |
| [](https://wiki.fablab.sorbonne-universite.fr/BookStack/uploads/images/gallery/2024-12/img-7773.png) | [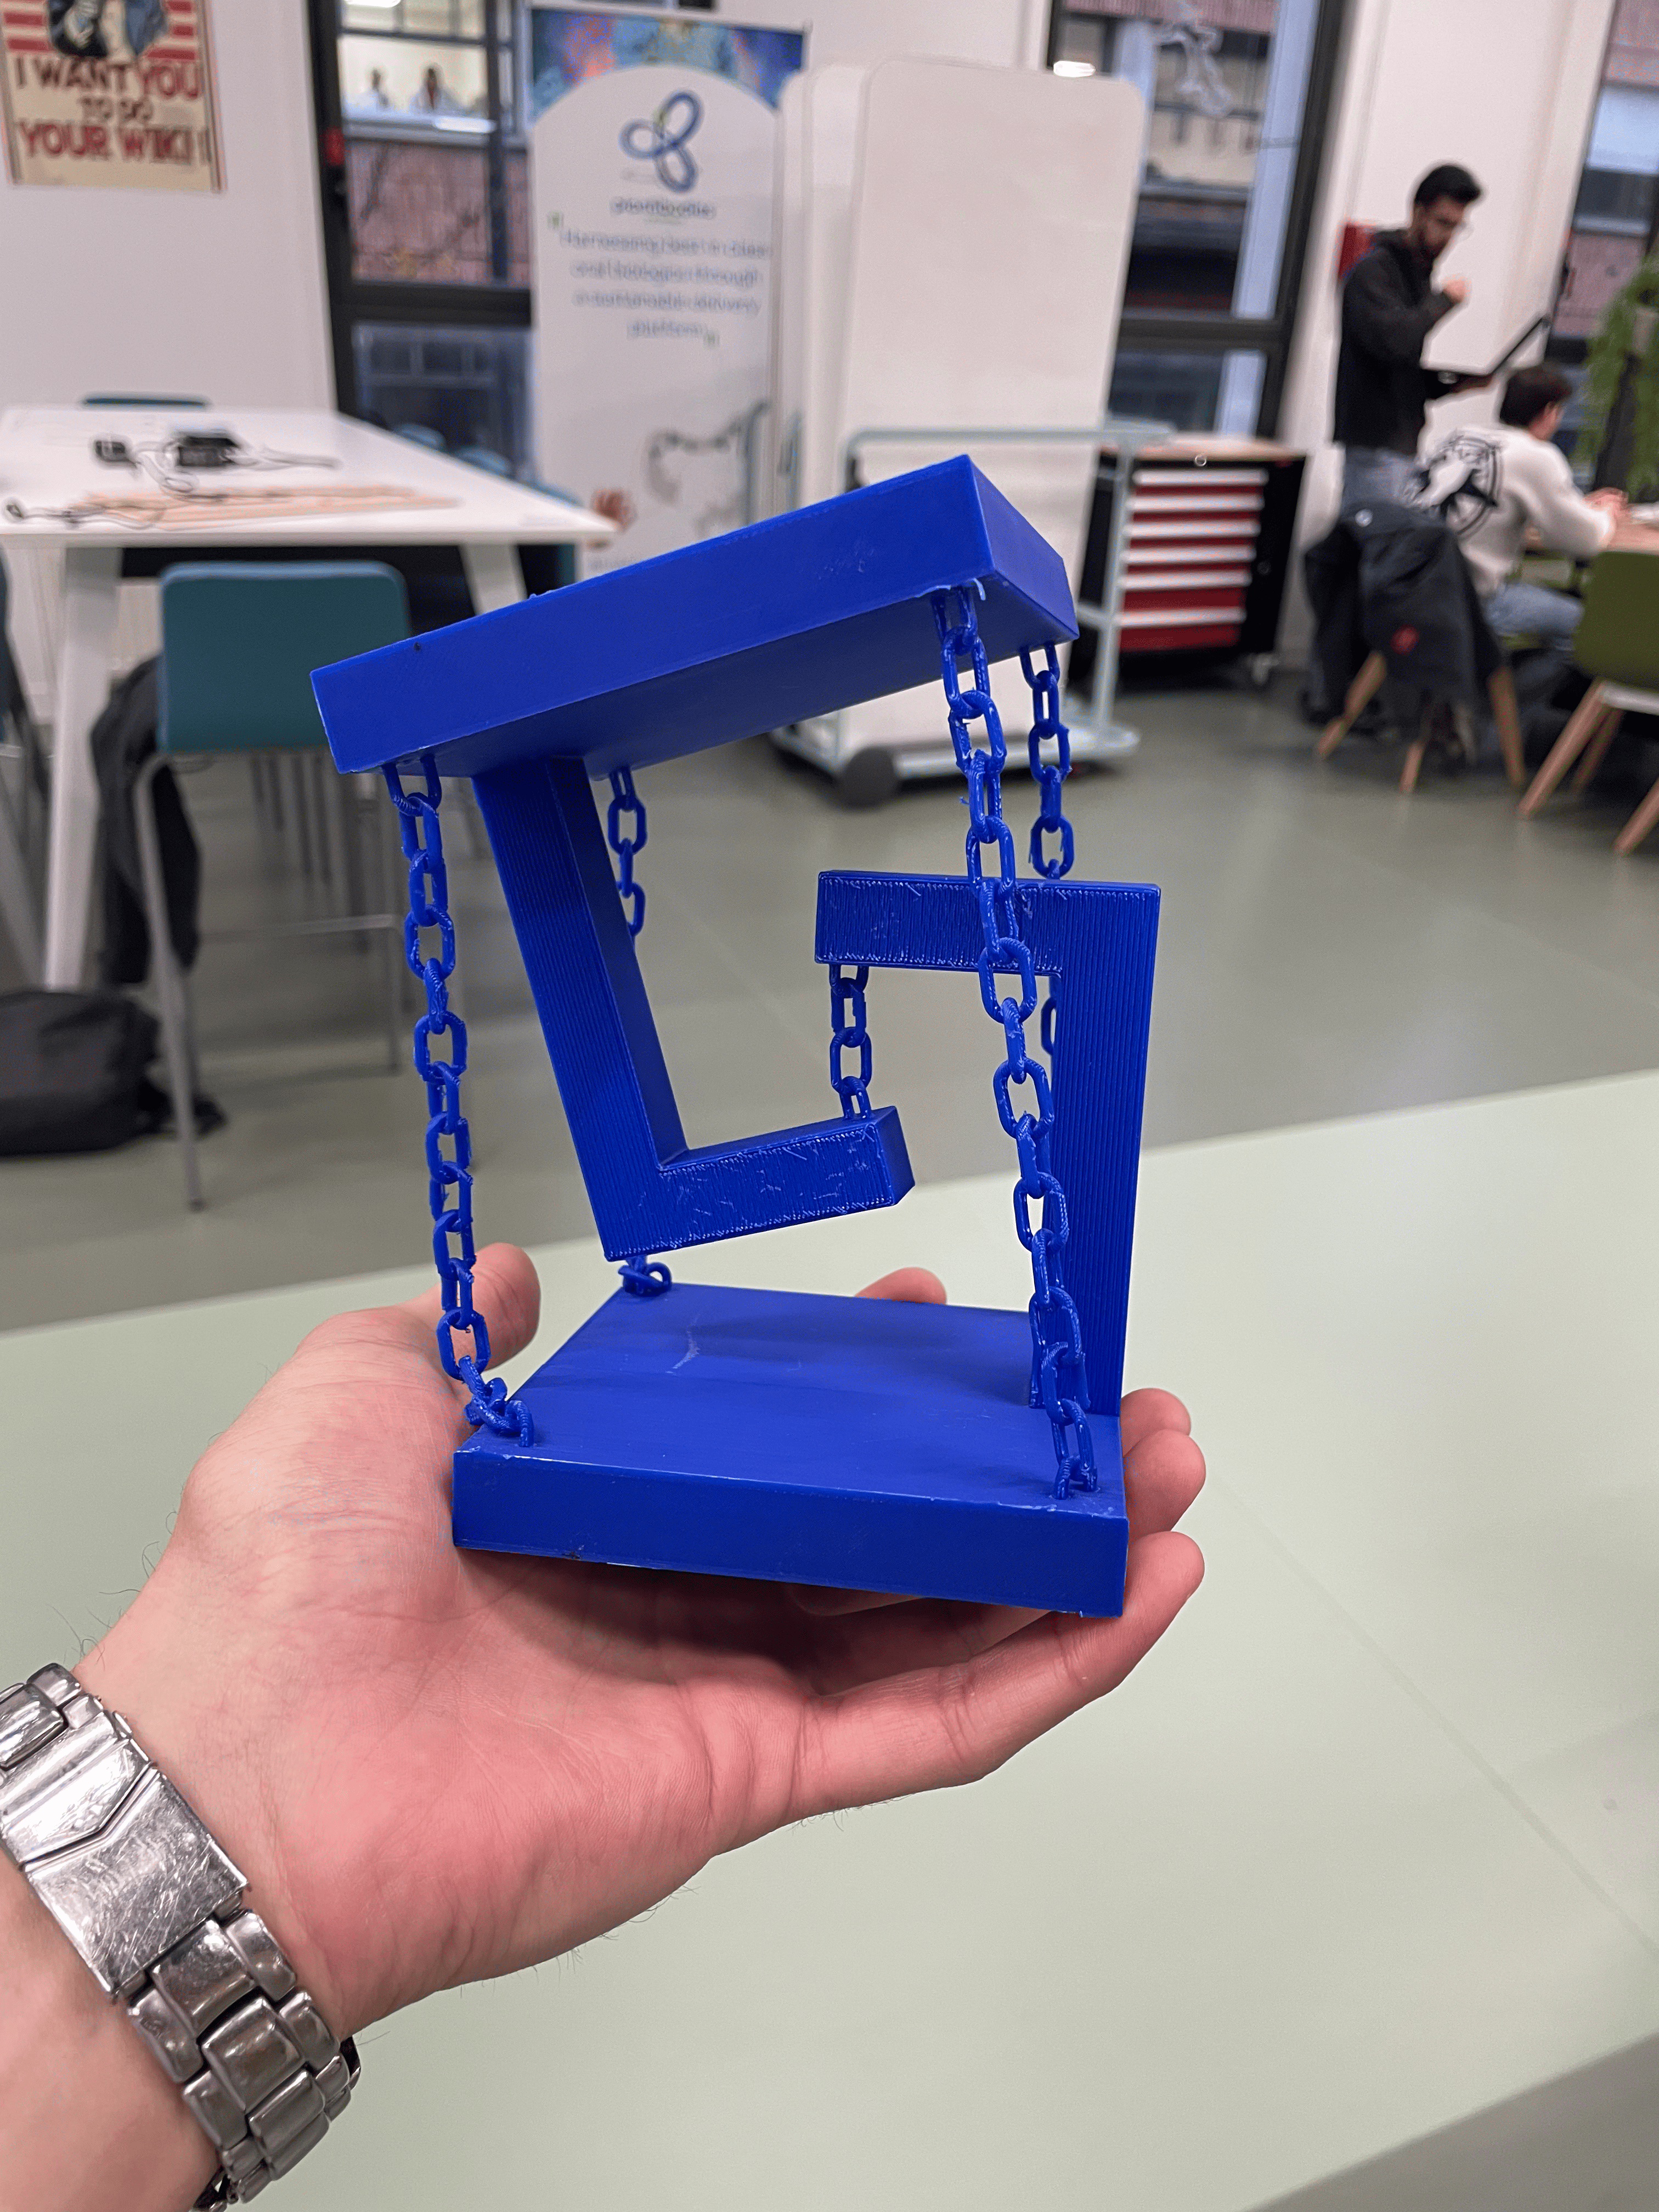](https://wiki.fablab.sorbonne-universite.fr/BookStack/uploads/images/gallery/2024-12/img-7774.png) |
| [](https://wiki.fablab.sorbonne-universite.fr/BookStack/uploads/images/gallery/2024-12/img-7840.jpg) | [](https://wiki.fablab.sorbonne-universite.fr/BookStack/uploads/images/gallery/2024-12/img-7839.png) |
| Objet sur OpenScad [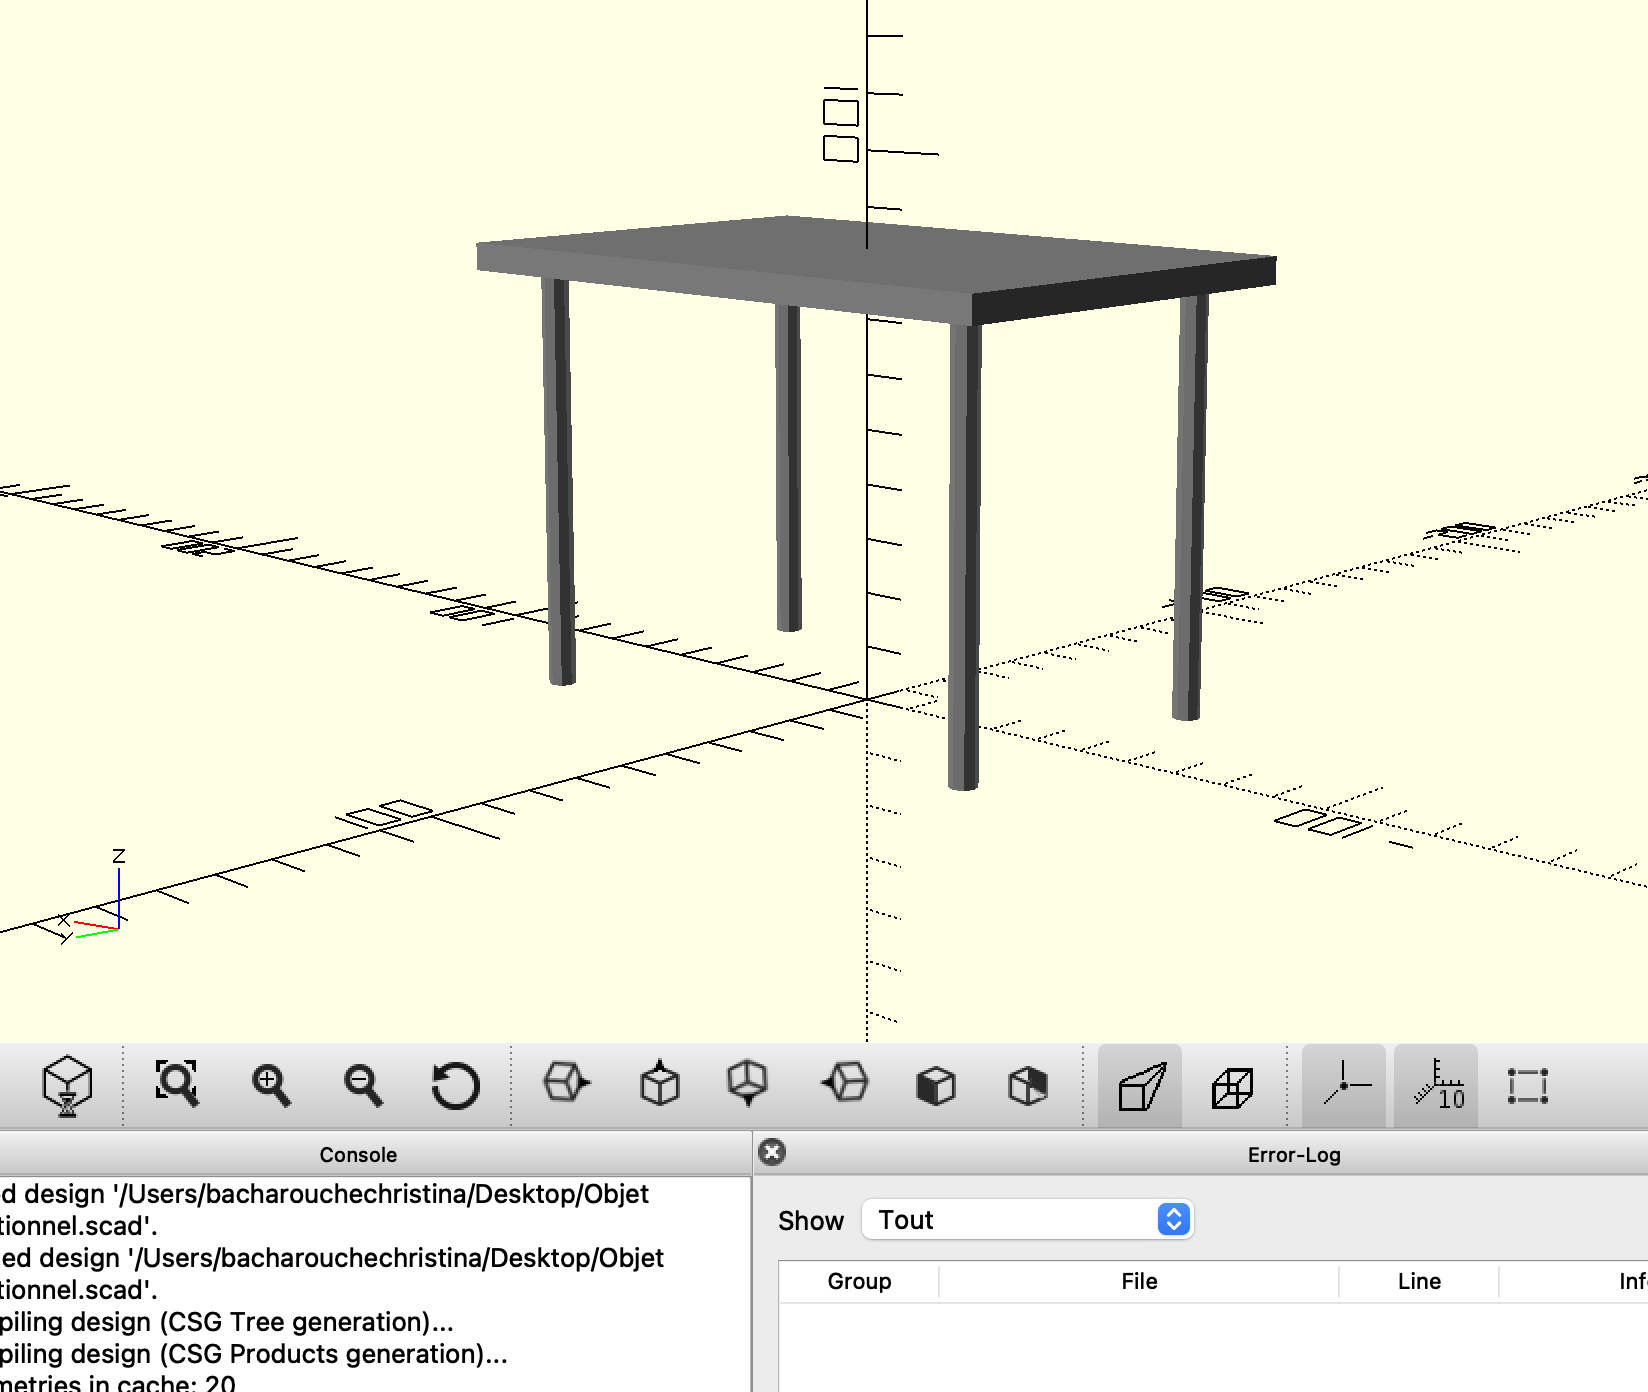](https://wiki.fablab.sorbonne-universite.fr/BookStack/uploads/images/gallery/2024-11/capture-decran-2024-11-25-a-10-30-09.png) | Objet sur PrusaSlicer [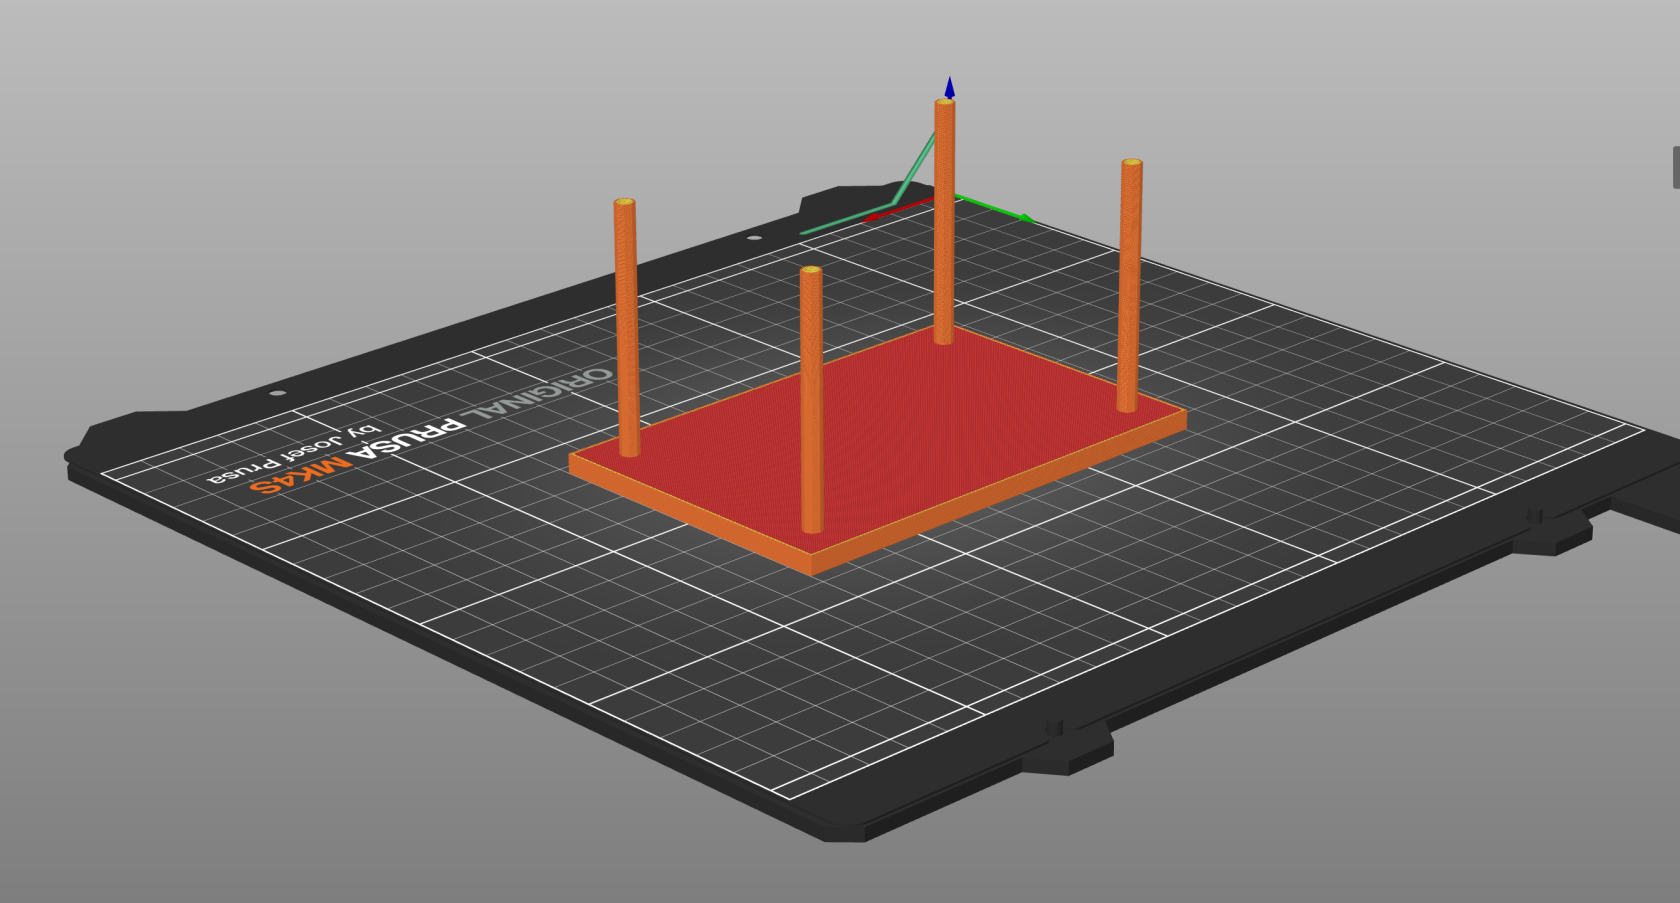](https://wiki.fablab.sorbonne-universite.fr/BookStack/uploads/images/gallery/2024-12/capture-decran-2024-12-12-a-15-47-55.png) | Photo de l'objet [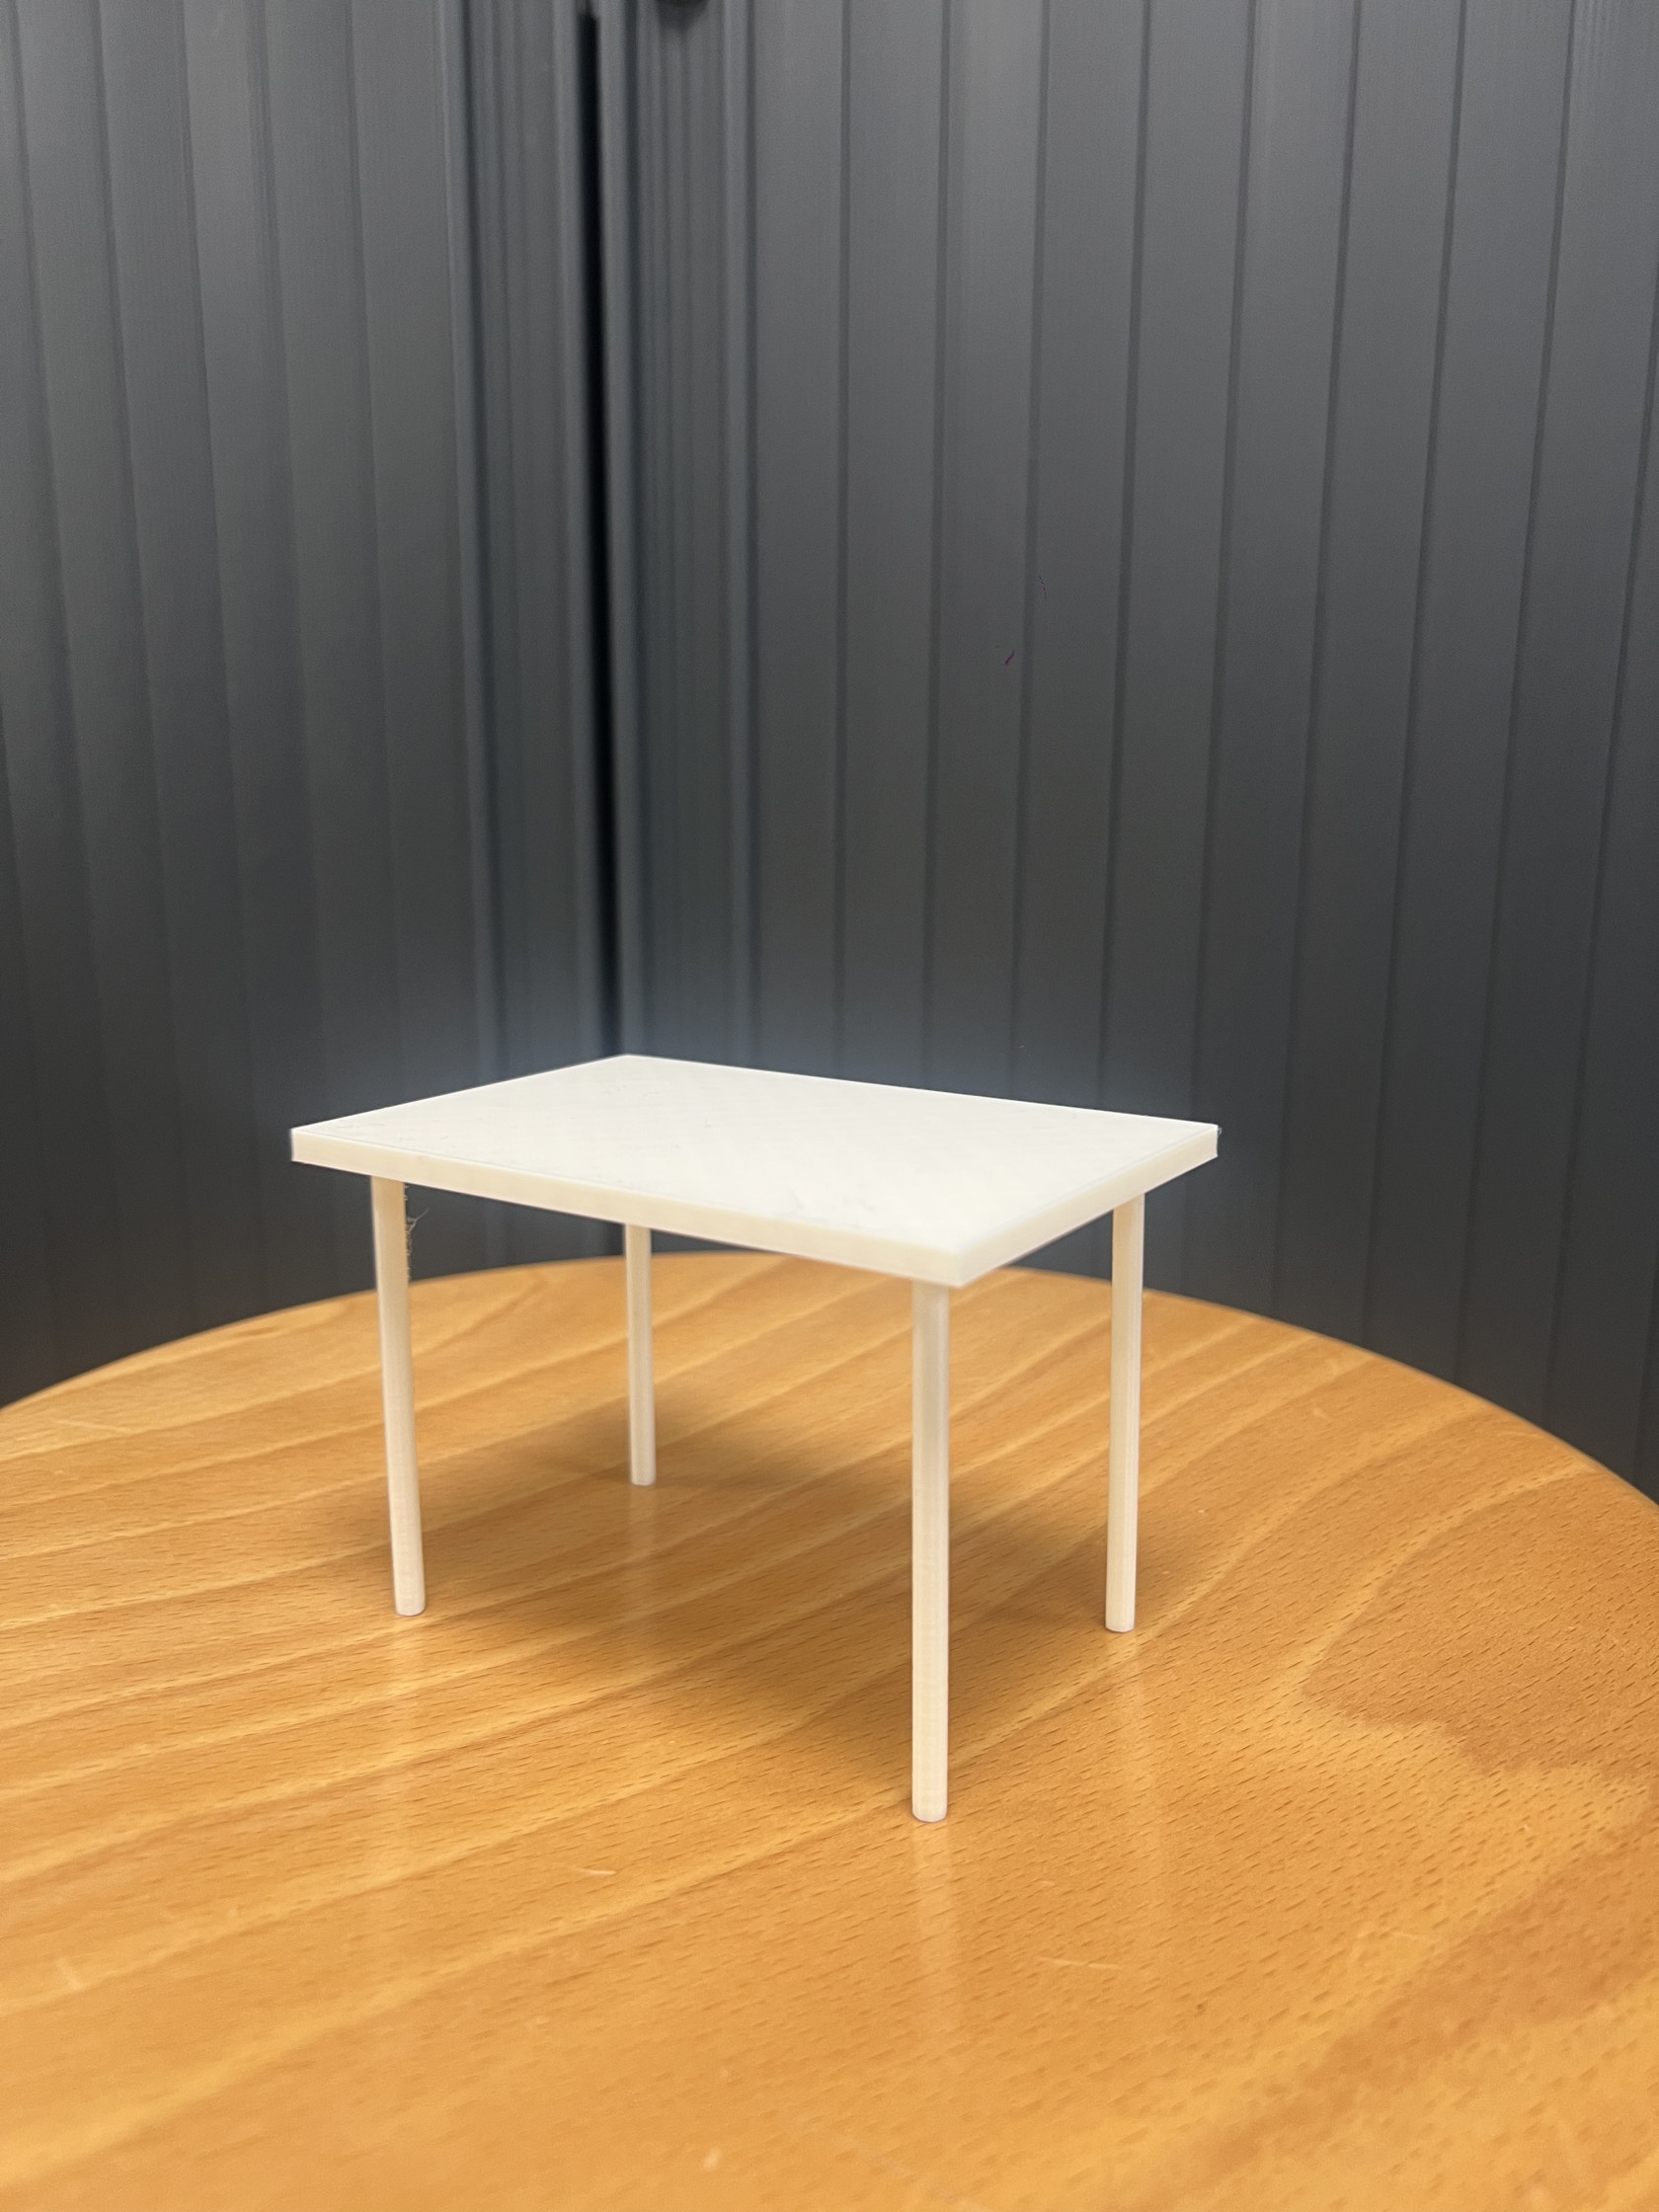](https://wiki.fablab.sorbonne-universite.fr/BookStack/uploads/images/gallery/2024-12/img-5237.jpg) |
| Objet sur OpenScad [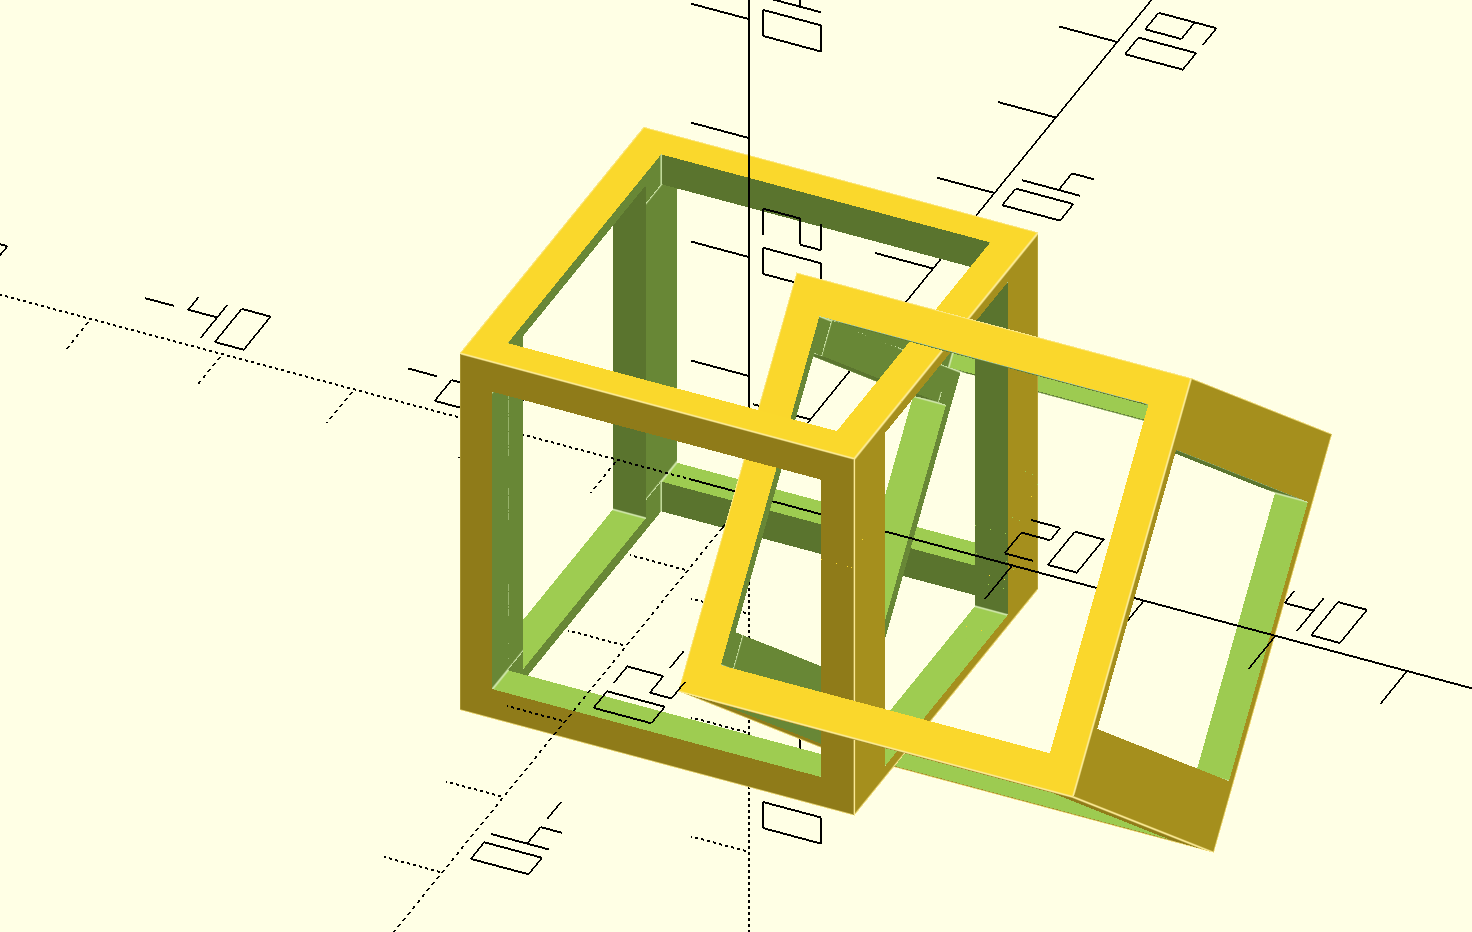](https://wiki.fablab.sorbonne-universite.fr/BookStack/uploads/images/gallery/2024-12/capture-decran-2024-12-11-a-18-13-57.png) | Objet sur PrusaSlicer [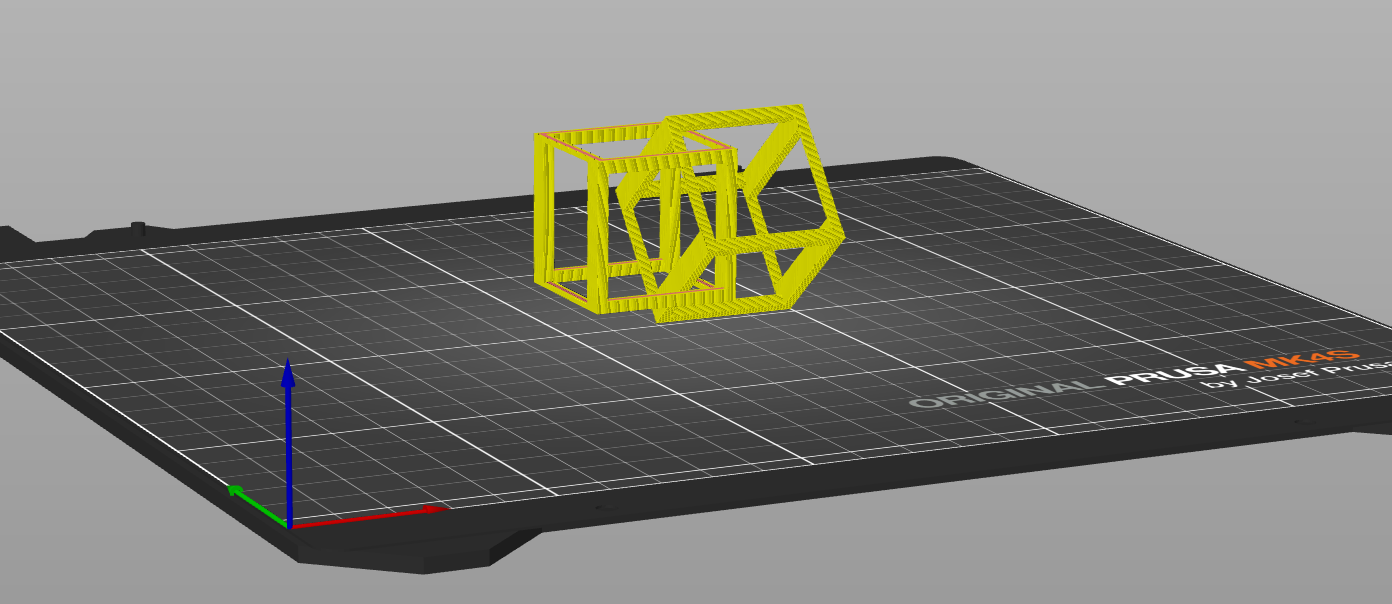](https://wiki.fablab.sorbonne-universite.fr/BookStack/uploads/images/gallery/2024-12/capture-decran-2024-12-12-a-15-52-18.png) | Photo de l'objet [](https://wiki.fablab.sorbonne-universite.fr/BookStack/uploads/images/gallery/2024-12/image.jpeg) |
| Objet sur OpenScad [](https://wiki.fablab.sorbonne-universite.fr/BookStack/uploads/images/gallery/2024-12/XJ8image.png) | Objet sur ideamaker [](https://wiki.fablab.sorbonne-universite.fr/BookStack/uploads/images/gallery/2024-12/capture-decran-2024-12-12-a-15-56-47.png) | Photo de l'objet [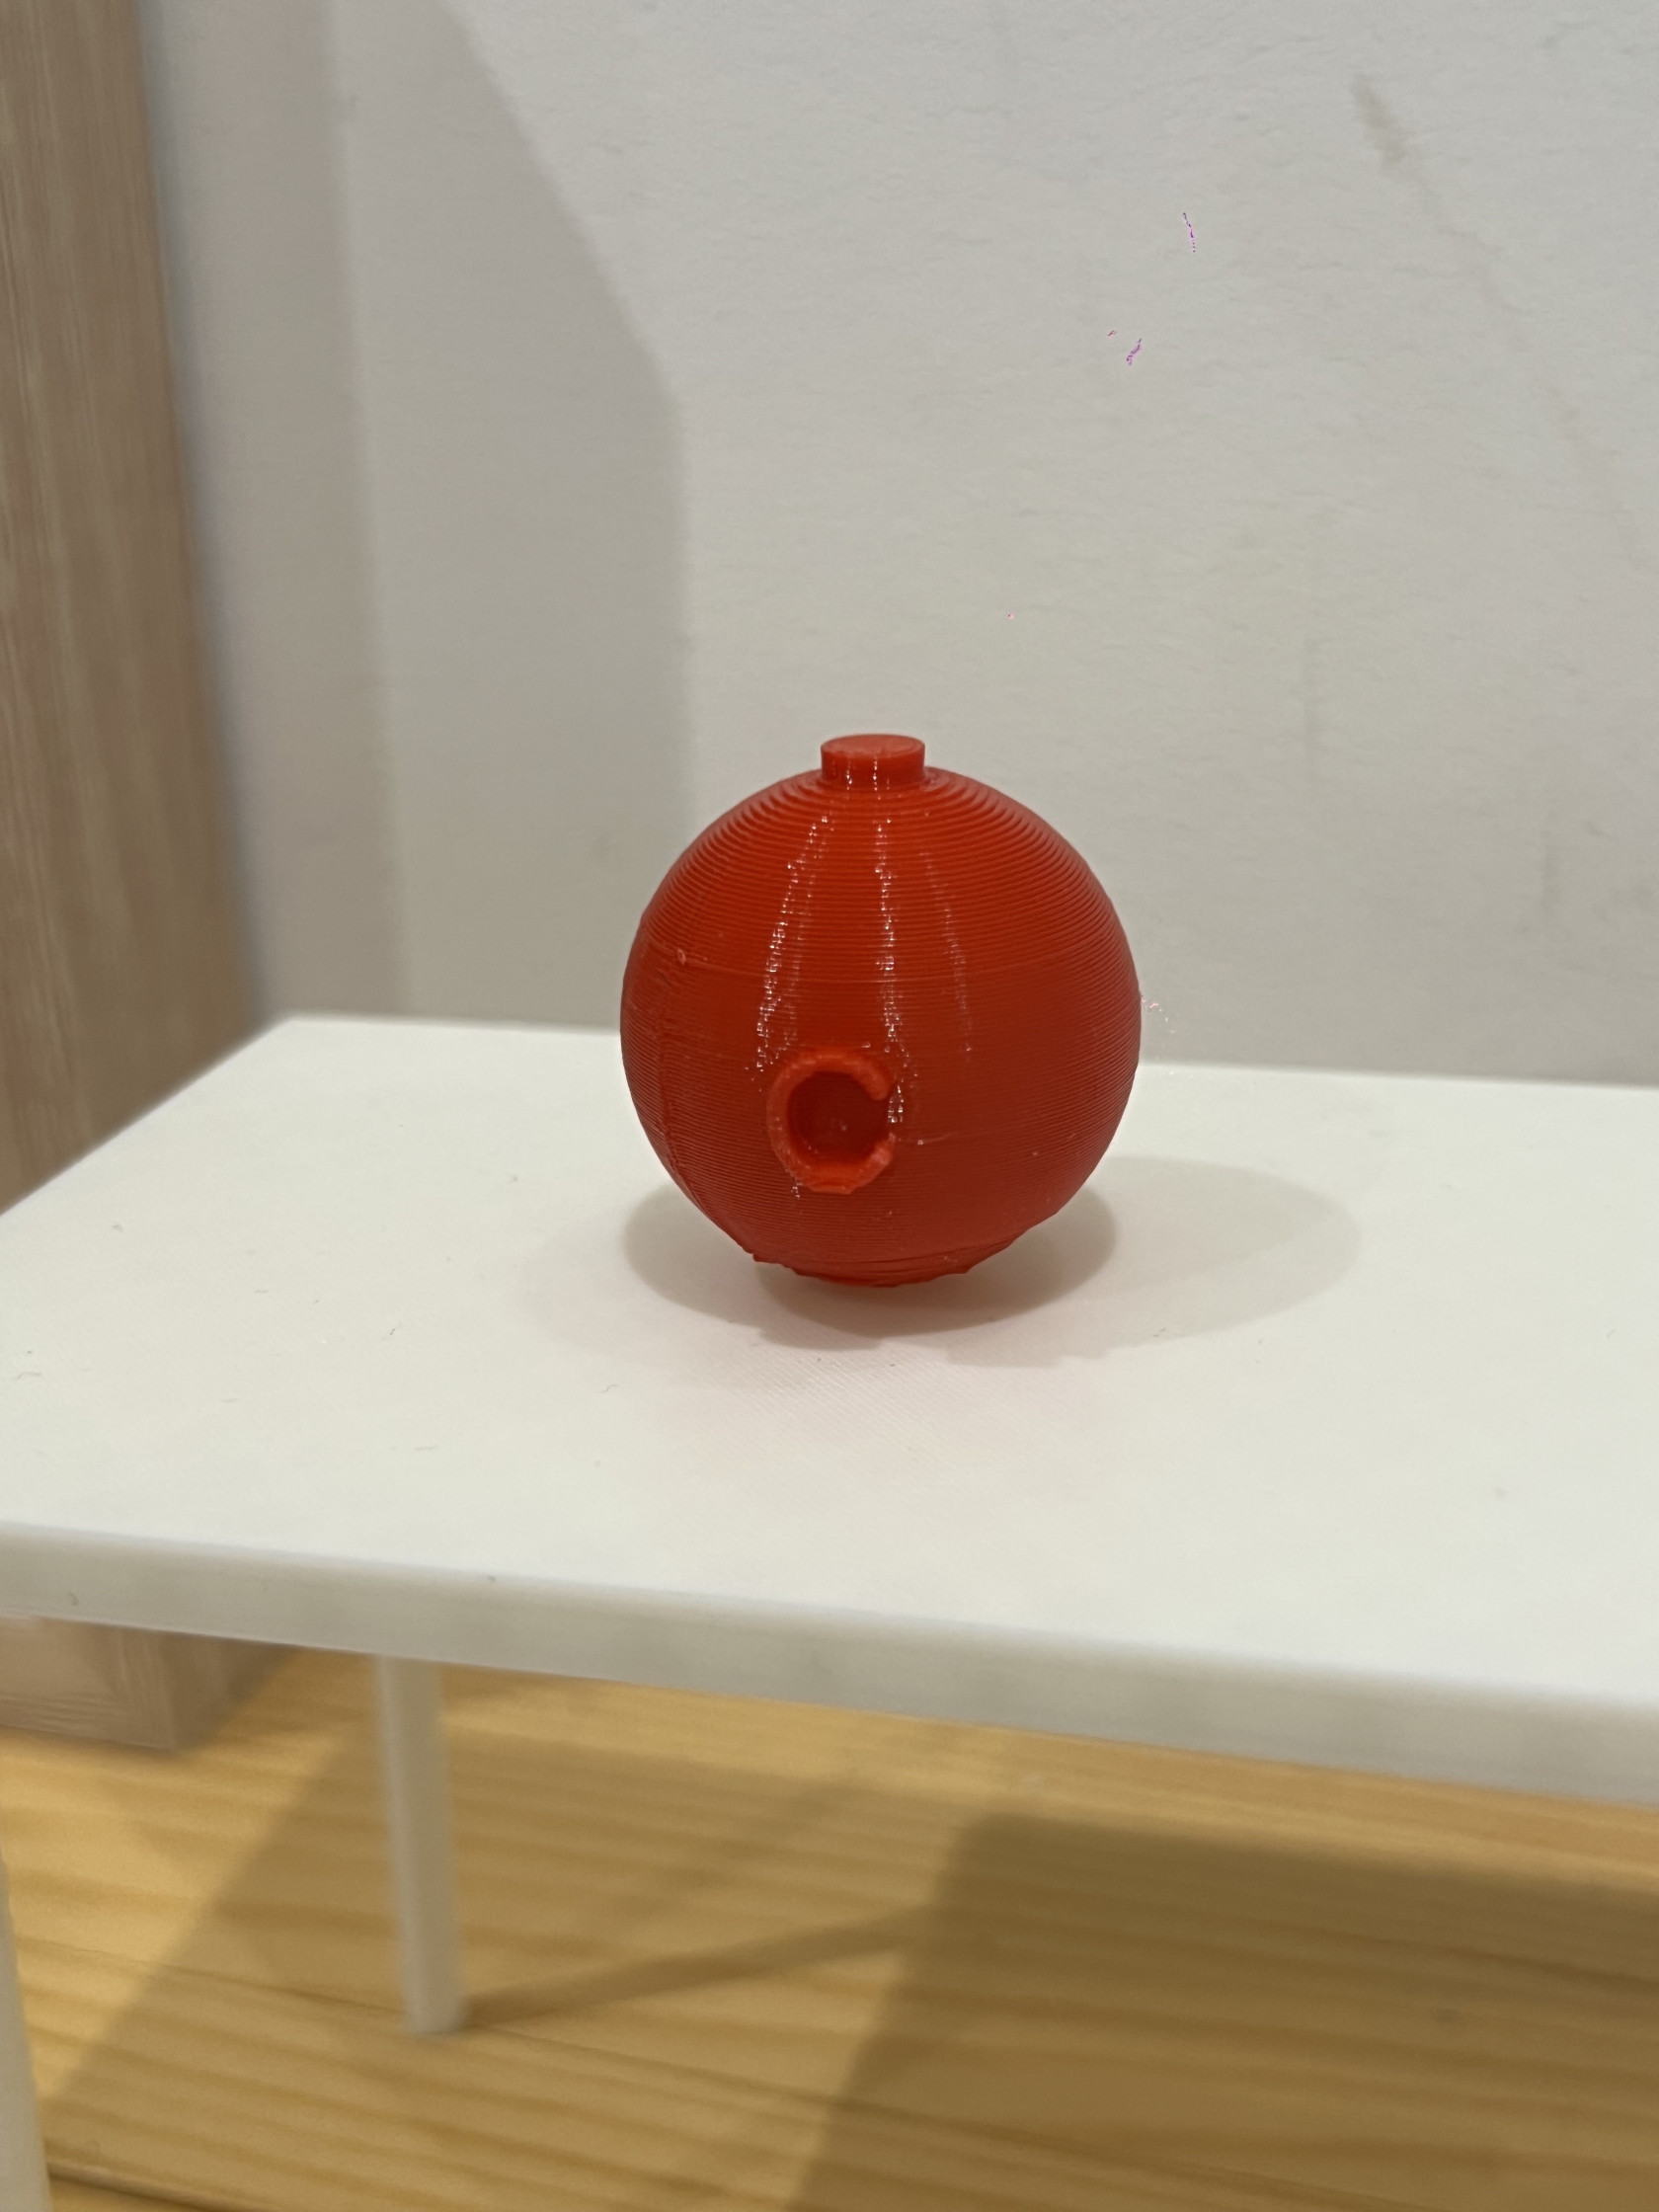](https://wiki.fablab.sorbonne-universite.fr/BookStack/uploads/images/gallery/2024-12/lJuimage.jpeg) |
| [](https://wiki.fablab.sorbonne-universite.fr/BookStack/uploads/images/gallery/2024-11/whatsapp-image-2024-11-28-at-10-54-43.jpeg) | **Objet : ** Assiette **Fonction :** Une assiette est le support principal pour présenter et contenir des plats. Sur une assiette avec des bords légèrement surélevés pour représenter une assiette plate. |
| **Scénario:** // Assiette principale module assiette (rayon = 100, hauteur = 10, bord = 5, profondeur = 8, finesse = 500) { différence() { cylindre (h = hauteur, r = rayonne, $fn = finesse); traduire (\[0,0,bord\]) cylindre (h = profondeur, r = rayon - bord, $fn = finesse) ; } } // Affichage de l'assiette assiette (); | **[](https://wiki.fablab.sorbonne-universite.fr/BookStack/uploads/images/gallery/2024-11/whatsapp-image-2024-11-28-at-10-51-07-1.jpeg)** |
| **[](https://wiki.fablab.sorbonne-universite.fr/BookStack/uploads/images/gallery/2024-12/capture.JPG)** | **Commentaires:** En utilisant une imprimante** Pruse MSK4S** , il a fallu réduire la taille de l'assiette pour pouvoir entrer sur le support. L'objet ainsi obtenu ressemble plus à une sous-tasse ou un dessous de verre en raison de la réduction des dimensions initiales.** ** **Paramètres d'impression :** - - **Taille:** - **Autobus** : 225°C - **Plateau** : 60°C - **Filament** : Prusa PLA, 1,75 mm - **Supports** : pas de support - **Remplissage** : 15% - **Paramètres d'impression** : paramètres par défaut de PrusaSlicer (qualité standard, épaisseur de couche classique) |
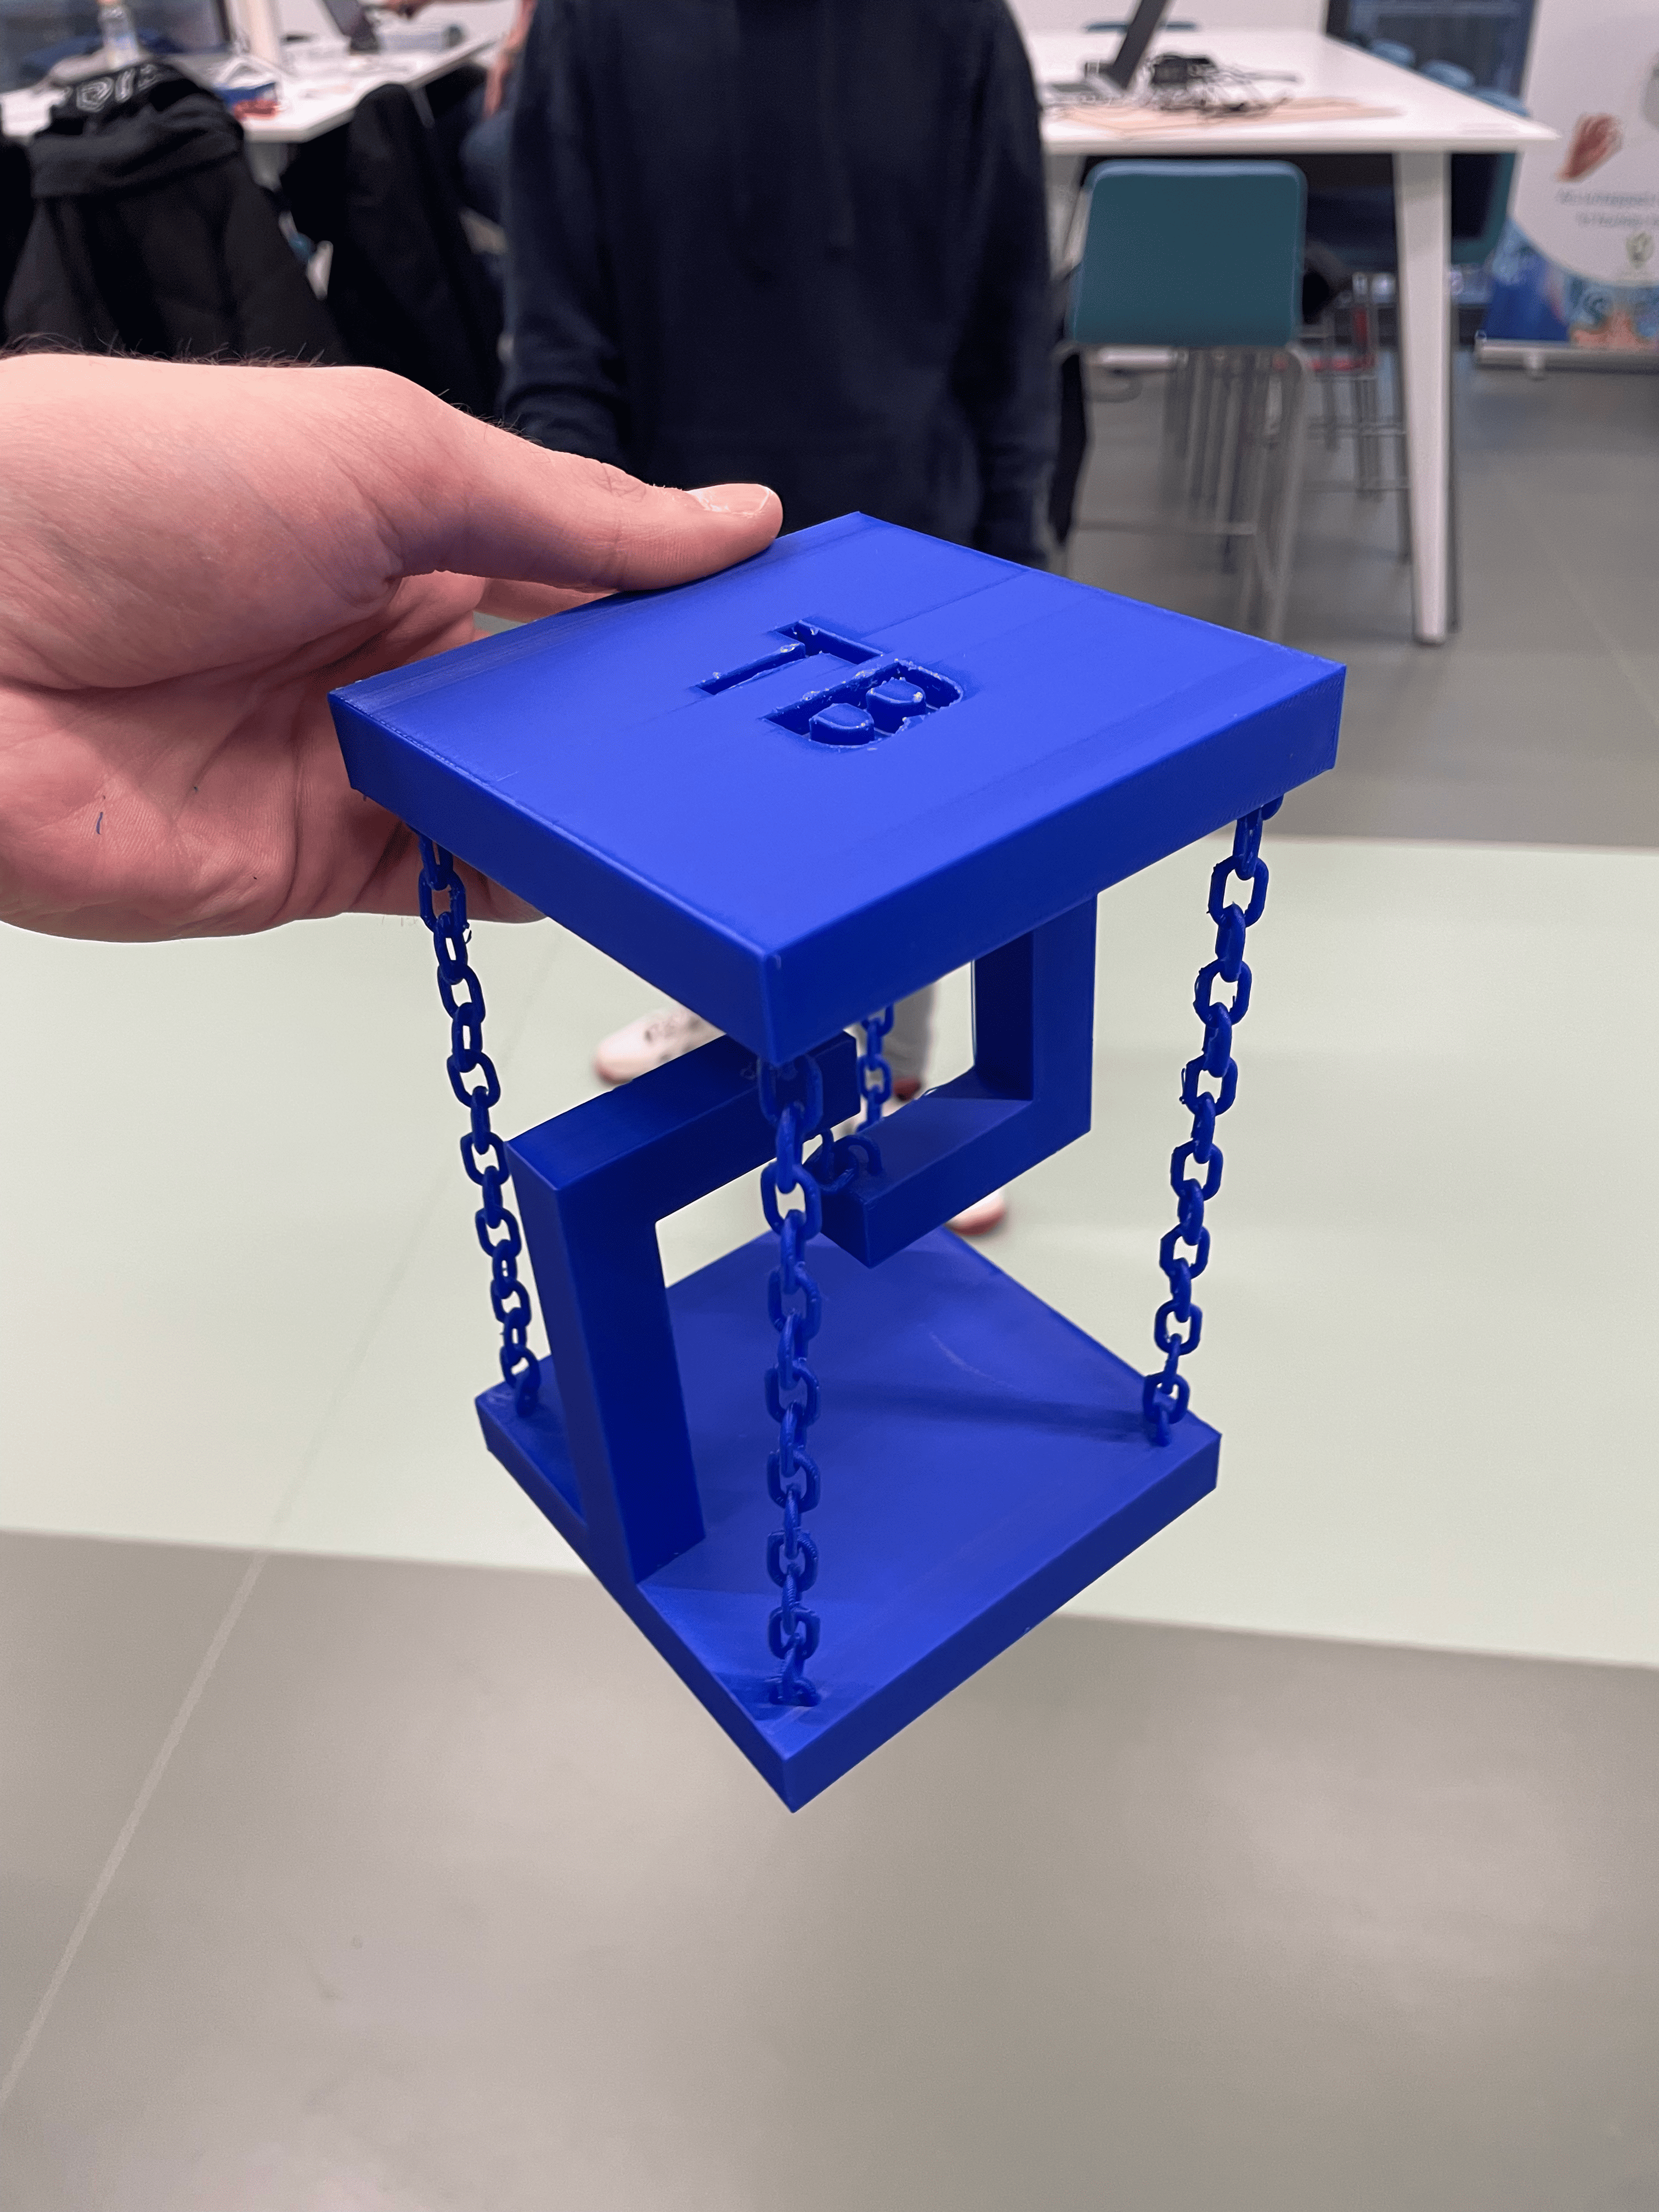
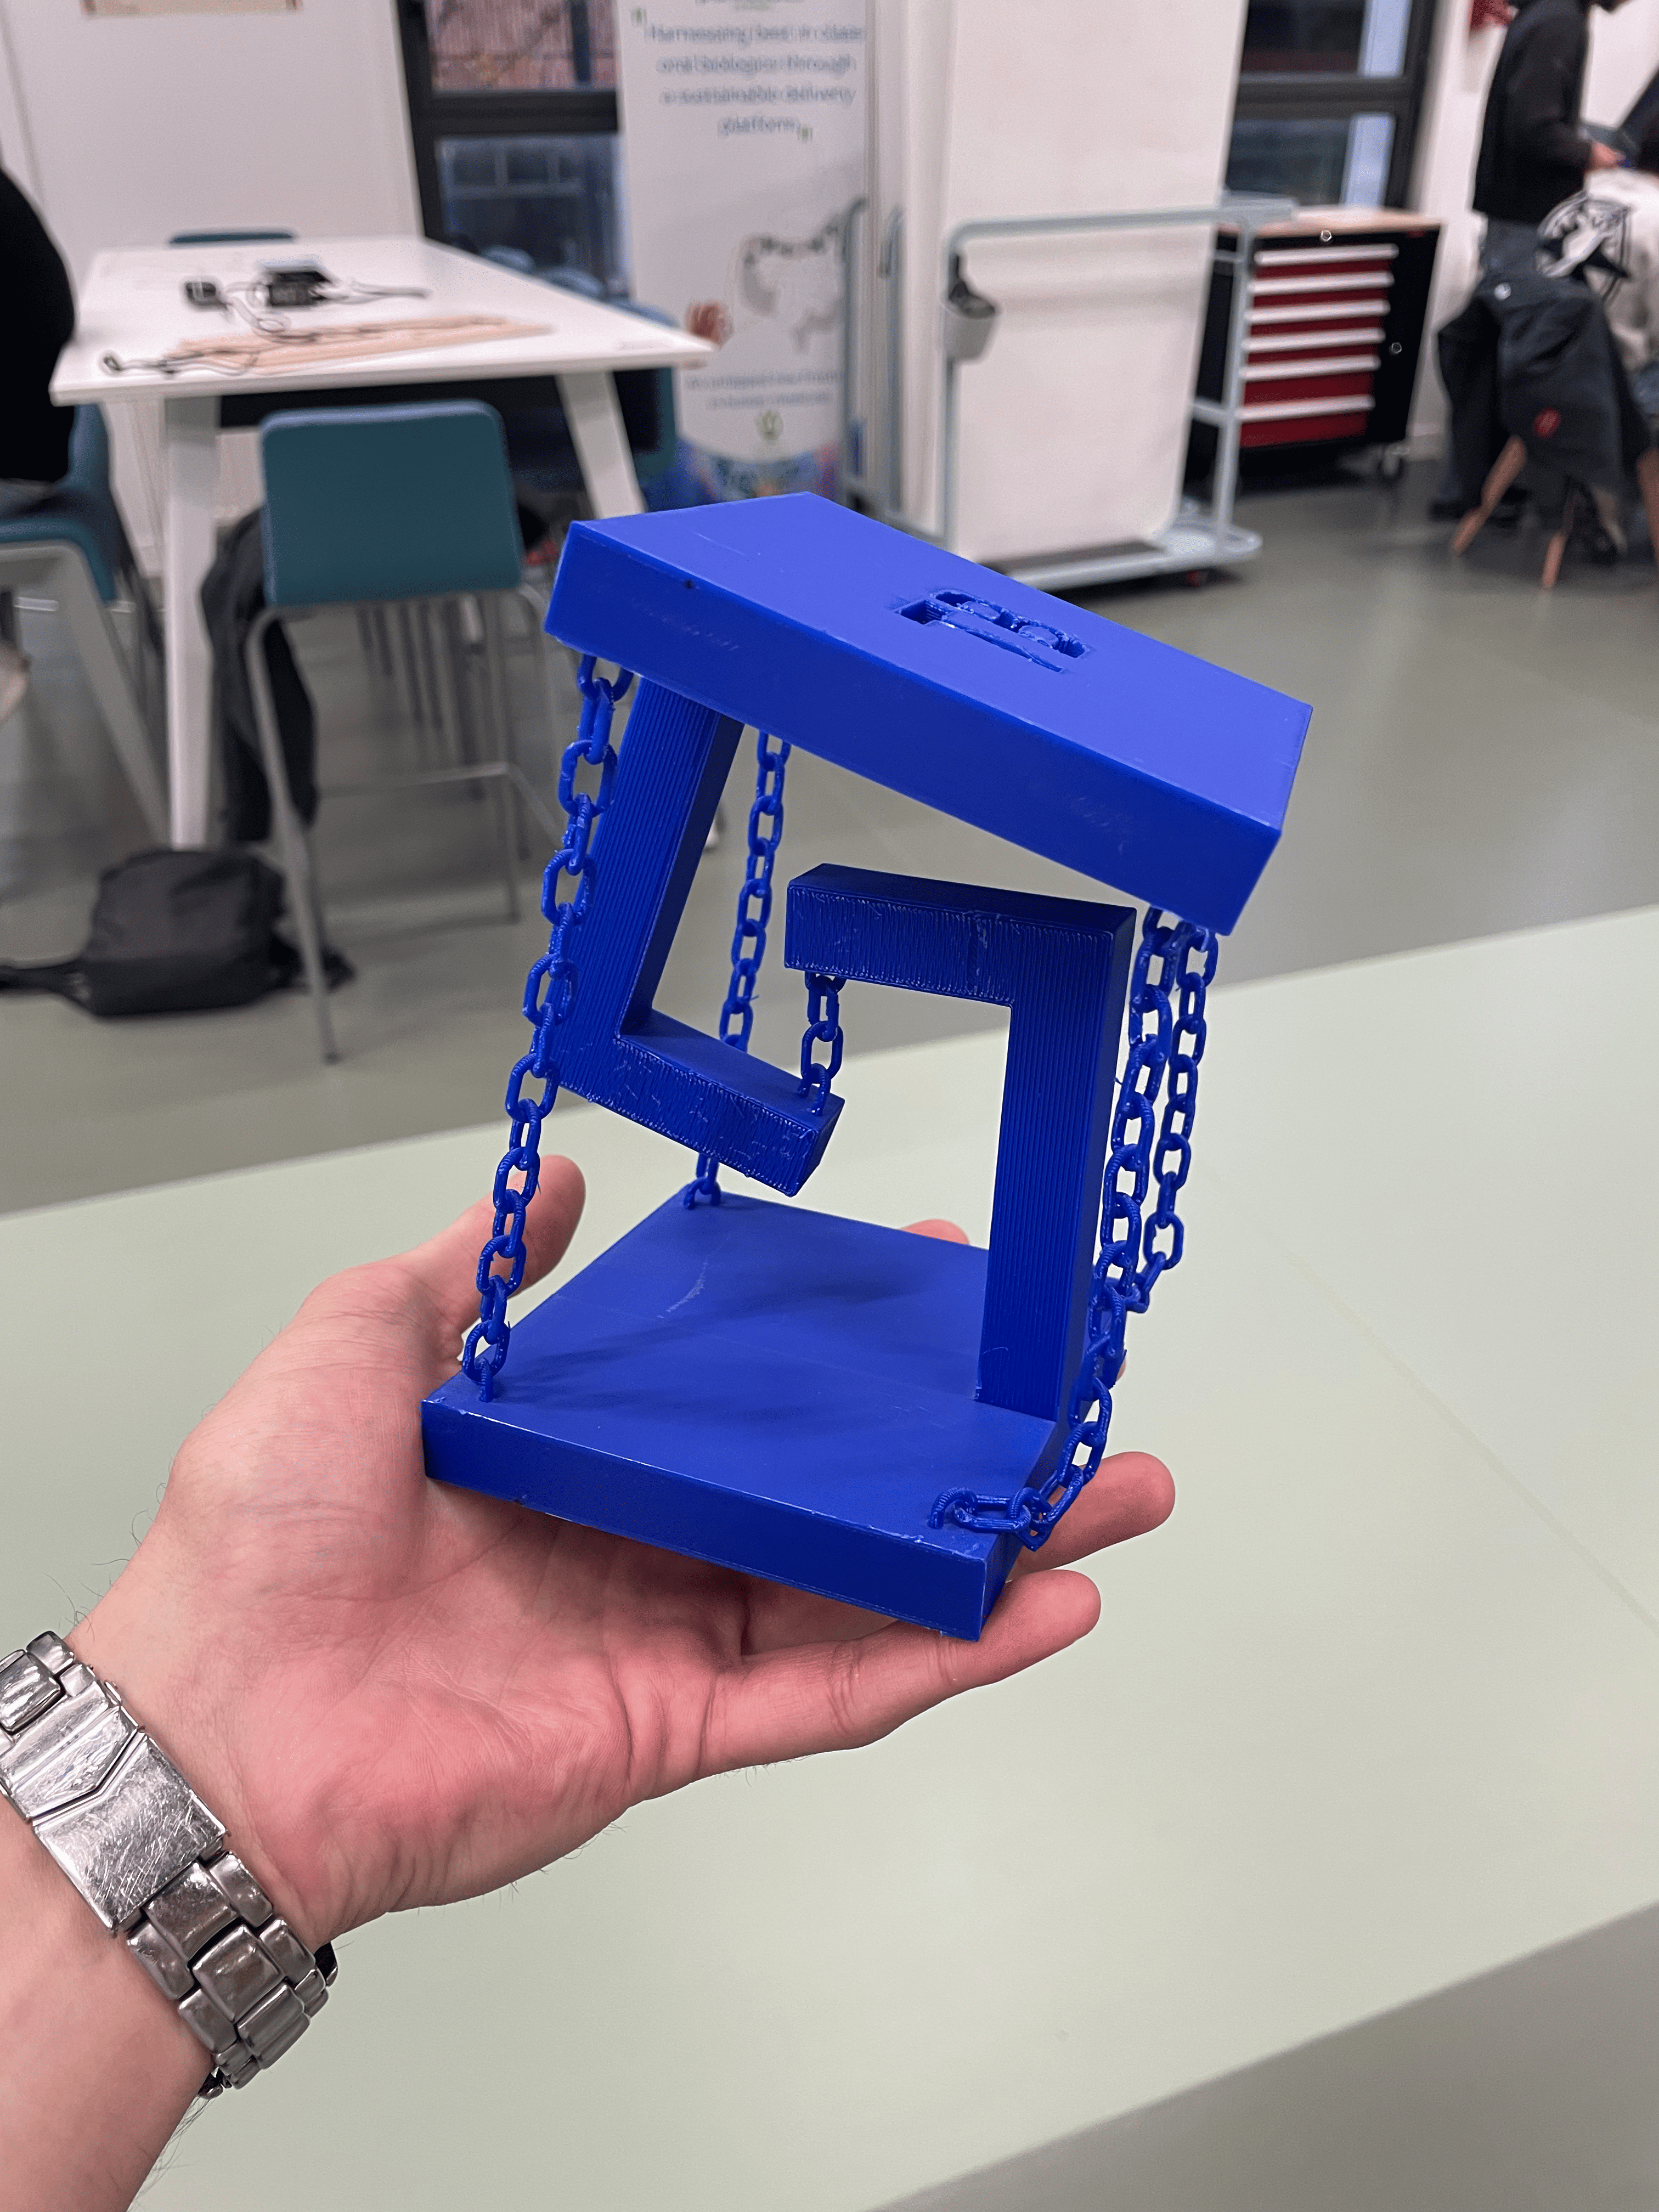
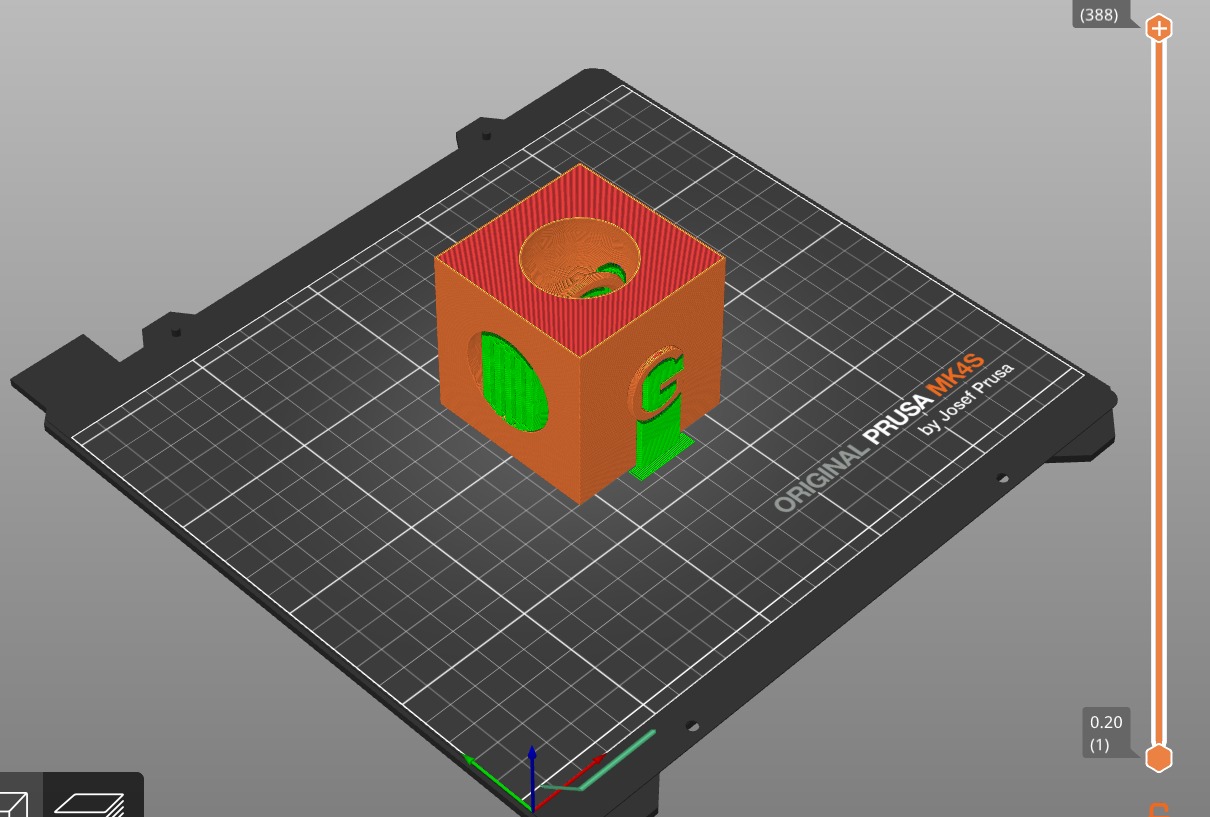
| [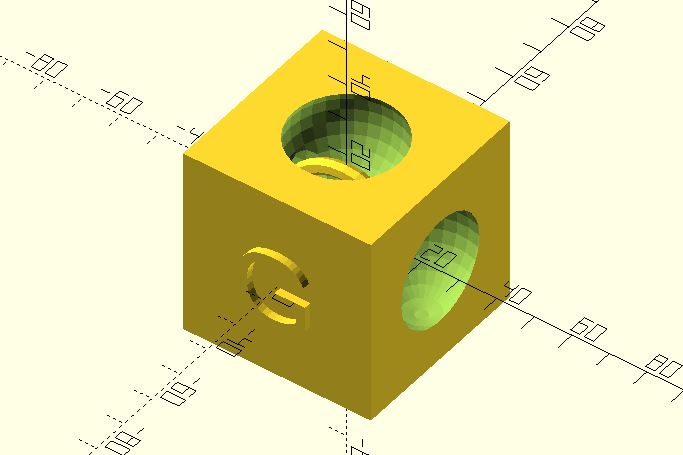](https://wiki.fablab.sorbonne-universite.fr/BookStack/uploads/images/gallery/2024-12/capture1.JPG) | **Objet :** Objet décoratif **Description :** Il s'agit d'un cube avec des cavités sphériques. Chaque possède une cavité où passera un anneau. **Commentaires :** L'objet en question n'a pas de fonction hormis être décoratif. Il est uniquement réalisable en impression 3D car il possède un anneau intégré traversant qui ne peut pas être inséré autrement dans les cavités que par impression 3D. |
| **Scénario:** // Dimensions du cube et des cavités cube\_size=50; sphère\_radius=15 ; décalage = 20 ; différence(){ //Cube externe cube(\[cube\_size,cube\_size,cube\_size\],center=true); //Cavité 1 : sphère du centre du haut translation(\[0,0,offset\]) sphere(r=sphere\_radius); //Cavité 2:sphère du centre bas translation(\[0,0,-offset\]) sphere(r=sphere\_radius); //Cavité 3 : Cavité à droite translation(\[offset,0,0\]) sphere(r=sphere\_radius); //Cavité 4 : translation de cavité à gauche (\[-offset,0,0\]) sphere(r=sphere\_radius); //Cavité 5 : cavité dans la sphère supérieure translation (\[0,0,offset\]) sphere(r=sphere\_radius/2); } // Canal horizontal translate(\[0,offset/2,0\]) rotate(\[0,90,0\]) cylinder(h=offset,r=cannel\_radius/2, center=true); //Anneau module tore(r1,r2){ rotate\_extrude(){ translate(\[r1,0,0\]) cercle(r=r2); }; } rotation(\[90,90,0\]) translation(\[0,0,0\]) tore(r1=15,r2=2); // Texte gravé module add\_text(){ translate (\[0, -cube\_size/2-0.1,0\]) rotate (\[90,0,0\]) linear\_extrude(height=2) text("G",size=20,valign="center",halign="center",font="Libération Sans"); } ajouter\_texte(); | [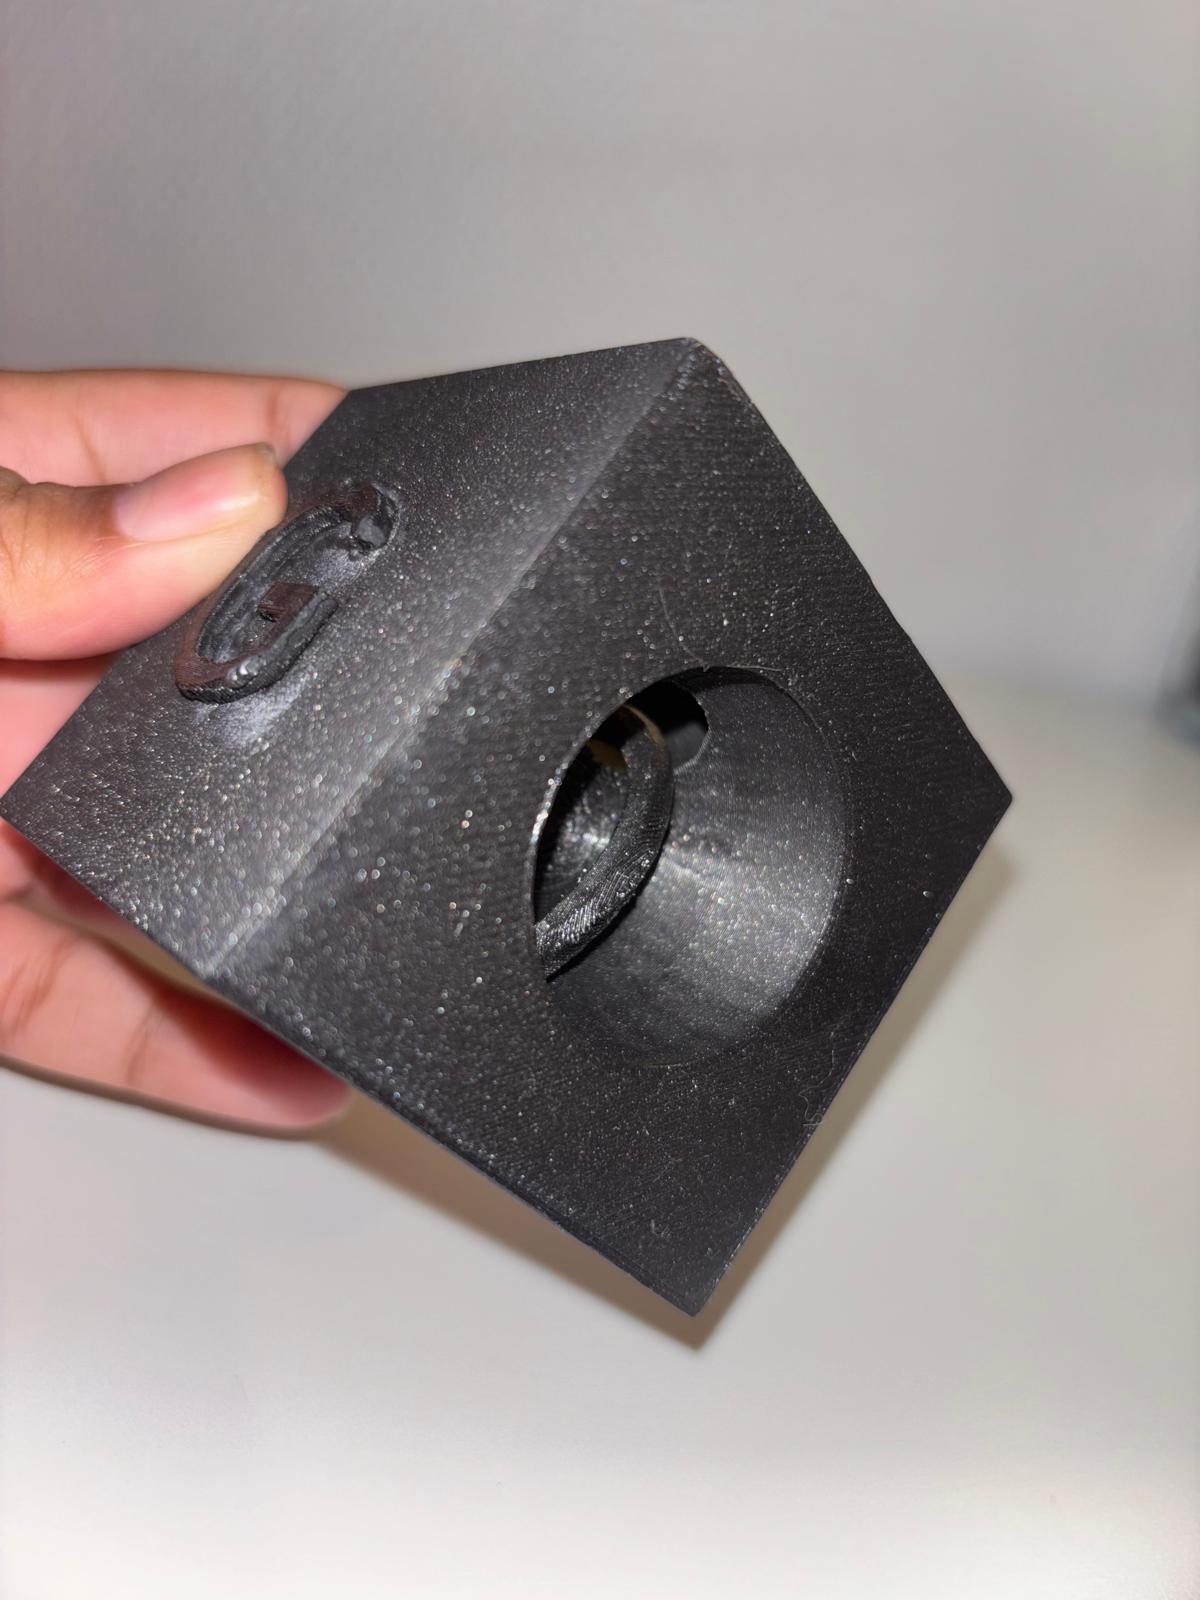](https://wiki.fablab.sorbonne-universite.fr/BookStack/uploads/images/gallery/2024-12/whatsapp-image-2024-12-03-at-21-49-57-1.jpeg) [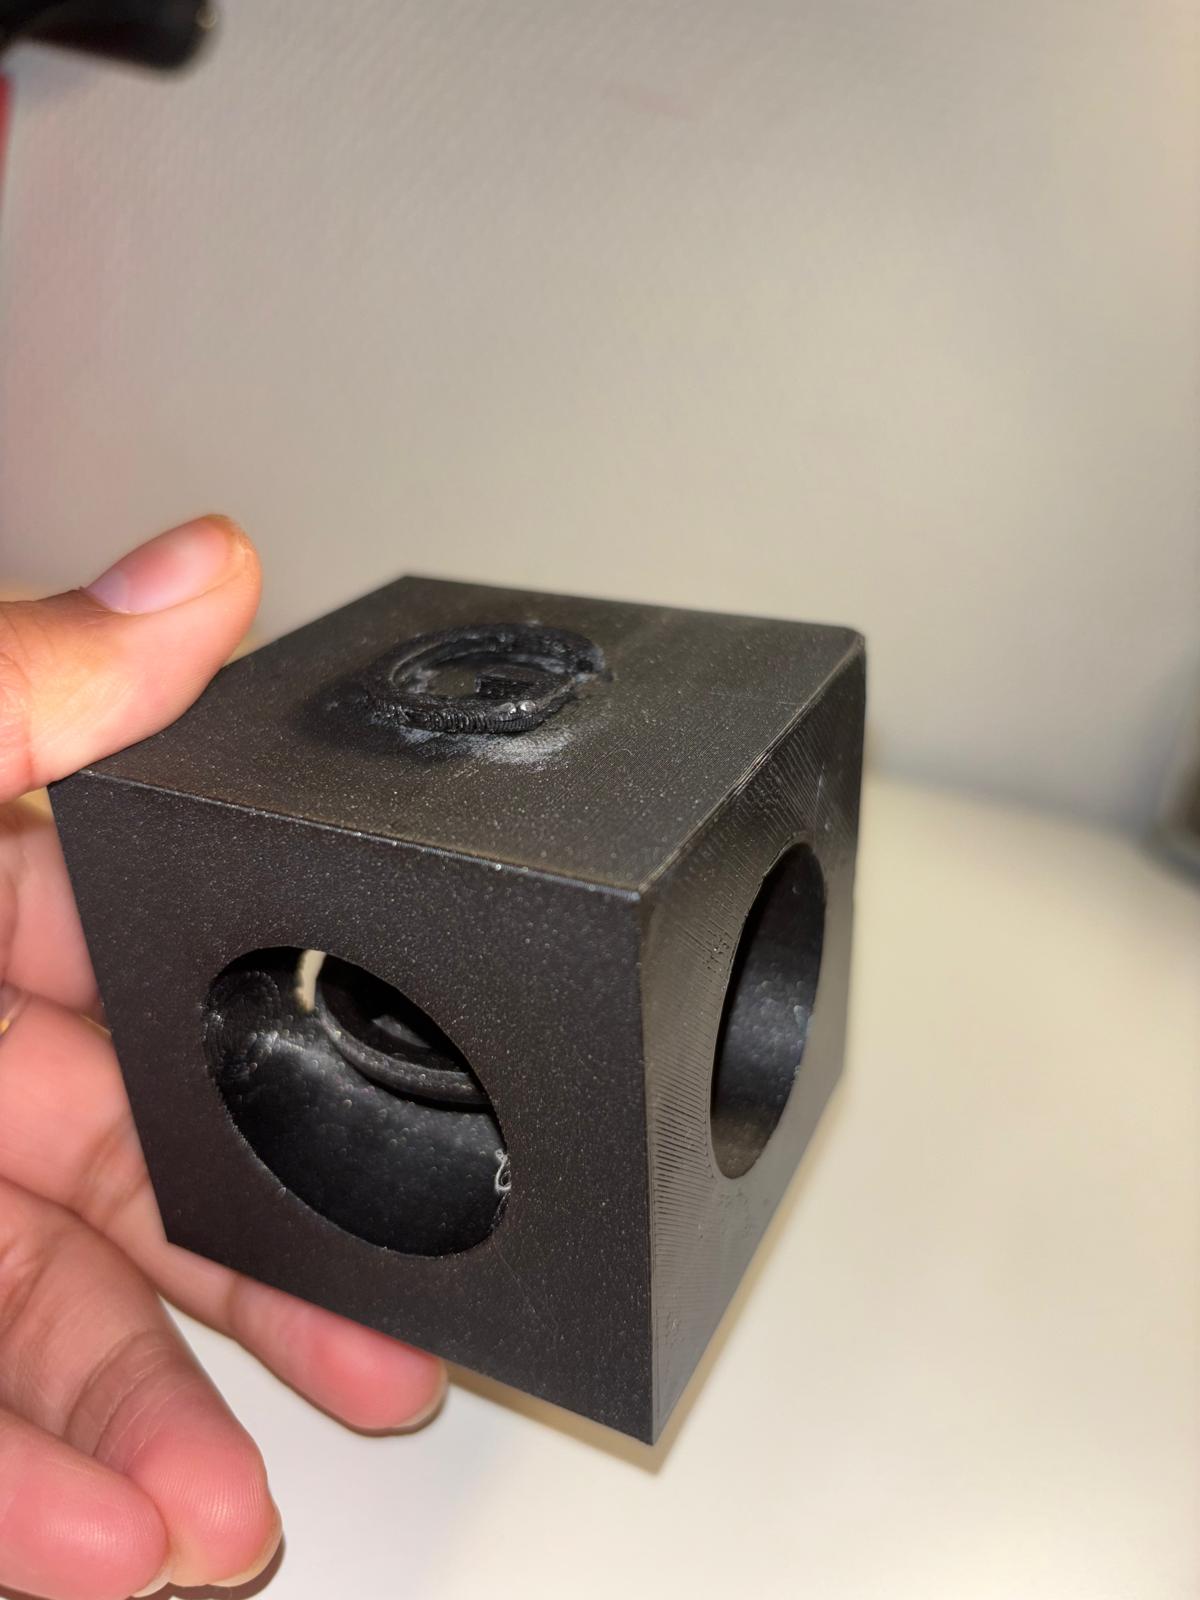](https://wiki.fablab.sorbonne-universite.fr/BookStack/uploads/images/gallery/2024-12/whatsapp-image-2024-12-03-at-21-49-57-4.jpeg) [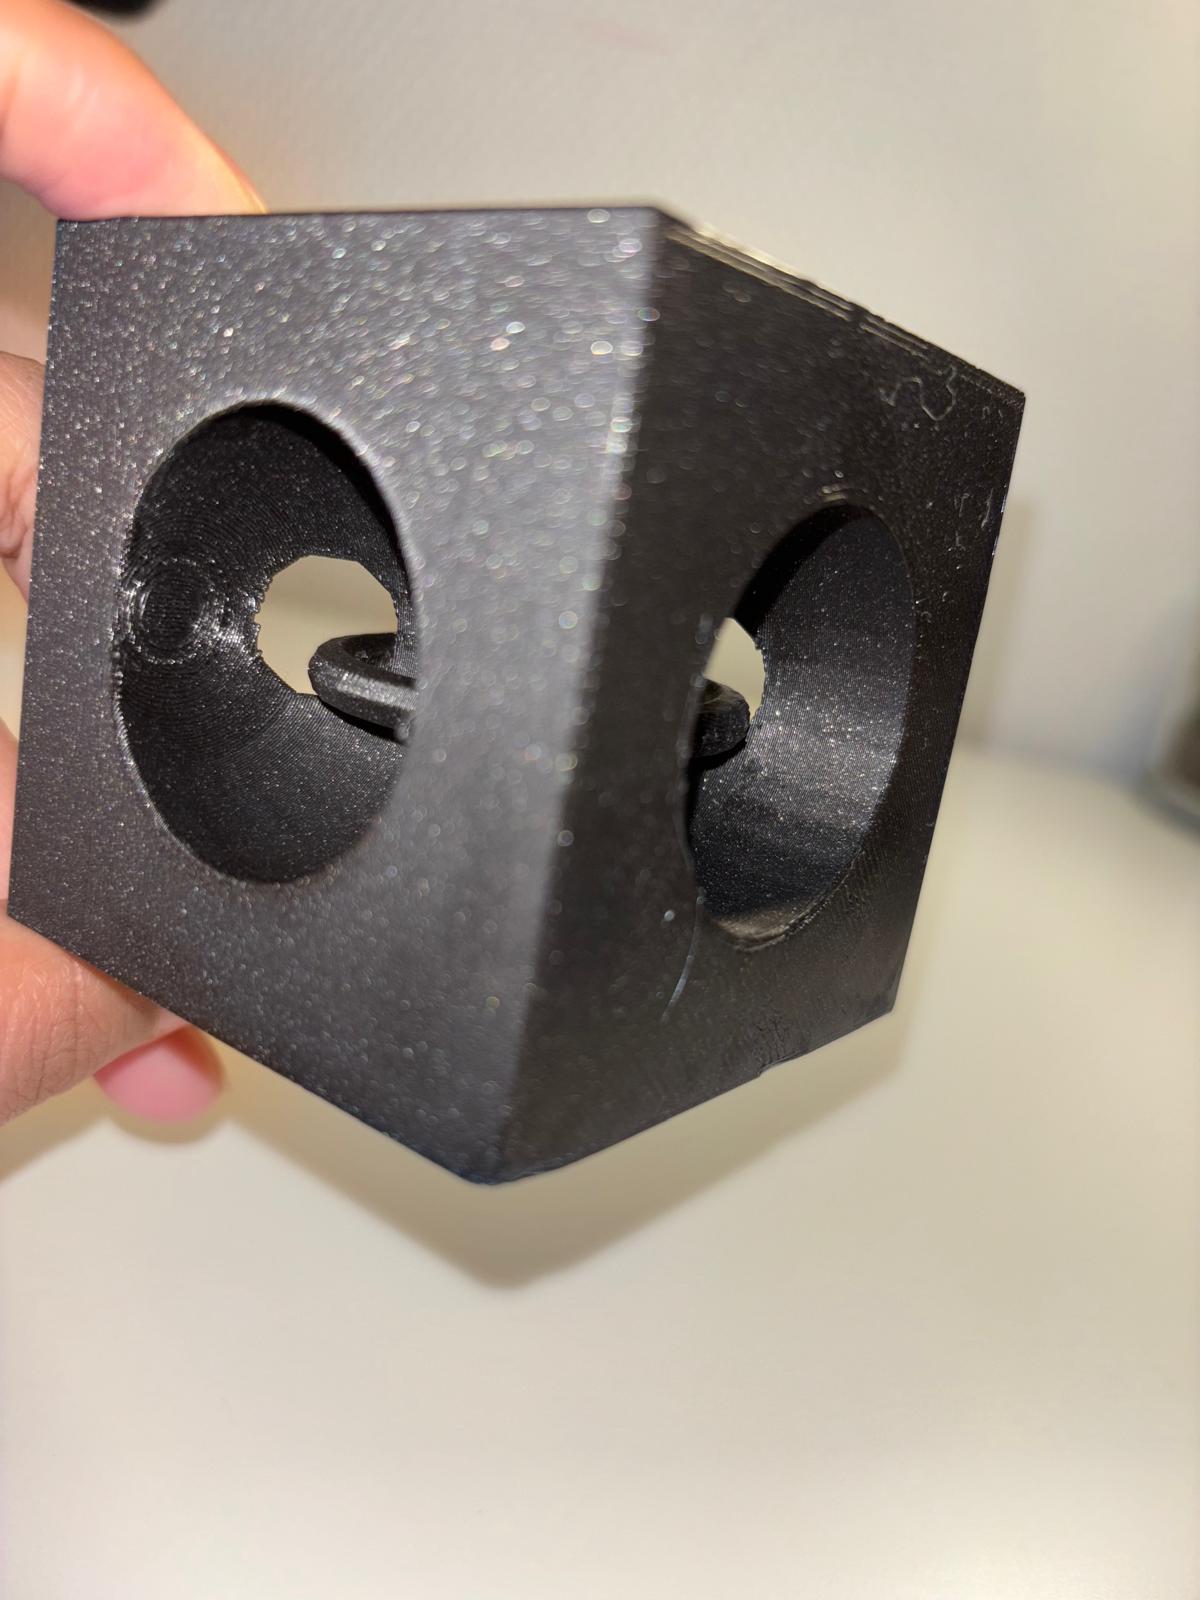](https://wiki.fablab.sorbonne-universite.fr/BookStack/uploads/images/gallery/2024-12/whatsapp-image-2024-12-03-at-21-49-57-2.jpeg) |
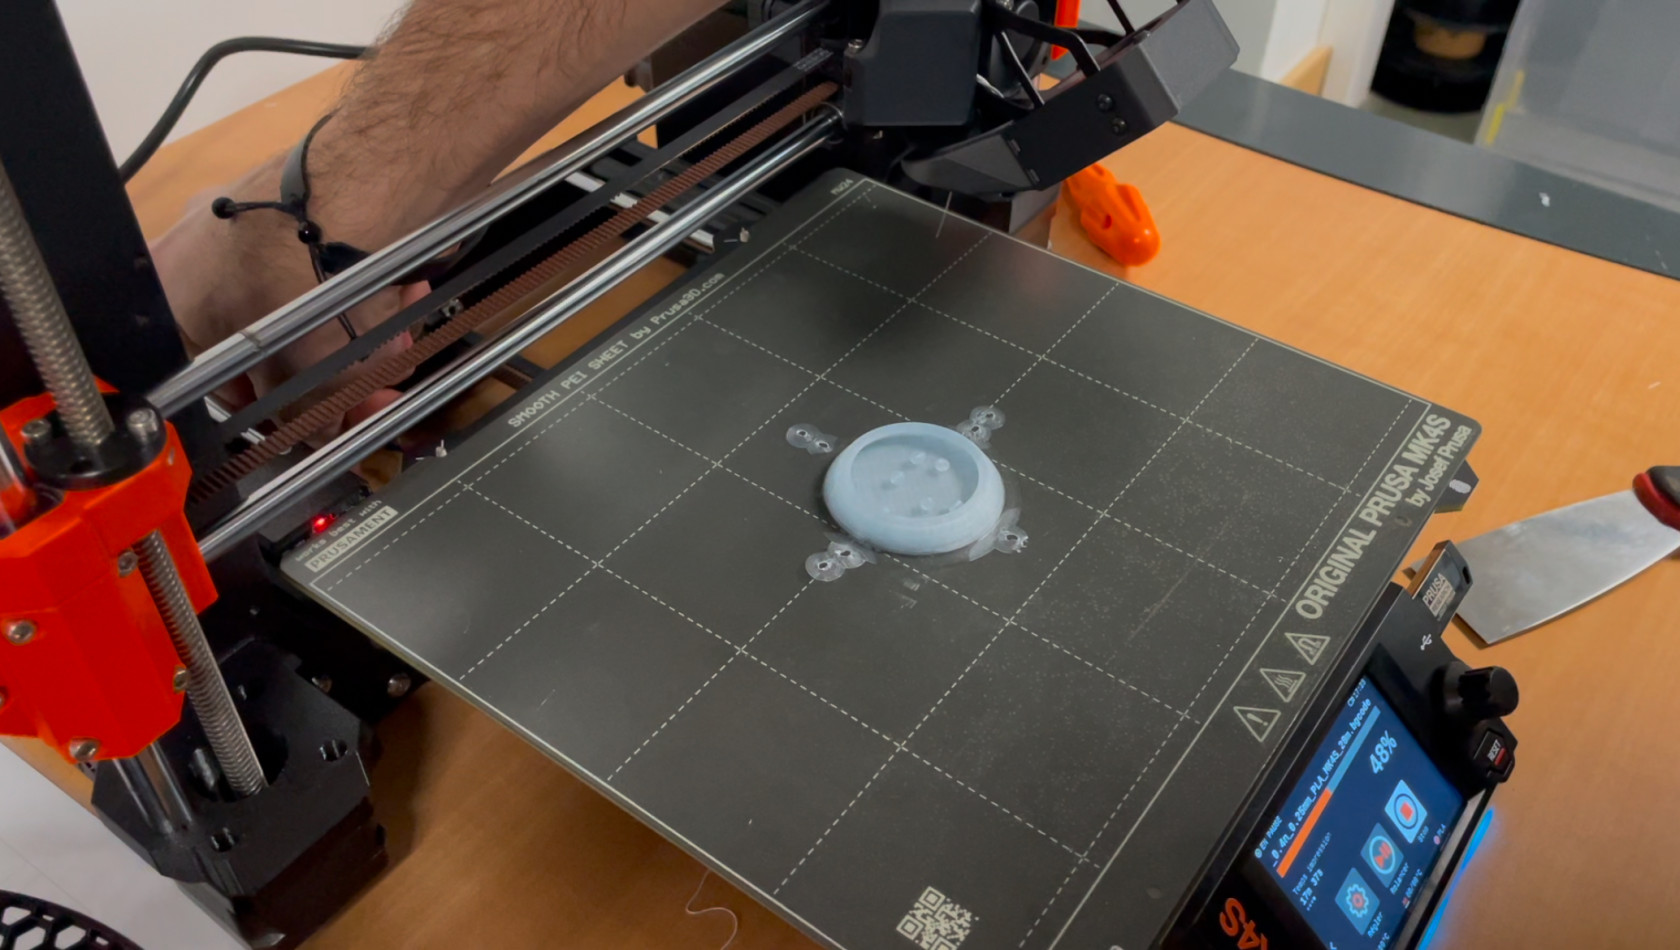
| [](https://wiki.fablab.sorbonne-universite.fr/BookStack/uploads/images/gallery/2024-12/whatsapp-image-2024-12-02-at-17-07-39.jpeg) | **Paramètres d'impression :** - - **Échelle:** 5% - **Autobus** : 225°C - **Plateau** : 60°C - **Filament** : Prusa PLA, 1,75 mm - **Supports** : support partout - **Remplissage** : 15% - **Paramètres d'impression** : paramètres par défaut de PrusaSlicer (qualité standard, épaisseur de couche classique) |
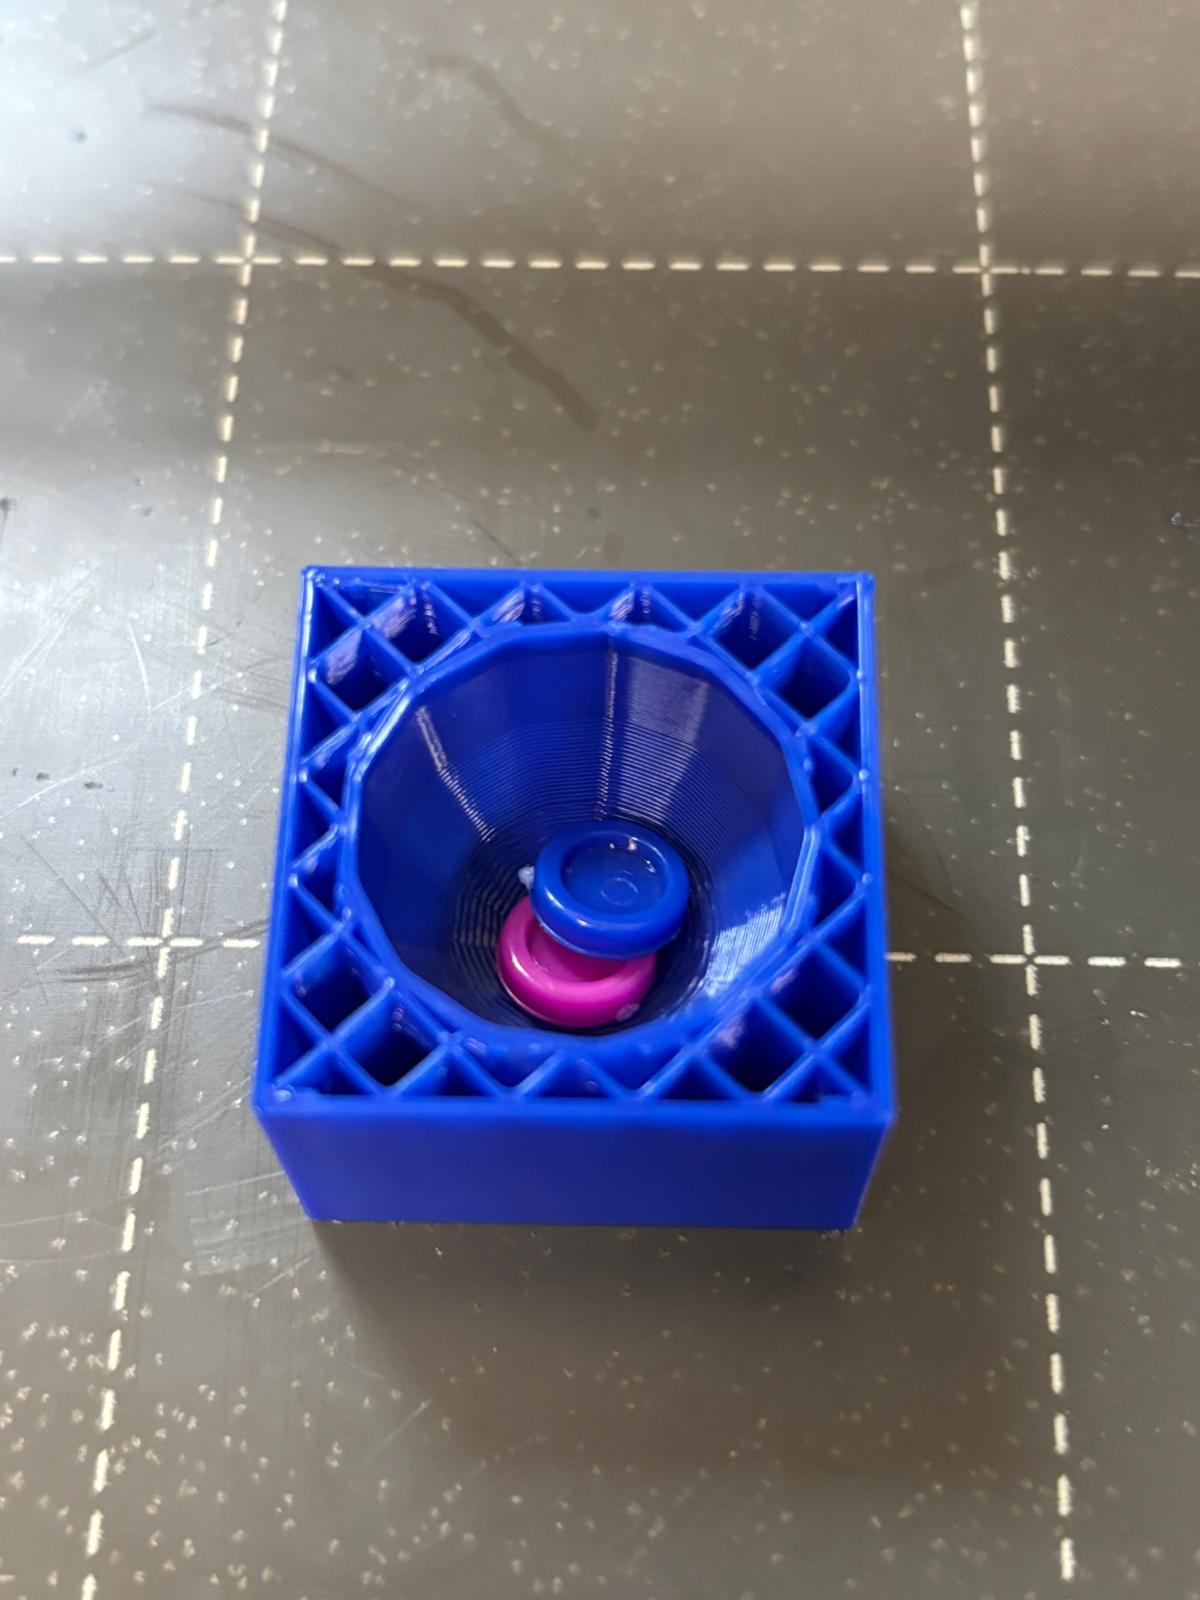
| [](https://wiki.fablab.sorbonne-universite.fr/BookStack/uploads/images/gallery/2025-01/whatsapp-image-2025-01-07-at-09-17-29.jpeg) | **Objet :** Objet décoratif **Description :** Il s'agit d'un cube avec une cavité sphérique creuse. **Objectif:** Notre objectif est de mettre l'impression 3D en pause à une moment donné pour pouvoir insérer un autre objet dans le cube. |
| **Scénario:** // Création cube\_creux // Paramètres size = 10; thickness = 1; // Fonction pour créer le cube module cube\_creux(){ difference(){ // Cube extérieur cube(\[size,size,size\], center=true); // Cube intérieur translate(\[0,0,thickness/2\]) cube(\[size-2\*thickness,size-2\*thickness,size-2\*thickness\], center=true); } } // Appel du module pour afficher le cube creux cube\_creux(); | |
| [](https://wiki.fablab.sorbonne-universite.fr/BookStack/uploads/images/gallery/2025-01/whatsapp-image-2025-01-07-at-09-17-29-1.jpeg) | **Paramètres d'impression :** - - **Échelle:** 300% - **Autobus** : 225°C - **Plateau** : 60°C - **Filament** : Prusa PLA, 1,75 mm - **Supports** : aucune - **Remplissage** : 20% - **Paramètres d'impression** : paramètres par défaut de PrusaSlicer (qualité standard, épaisseur de couche classique) |
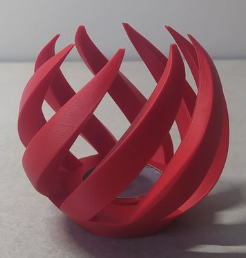
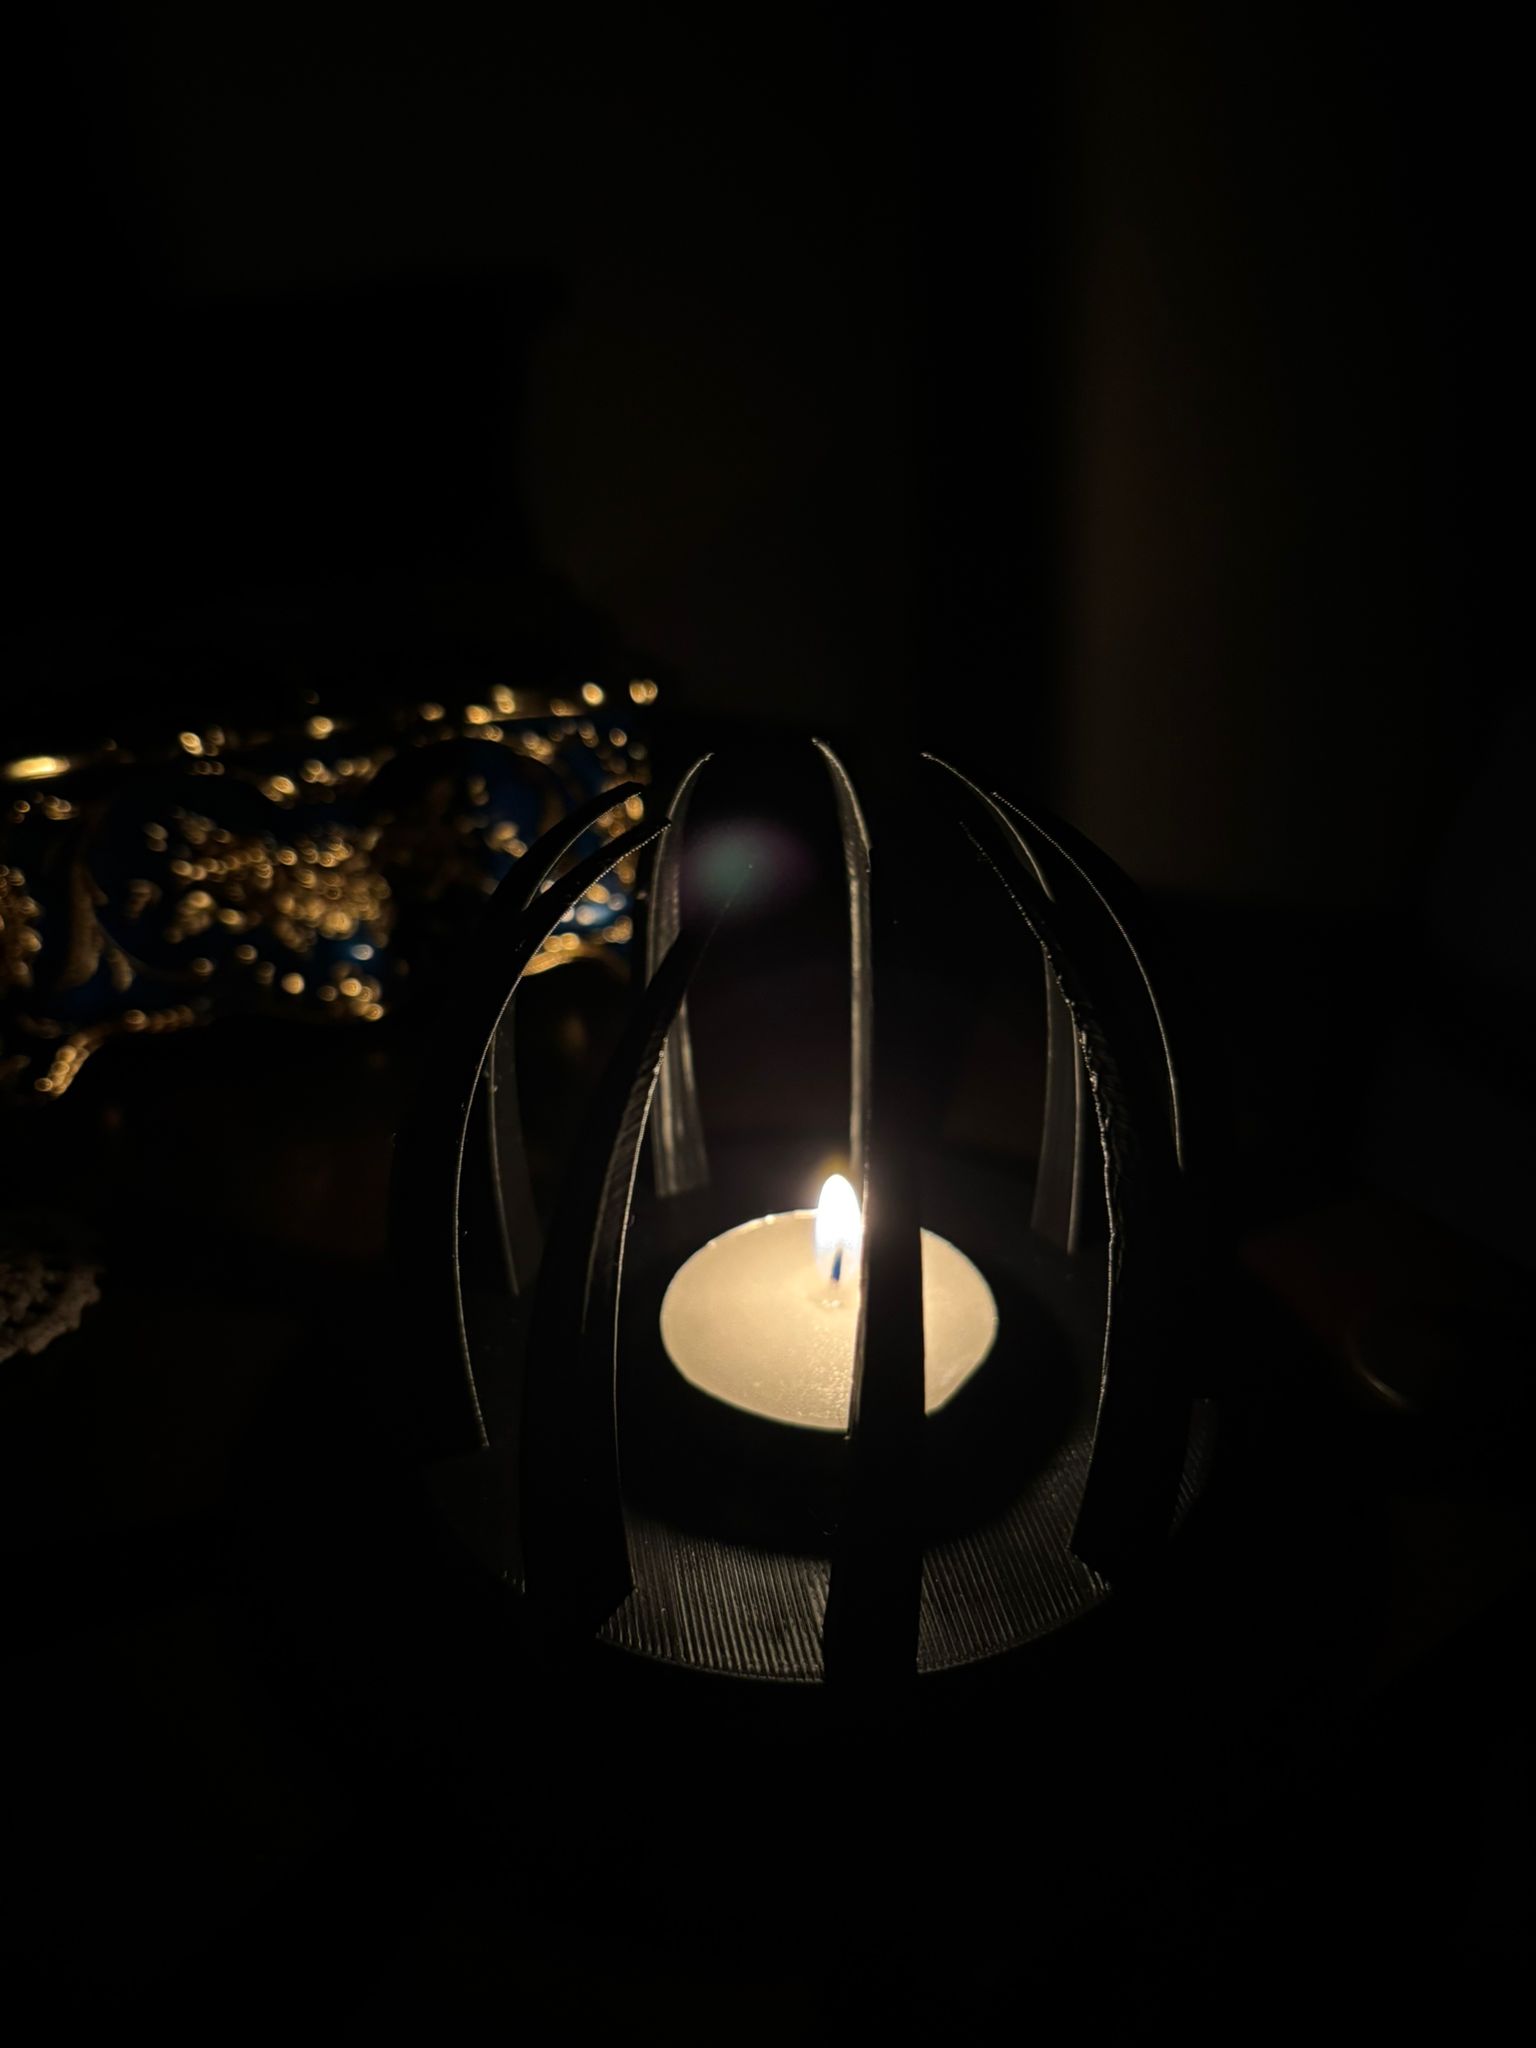
Pour cette exercice j'ai voulu créer un porte bougie inspiré de ce cliché :
Pour cela, j'ai utilisé le logiciel **Autodesk Fusion 360.** Voici les étapes de conception :
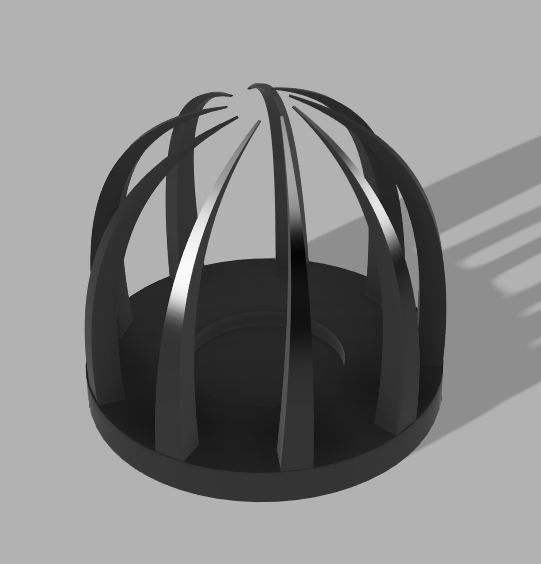
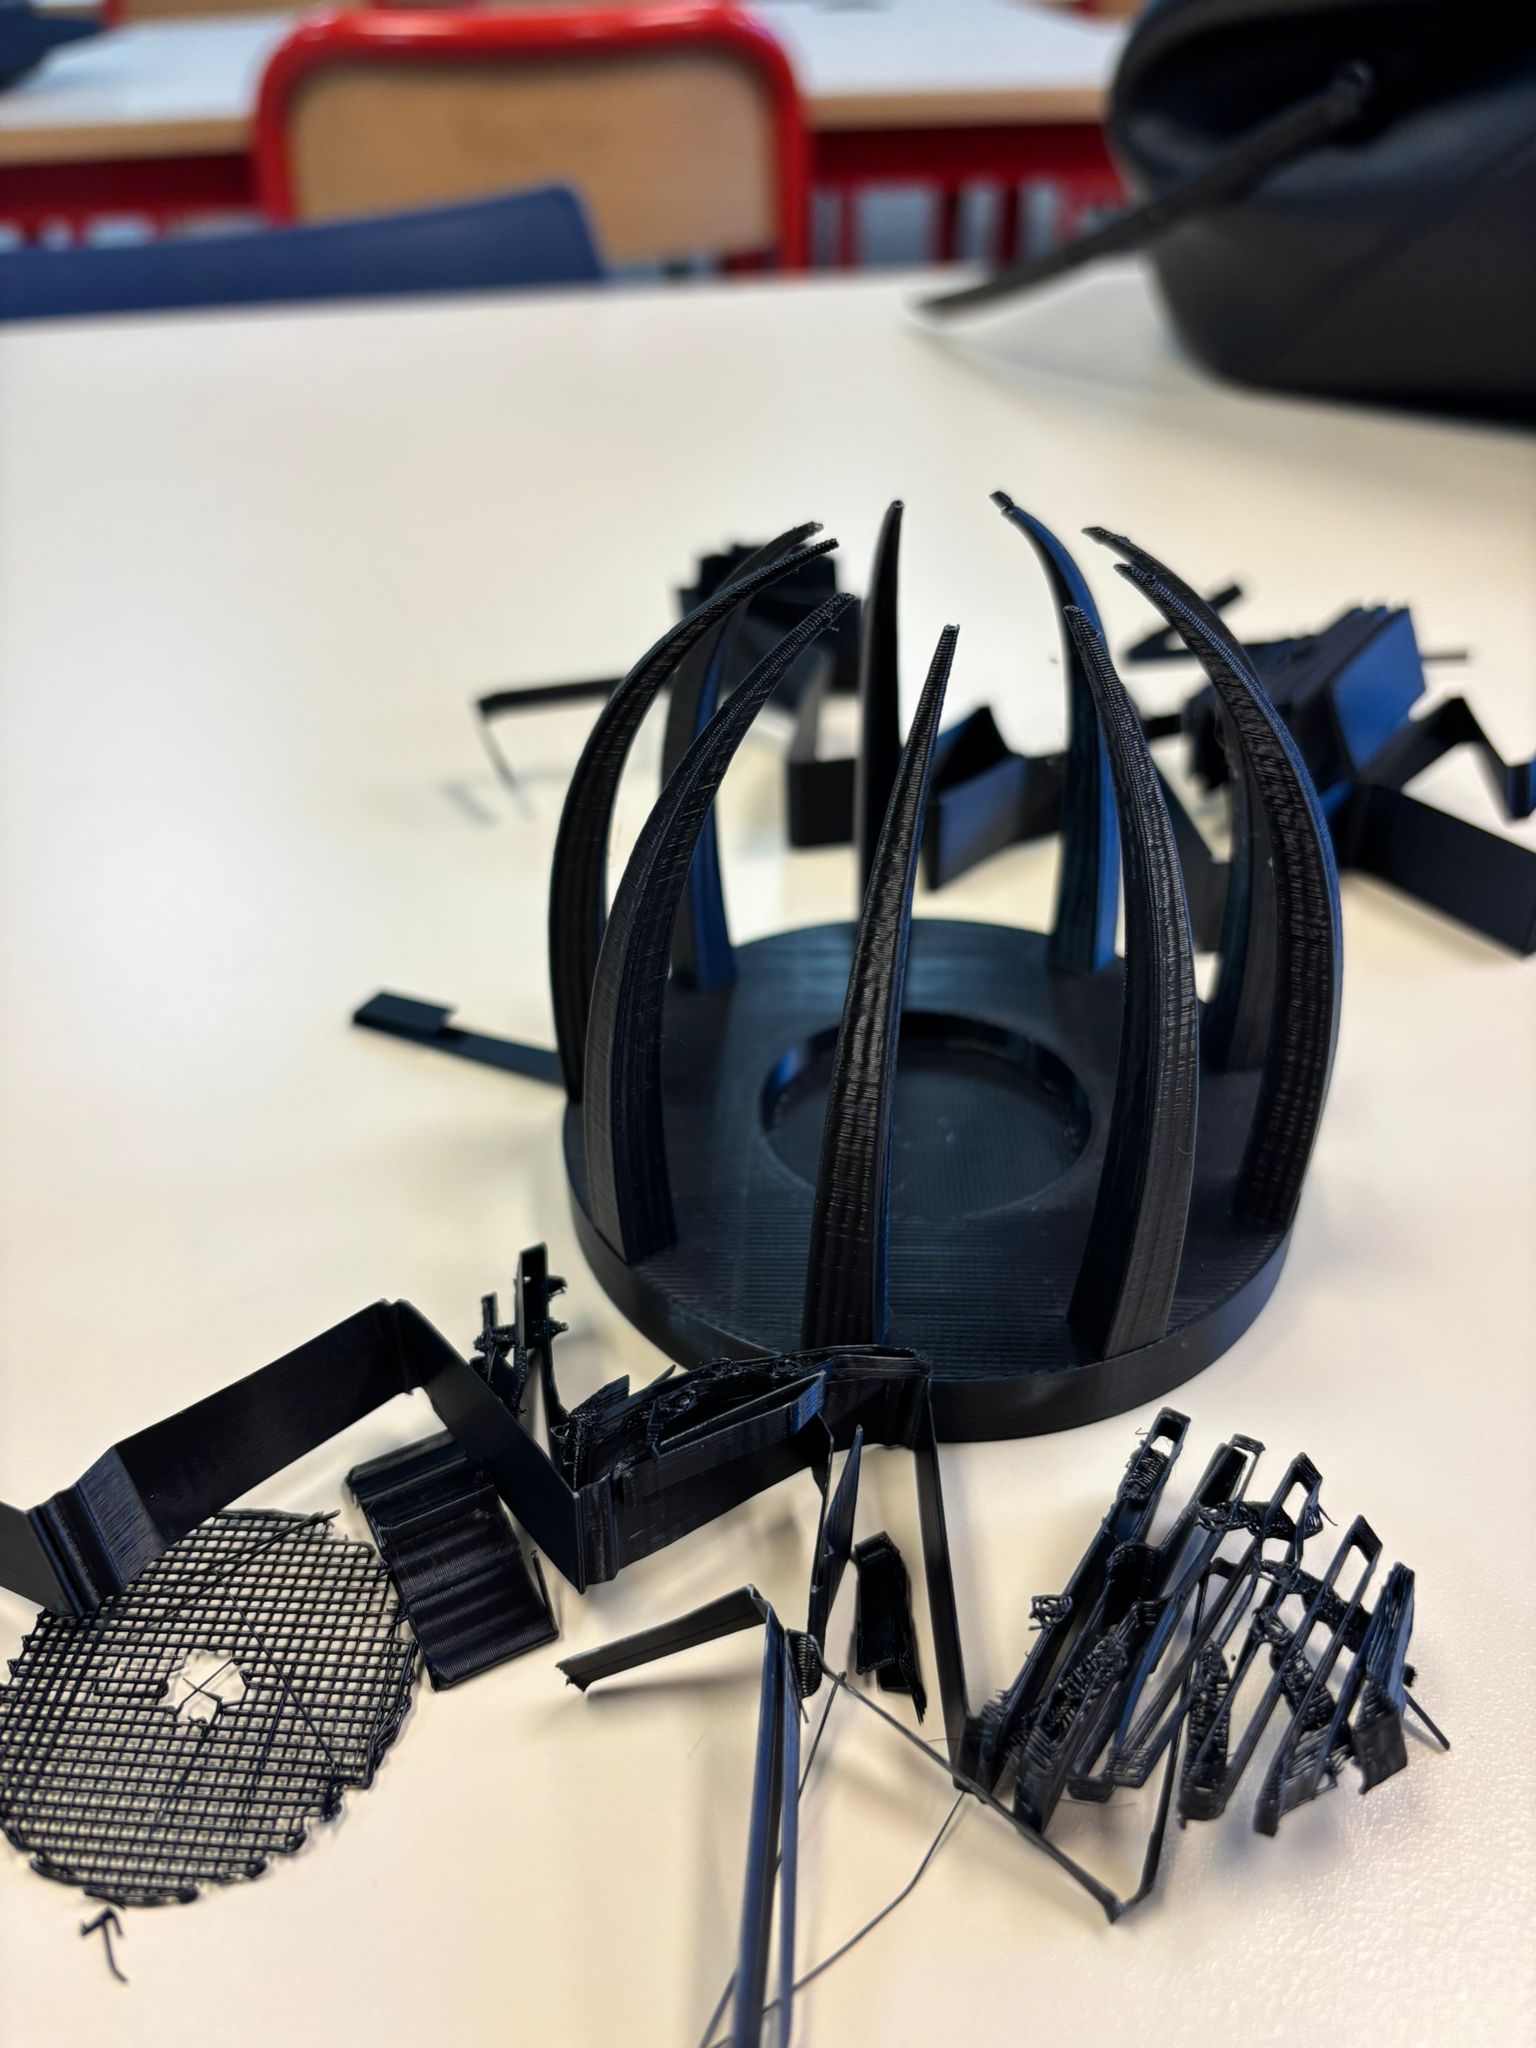
1\) Créer la base du porte bougie avec un cercle (diamètre = 200 mm , hauteur = 20 mm).  2\) Créer l'emplacement de la future bougie dans le cercle (diamètre = 90 mm, profondeur = 10 mm). 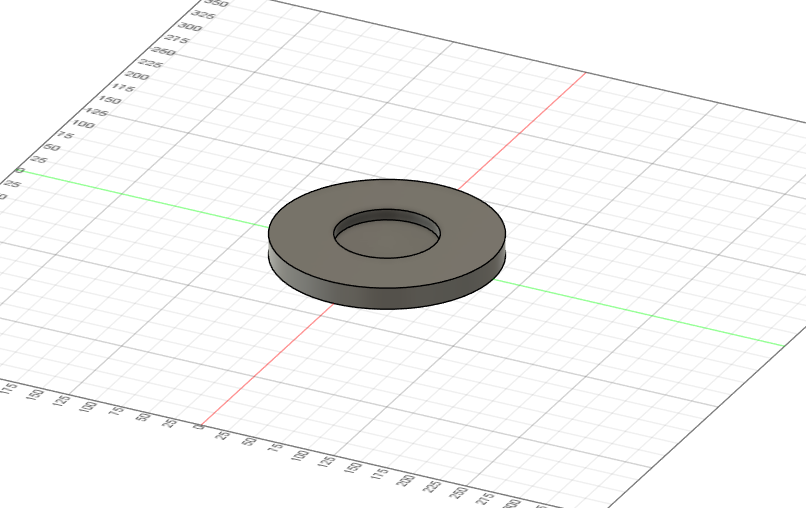 3\) Créer la première épine à la hauteur et à l'épaisseur souhaité.  4\) Créer un réseau circulaire pour répéter la même forme d'épine identique tout autour de la base (9 épines). 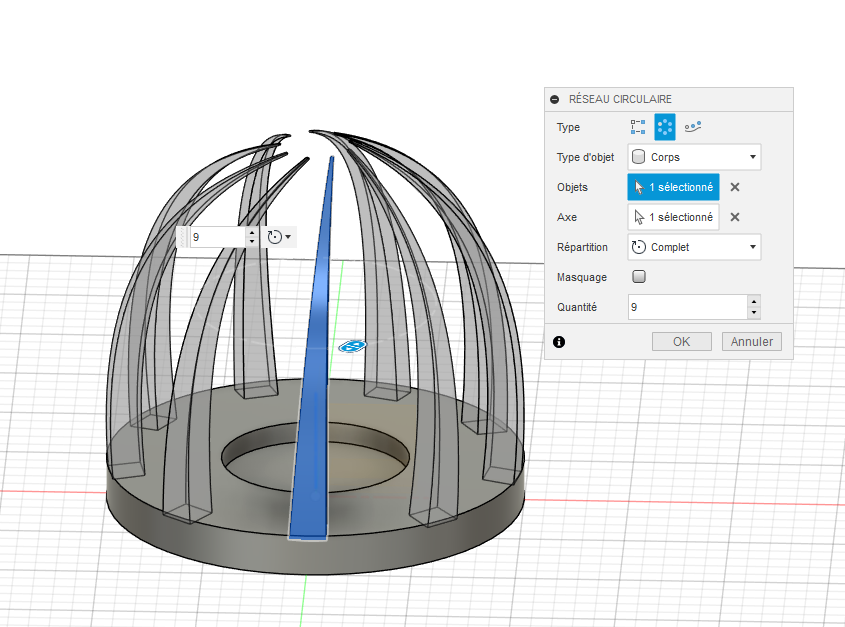Voici le rendu final de mon prototypage de porte bougie avant impression :
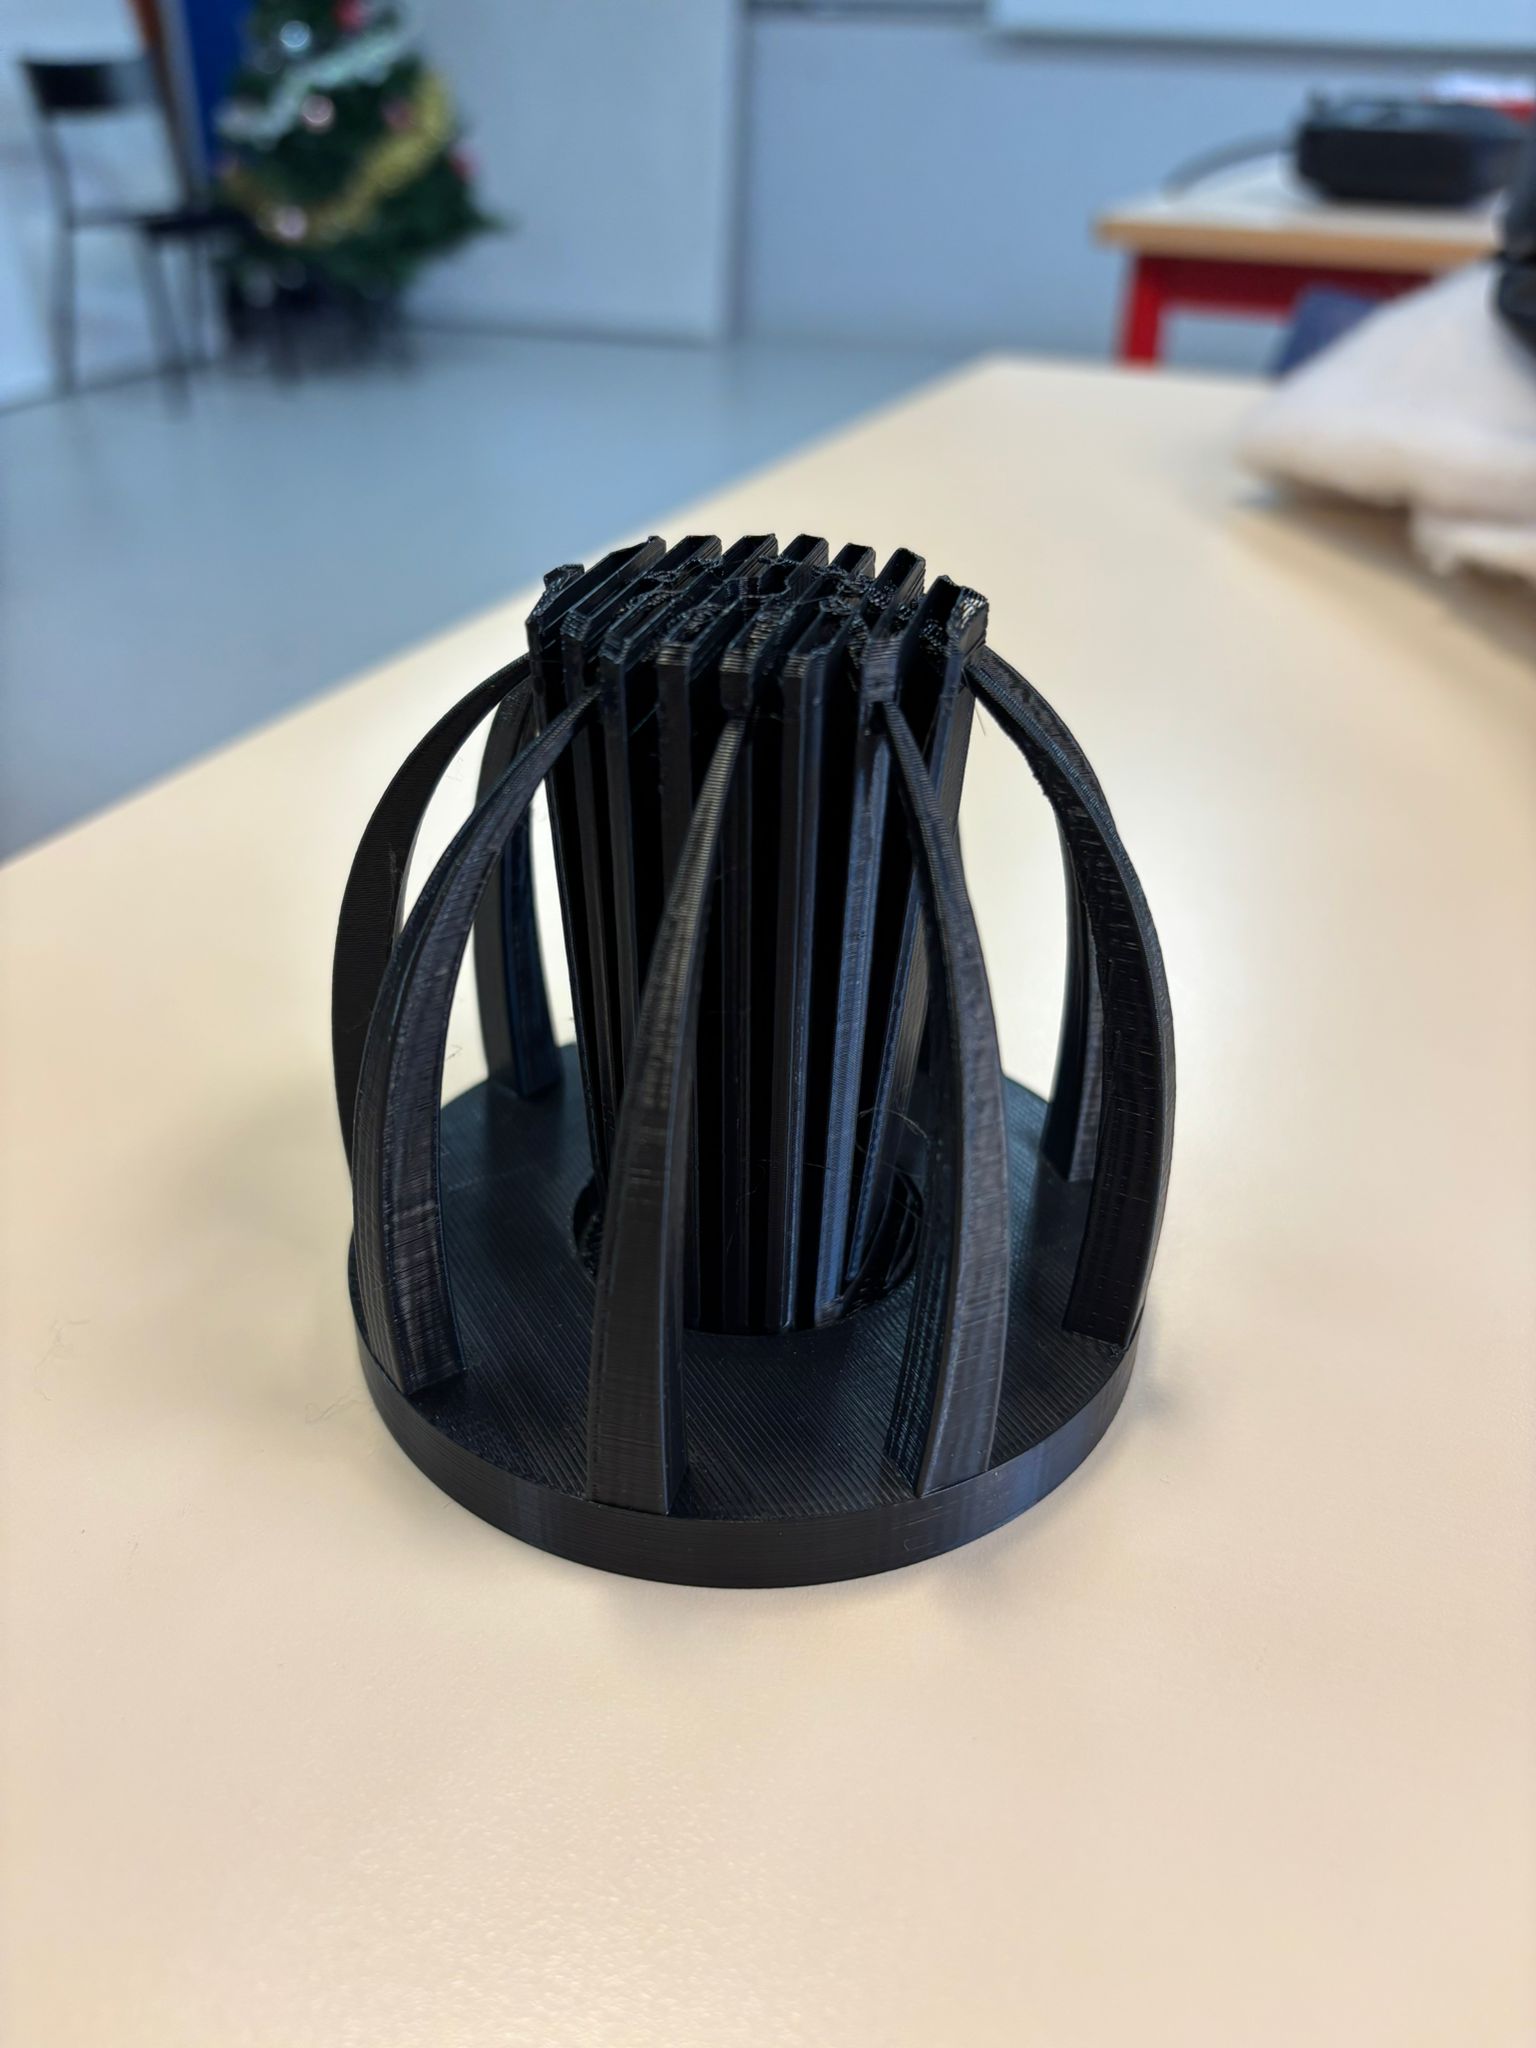
 - **Paramètres d'impression : - **Imprimante Creality K1** - Echelle : 0.46 - Filaments utilisés : PLA Creality gris foncé - Support overhang angle : 60° - Température buse : 220 °C - Température plateau : 50 °C - Remplissage : 15% - Hauteur de couche : 0,02 mmVoici le rendu final de mon prototypage de porte bougie après impression :
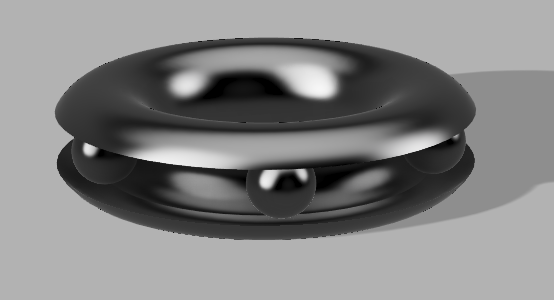
[](https://wiki.fablab.sorbonne-universite.fr/BookStack/uploads/images/gallery/2024-12/whatsapp-image-2024-12-04-a-22-21-47-81656f53.jpg)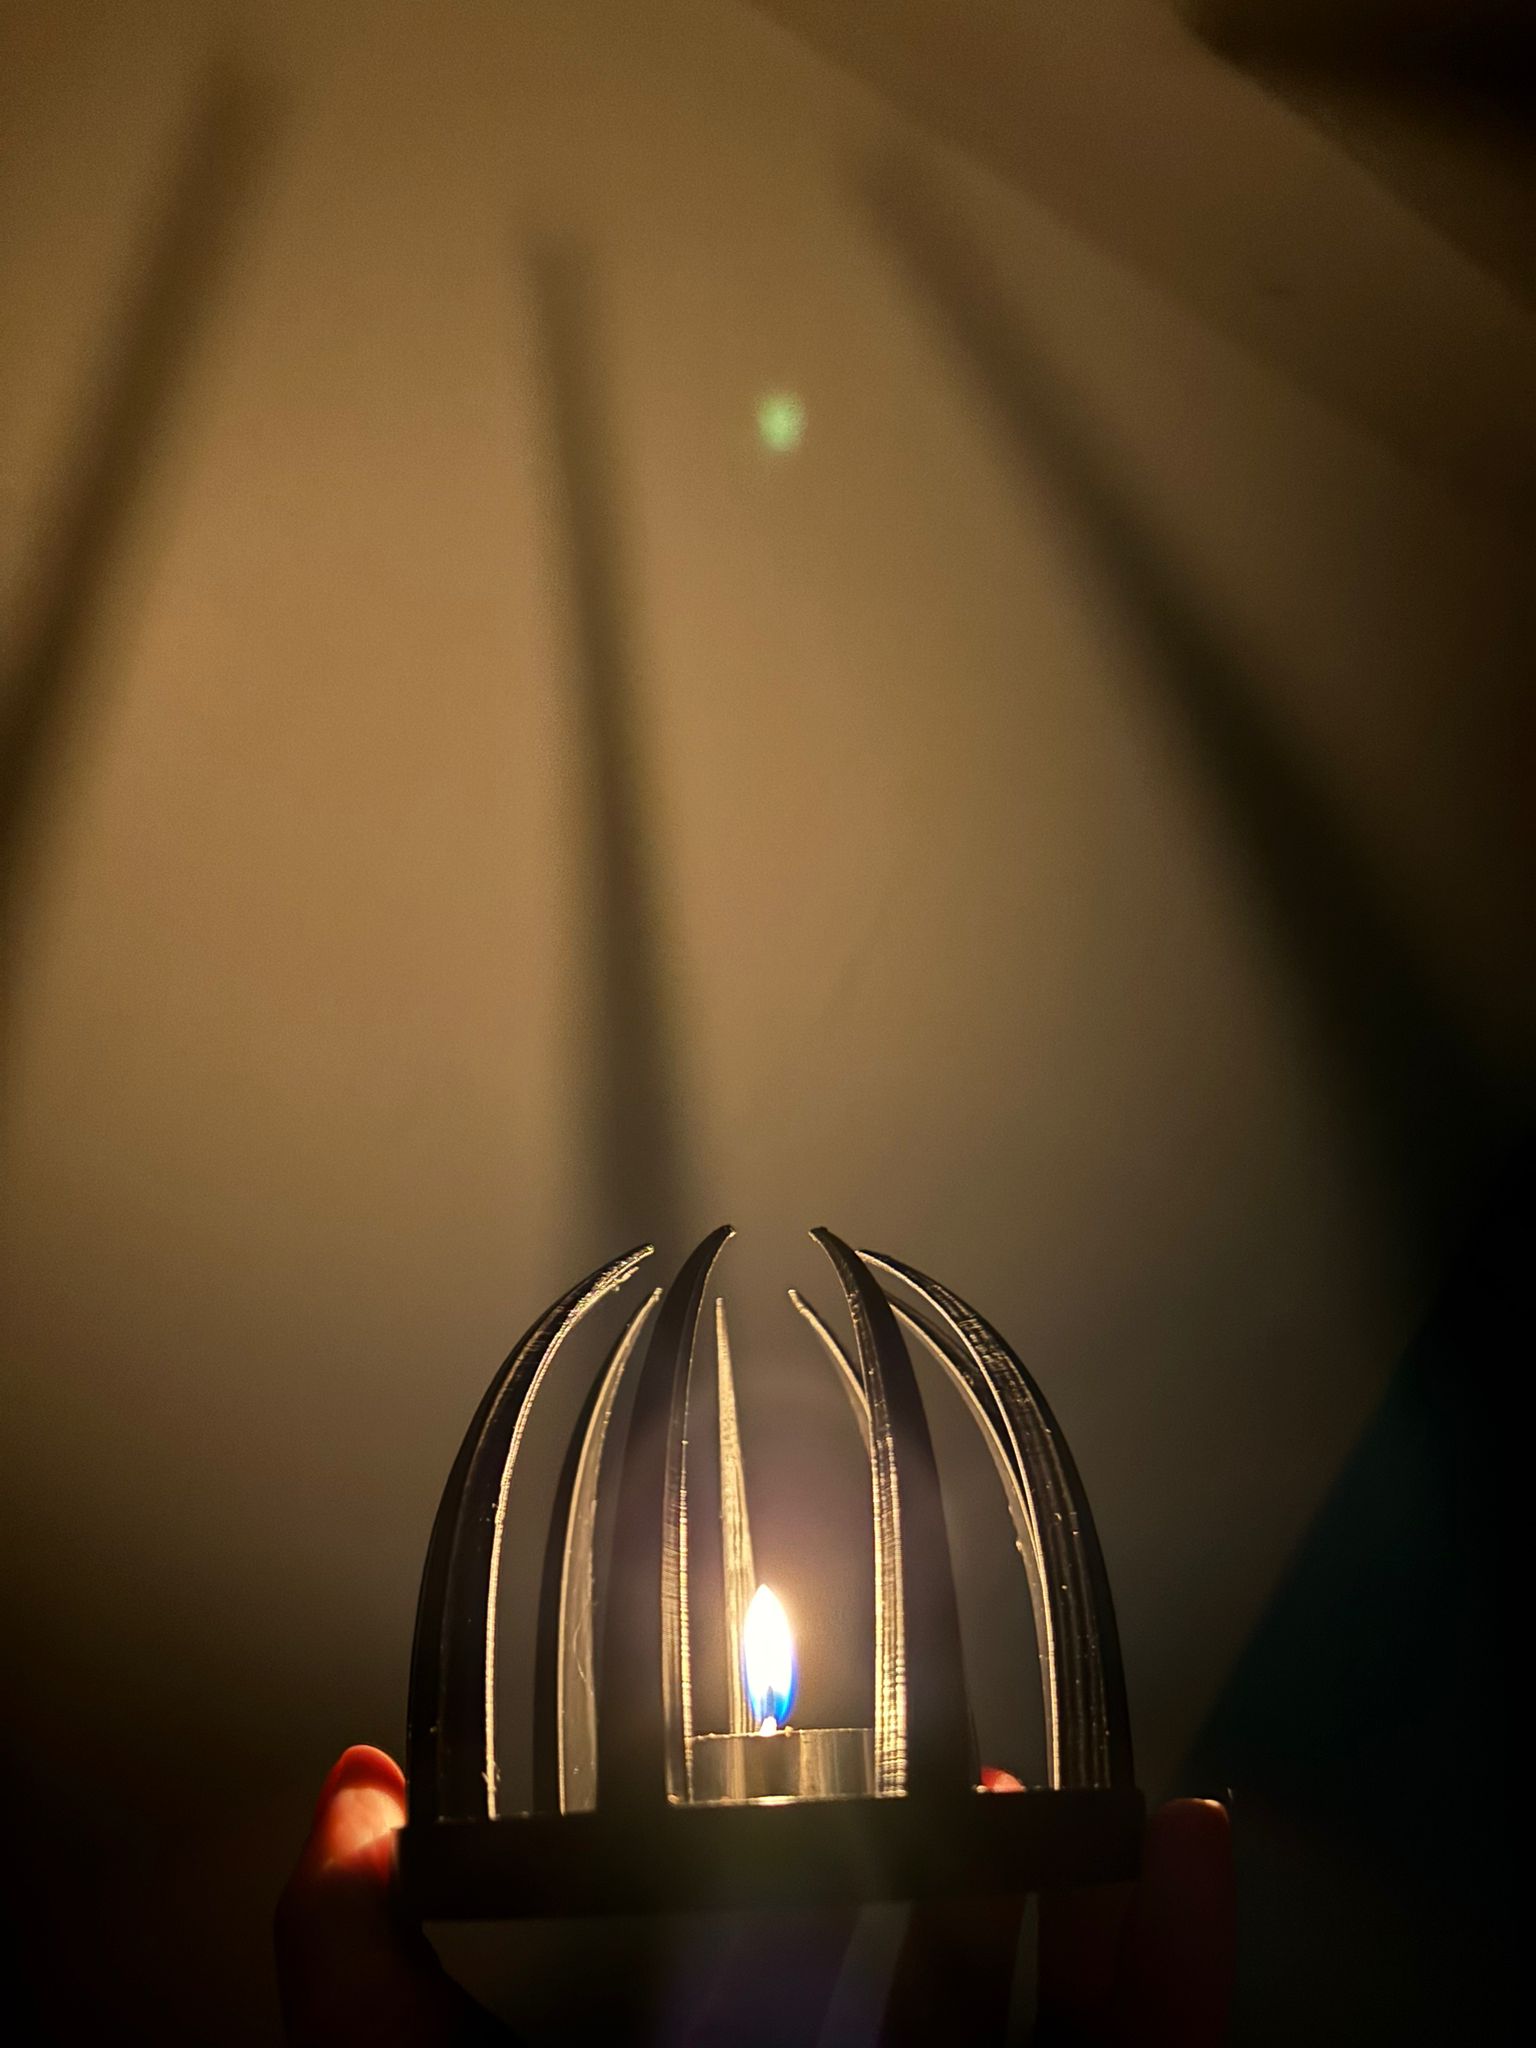 **B) Créer un objet réalisable seulement avec une imprimante 3D sur AUTODESK FUSION 360**Pour cette exercice j'ai voulu créer mon objet inspiré de ce cliché :
Pour cela, j'ai utilisé le logiciel **Autodesk Fusion 360.** Voici les étapes de conception :
1\) Créer un tore (diamètre intérieur = 75 mm , diamètre du tore = 25 mm). 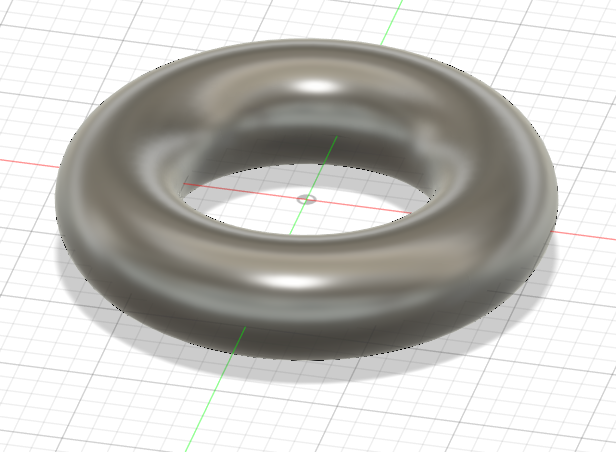 2\) Créer un tuyau à l'intérieur du tore (taille de section = 15 mm). 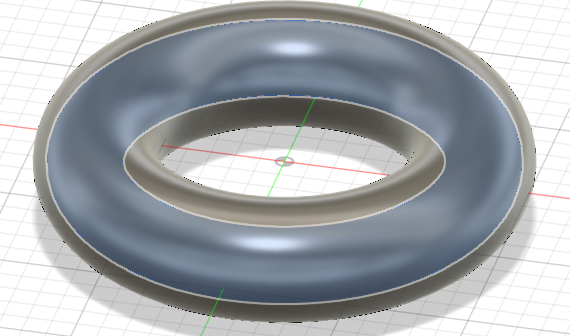 3\) Créer un second tore pour obtenir le creux (diamètre intérieur = 85 mm , diamètre du tore = 17 mm). 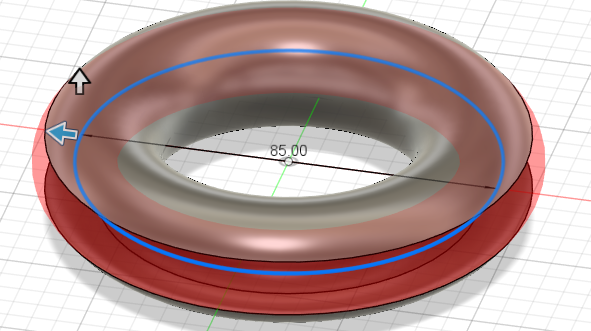 4\) Créer une boule dans le creux (diamètre = 15 mm). 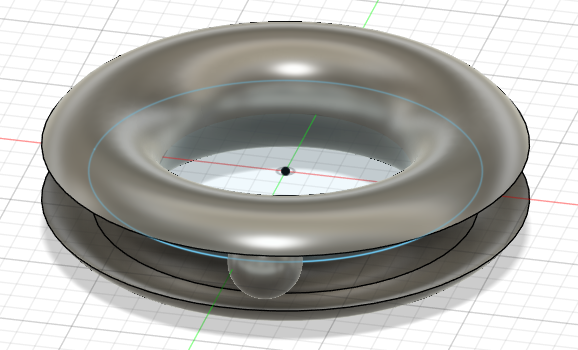 5\) Créer un réseau circulaire pour répéter la même forme de boule identique tout autour de la base (5 boules). Voici le rendu final de mon prototypage de l'objet avant impression :
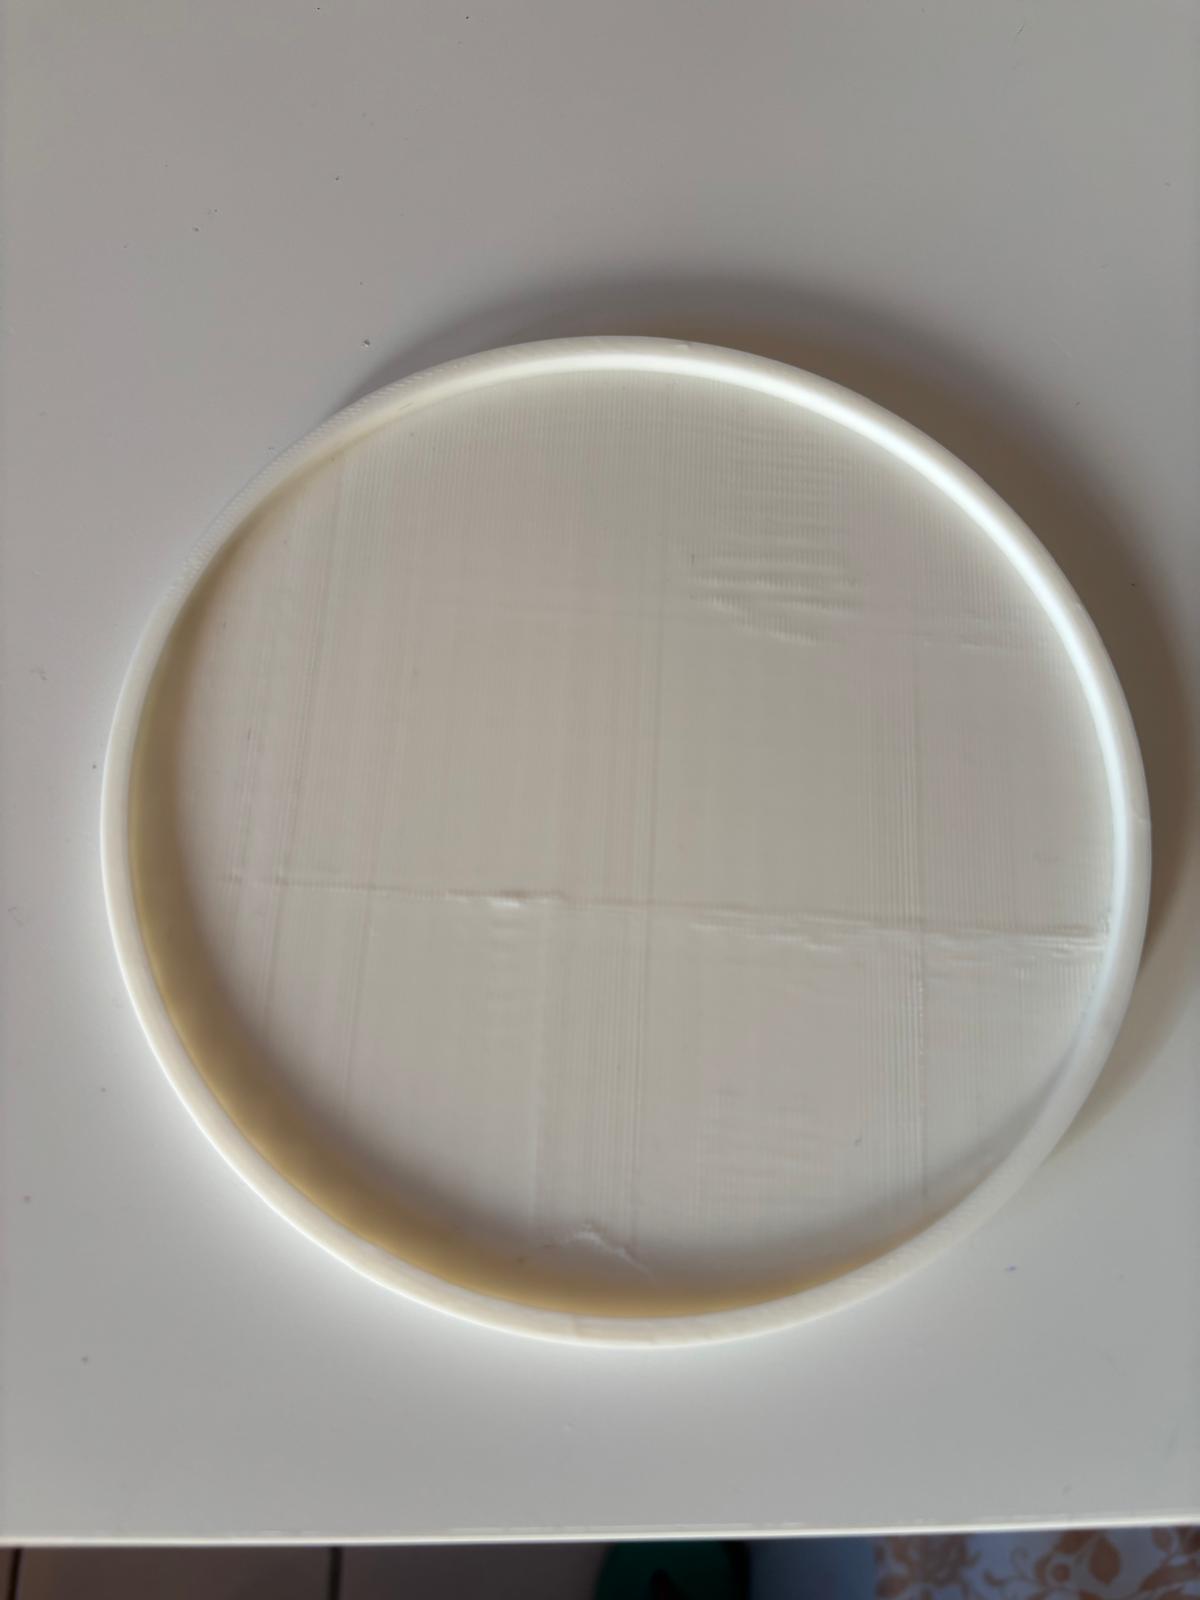
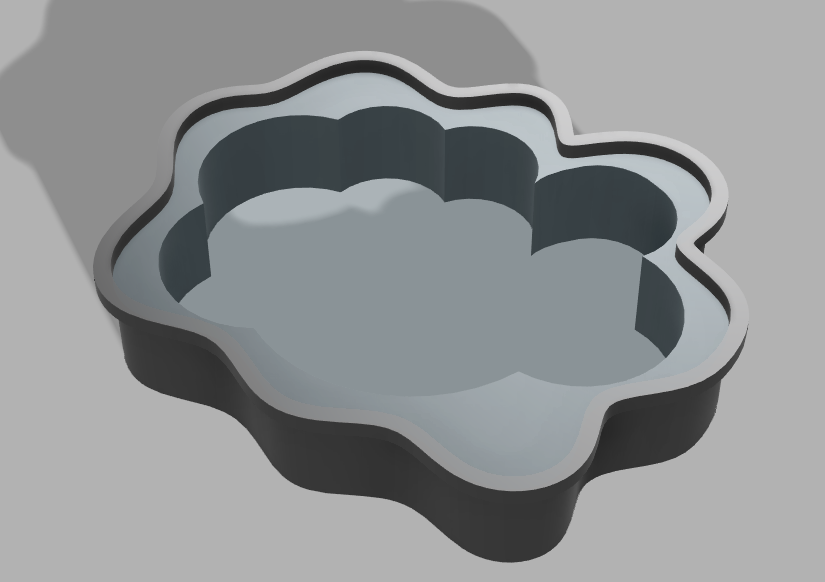
 **B) Créer un objet avec une pause pendant l'impression sur AUTODESK FUSION 360**Pour cette exercice j'ai voulu créer un cadran pour miroir. Le miroir sera inséré lorsque l'impression sera complétée à 50%. Pour cela, j'ai utilisé le logiciel **Autodesk Fusion 360.** Voici les étapes de conception :
1\) Créer la forme souhaité du cadran.   2\) Créer des perçages au milieu du cadran pour l'emplacement du futur miroir.  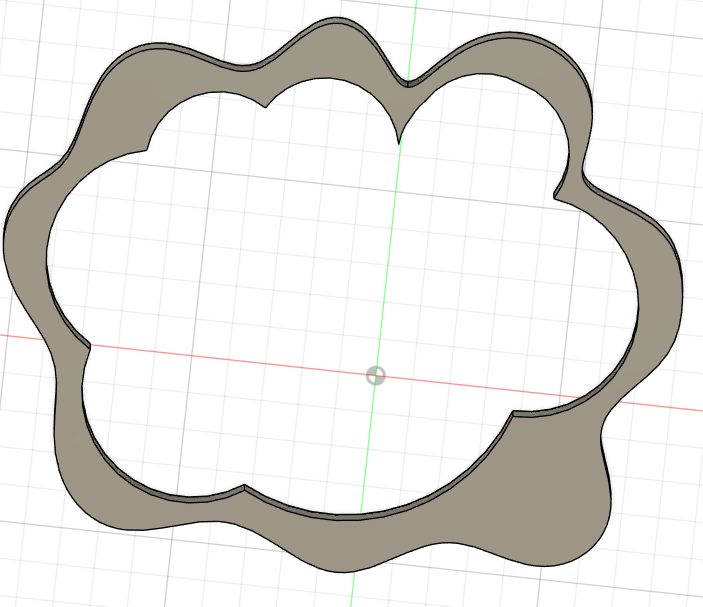 3\) Créer un contour autour du cadran. 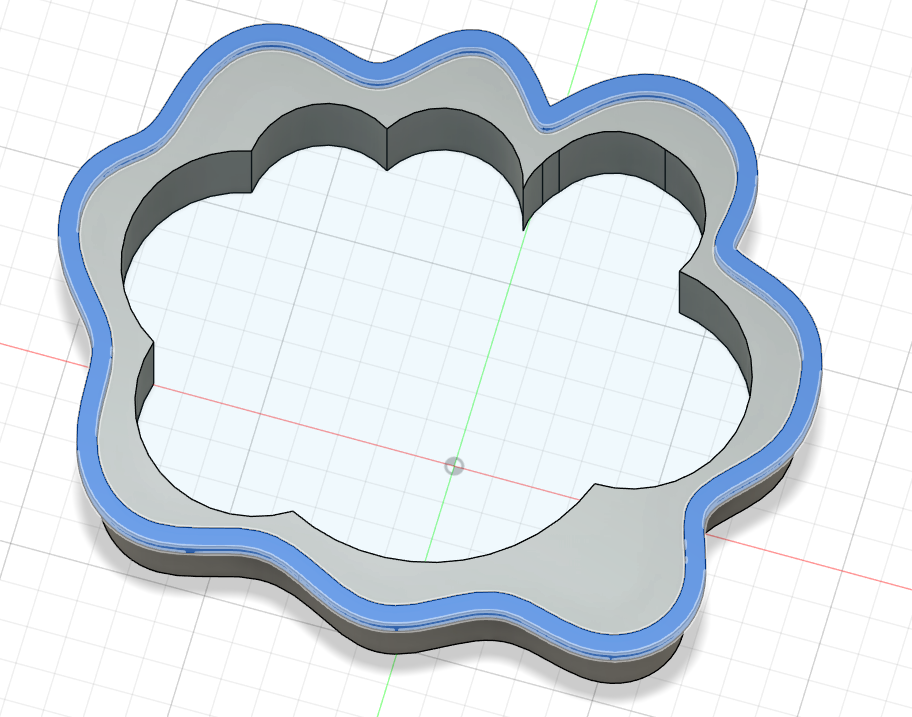 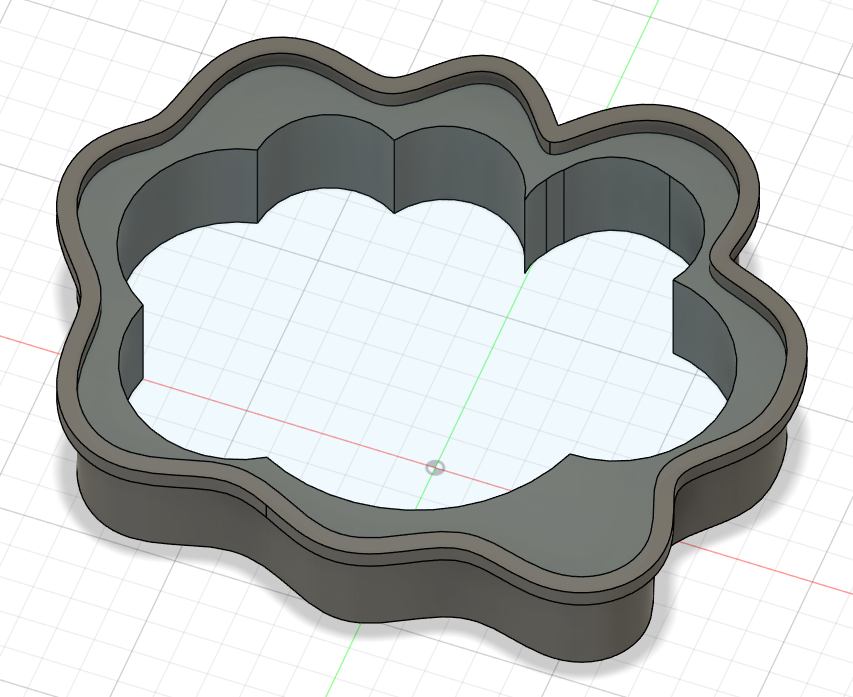Voici le rendu final de mon prototypage de l'objet avant impression :
 ##### **D) Fabriquer les prototypes 3D via l'imprimante**Avant de pouvoir enfin imprimer nos prototypes 3D via l'imprimante, il faut passer par plusieurs étapes intermédiaires :
1\) Exporter les prototypes crées sur **AUTODESK** en fichier **STL** sur notre appareil 2\) Télécharger le logiciel **PRUCASLICER** et importer les différents fichiers **STL** 3\) Faire les ajustements nécessaires, pour mes différents objets dans la dimension souhaitée. \+ Vérifier les supports nécessaires pour optimiser l'impression des parties plus complexes. 4\) Exporter les prototypes en ficher **GCODE** sur ma clef USB 5\) Lancer les impressions ! # Zaynab MOHAMMAD **UE PROTOTYPAGE : MU4MN011** **18/11/2024** **:** **Initiation a l'impression 3D.** Lors de cette première séance nous avons appris les bases de l'impression 3D. Nous avons appris a nous servir de OpenScad qui est un logiciel pour coder des objets pour une impression 3D. Nous avons suite a cette séance du coder un objet fonctionnel. Pour cela j'ai choisi de concevoir une petite boite de rangement avec un couvercle pour pouvoir stocker mes bijoux (bagues, colliers,...). Pour créer ce code j'ai réaliser une boite pour cela j'ai modéliser plusieurs rectangles pour pouvoir faire une boite. Ensuite pour le couvercle j'ai dans un premier temps créer seulement un rectangle avec les dimensions de la boite pour pouvoir le poser dessus. Après l'impression je me suis rendu compte que le couvercle n'était pas tres fonctionnel puisque il recouvrait seulement ma boite et ne la fermait pas correctement j'ai donc modifié mon code pour imprimer un couvercle avec un grand rectangle de la taille de la boite puis un plus petit pour qui puisse rentrer dans ma boite. Taille de la boite : 8cm en largeur, 7cm en hauteur, 10cm en longueur **Photo de ma boite :** **Paramètre d'impression :** (paramètres par défaut) → Échelle **:** 100% → Buse : 225°C → Plateau : 60°C → Filament : Prusa PLA, 1,75 mm de diamètre → Supports : non nécessaire → Remplissage : 40% → Réglages d’impression : paramètres par défaut **25/11/2024 : Deuxième séance** Pour cette deuxième séance nous avons commencer a créer des objets plus complexe et pour cette exercice nous avons du créer un objet qui est seulement imprimable par impression 3D. J'ai été fortement inspirée par des objets qui ont deja été imprimé au Fablab et j'ai décidé d'imprimer un cube avec une sphere intégrée. Pour cela j'ai j'ai coder un cube creux avec des trou rond sur tous ses coté et j'ai rajouté une sphere qui est plus petit que la taille du cube mais plus grande que les trou sur les cotés du cube. Taille de l'objet : **Photo de l'objet : ** [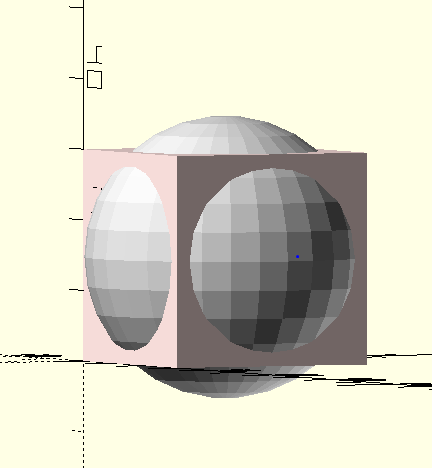](https://wiki.fablab.sorbonne-universite.fr/BookStack/uploads/images/gallery/2024-11/L73image.png) **Paramètre d'impression :** (paramètres par défaut) → Échelle **:** 100% → Buse : 225°C → Plateau : 60°C → Filament : Prusa PLA, 1,75 mm de diamètre → Supports : non nécessaire → Remplissage : 40% → Réglages d’impression : paramètres par défaut **02/12/2024 : Troisième séance** Lors de cette séance nous avons du imprimer un objet puis le mettre en pause pour insérer un autre objet a l'intérieur puis reprendre l'impression pour terminer l'objet. Pour cela j'ai decider de créer un aimant en forme de tete d'ours. Dans cet aimant il y a une partie creuse spécialement conçu pour accueillir l'aimant et cette partie est tout juste plus grande que l'aimant pour pouvoir le mettre sans problème. Taille de l'aimant : **Photo de l'aimant :** **Paramètre d'impression :** (paramètres par défaut) → Échelle **:** 100% → Buse : 225°C → Plateau : 60°C → Filament : Prusa PLA, 1,75 mm de diamètre → Supports : non nécessaire → Remplissage : 40% → Réglages d’impression : paramètres par défaut **13/12/2024 : Quatrième séance** Lors de cette séance nous avons présenté nos objet a la classe et nous avons vu si il y avait des améliorations a faire. **16/12/2024 : Cinquième séance** Lors de cette séance nous avons eu une initiation à l'Arduino. # Seema BAIG DUSMEE ### **Exercice 1 : Création d’un produit du quotidien** Pour cet exercice, j’ai réalisé un ***vide-poche* original**, en forme de **pirogue**. J’ai choisi ce design pour son côté esthétique et fonctionnel. Le vide-poche a été gravé avec mon nom de famille, ajoutant une touche personnelle à l’objet. J'ai utilisé Fusion 360 pour le faire, car je n'y arrivais pas avec OpenScad. Je n'étais pas partie dessus à la base ; je voulais faire une étagère avec un pot de fleurs intégré, munie d'une bibliothèque. Mais la taille de l'étagère est beaucoup trop importante, et une version miniature ne m'intéressait pas. J'ai donc cherché une autre idée, afin d'avoir quelque chose qui soit à la fois utile, pratique et qui répond à l'exercice ! Pour réaliser mon projet d’étagère avec un pot de fleurs intégré, j’ai utilisé ChatGPT comme assistant de conception. Grâce à des échanges interactifs, j’ai pu préciser mes idées et obtenir des conseils à chaque étape. Voici comment je m’y suis prise : **1. Définir l'idée initiale** J’ai commencé par expliquer mon projet à ChatGPT : créer une petite étagère murale avec un emplacement intégré pour un pot de fleurs. Mon objectif était de combiner esthétique et fonctionnalité dans un design simple et moderne. **Prompt utilisé :** *"Je veux créer une étagère murale avec un pot de fleurs intégré, dans un style épuré, qui soit imprimable en 3D. Donne moi le code pour OpenScad."* ChatGPT m’a alors proposé idées, comme intégrer un cylindre pour le pot. J'ai voulu faire quelque chose de sympa, et de "technique" en rajoutant par exemple de faux livres. Le vrai défi était dans le positionnement de ces faux livres, ChatGPT étant incapable de comprendre ce que je lui demandais, c'est à dire de centrer les livres et de les aligner correctement. J'ai rectifié par moi-même les paramètres dans le code, car celui était correct. **Prompt utilisé :** *"Voici mon design : une étagère rectangulaire avec une ouverture circulaire pour le pot de fleurs, des supports droits pour le mur, et une base renforcée sous le pot. Est-ce que ça te semble réalisable pour une impression 3D ?"* [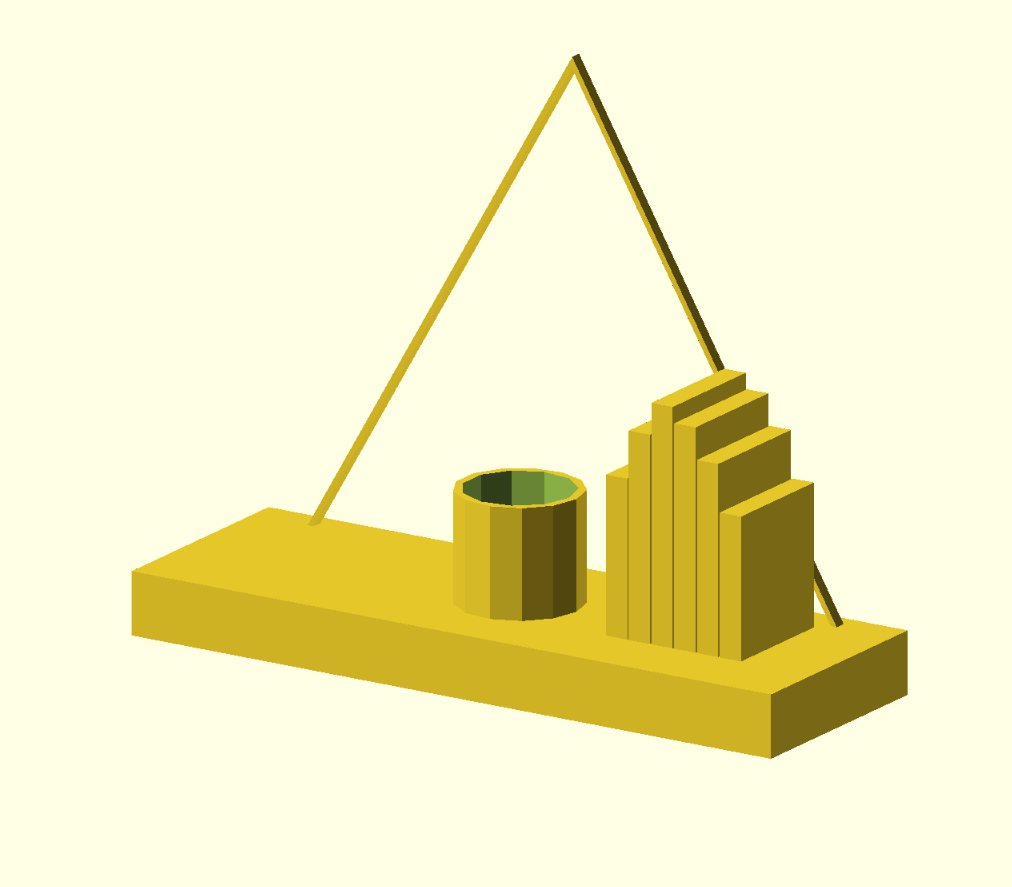](https://wiki.fablab.sorbonne-universite.fr/BookStack/uploads/images/gallery/2024-12/Ijyimage.png) ChatGPT m’a confirmé que le design était solide et m’a rappelé de vérifier les dimensions exactes par rapport aux capacités de l’imprimante et du pot de fleurs. Mais le design ne passait pas pour l'impression 3D ; trop de temps, trop de matière et je voulais quelque chose de simple et efficace. J'ai donc abandonnée l'idée. **2. La "pirogue"** Au final, j'ai demandé à ChatGPT comment faire un vide-poche (que j'appelle pirogue à cause de la forme que je lui ai donné") sur Fusion 360. J'ai eu un peu de mal avec la prise en charge du logiciel mais au final, sans même l'aide de l'IA, j'ai pu le créer simplement et rapidement. J'ai ajouté mon nom, et le tour était joué ! Lors de l'impression, j'ai fais le choix de ne pas mettre de support, mais j'aurai du en mettre un ; la base n'est pas très propre, tout comme le nom. - **Paramètres d’impression** - **Échelle :** 100% - **Buse** : 225°C - **Plateau** : 60°C - **Filament** : Prusa PLA, 1,75 mm de diamètre - **Supports** : non nécessaire (mais au final j'aurai peut-être dû insérer un support pour l'impression du nom) - **Remplissage** : 40% - **Réglages d’impression** : paramètres par défaut de PrusaSlicer (qualité standard, épaisseur de couche classique) ### **Exercice 2 : Objet uniquement imprimable en 3D** L’objectif était de concevoir un objet nécessitant exclusivement une imprimante 3D. J’ai tenté de créer une structure complexe composée de sphères reliées entre elles par des cercles. Mais cette réalisation est encore en cours d’optimisation, car les contraintes techniques de l’imprimante et des logiciels rendent l’impression difficile. J'ai totalement changé d'idée par la suite, car même si l'idée était bonne, je ne suis pas suffisamment à l'aise avec ce type de structure et de logiciel. Je suis donc partie sur quelque chose de simple et efficace. J'ai ### **Exercice 3 : Objet intégrant une pause d’impression** Pour cet exercice, j’ai conçu un bâton, de type *maracas,* plus communément appelé bâton de pluie. L’impression intègre une pause dans sa phase finale, permettant d’ajouter du riz à l’intérieur avant de terminer la fabrication. L'impression a très bien commencé, mais le bâton a changé de place entre temps. Je l'ai donc stoppé pour revoir le code, mais j'ai fais l'erreur de ne pas mettre de jupe en pensant que cela tiendrait vu qu'il s'agit d'un bâton. Au final, j'ai pu le faire sans problème, en ajoutant un support et une jupe, et j'ai eu mon bâton de pluie, avec lequel mon neveu joue tout le temps ! - **Paramètres d’impression** - **Échelle :** 100% - **Buse** : 225°C - **Plateau** : 60°C - **Filament** : Prusa PLA, 1,75 mm de diamètre - **Supports** : non nécessaire (mais au final j'aurai peut-être dû insérer un support pour l'impression du nom) - **Remplissage** : 20 % - **Réglages d’impression** : paramètres par défaut de PrusaSlicer (qualité standard, épaisseur de couche classique) # Meritxell ALIÉ FÀBREGAS #### **1. Objet Fonctionnel: Porte-clés Smiley** Le porte-clé sert à tenir toutes les clés ensemble, avec un crochet. A travers du trou, il faut insérer les clés. Les dimensions de l'objet sont en cm pour l'impression. **Le résultat avec Open SCAD**: [](https://wiki.fablab.sorbonne-universite.fr/BookStack/uploads/images/gallery/2024-12/t1qimage.png) **Impression**: J'ai imprimé l'objet avec Prusa Slicer avec les paramètres suivants: - Échelle: 100% - Buse: 225 ºC - Plateau: 65 ºC - Filament: Prusa PLA 1,75 mm, couleur blanc - Supports: activés partout - Remplissage: 20% - Réglages d'impression: paramètres par défaut de PrusaSlicer (qualité standard, épaisseur de couche classique) [](https://wiki.fablab.sorbonne-universite.fr/BookStack/uploads/images/gallery/2024-12/gBQimage.png) Il est indispensable ,après l'impression, de retirer le support, en faissant attention aux support de l'anneaux vu qu'il est très fragile. [ 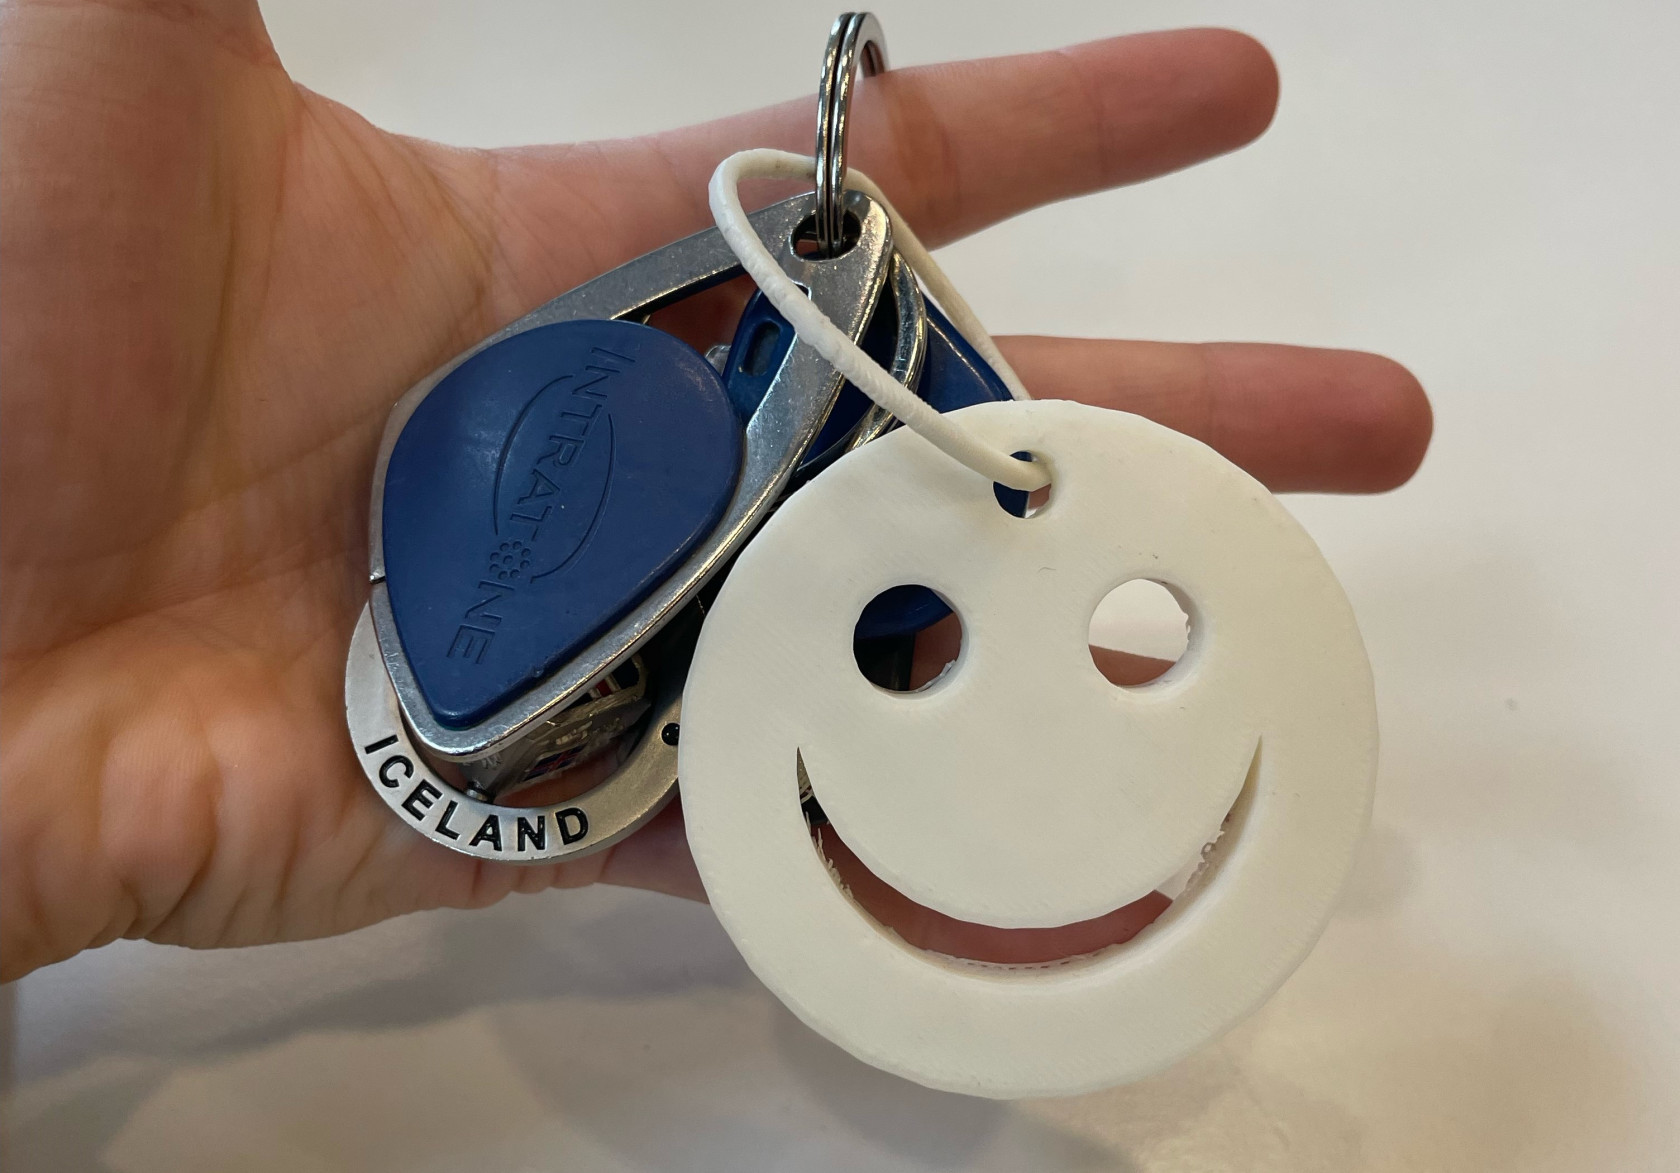](https://wiki.fablab.sorbonne-universite.fr/BookStack/uploads/images/gallery/2024-12/imatge-smiley.jpeg) *Résultat final de l'objet* #### **2. Object non-fonctionnel:** J’ai conçu un objet combinant des formes géométriques en 2D et 3D . La structure principale est deux pyramides l'une sur l'autre (pour créer une espèce de sablier) , avec un anneux qui le travers, tout entouré d'un cube vide. **Résultat avec OpenSCAD** [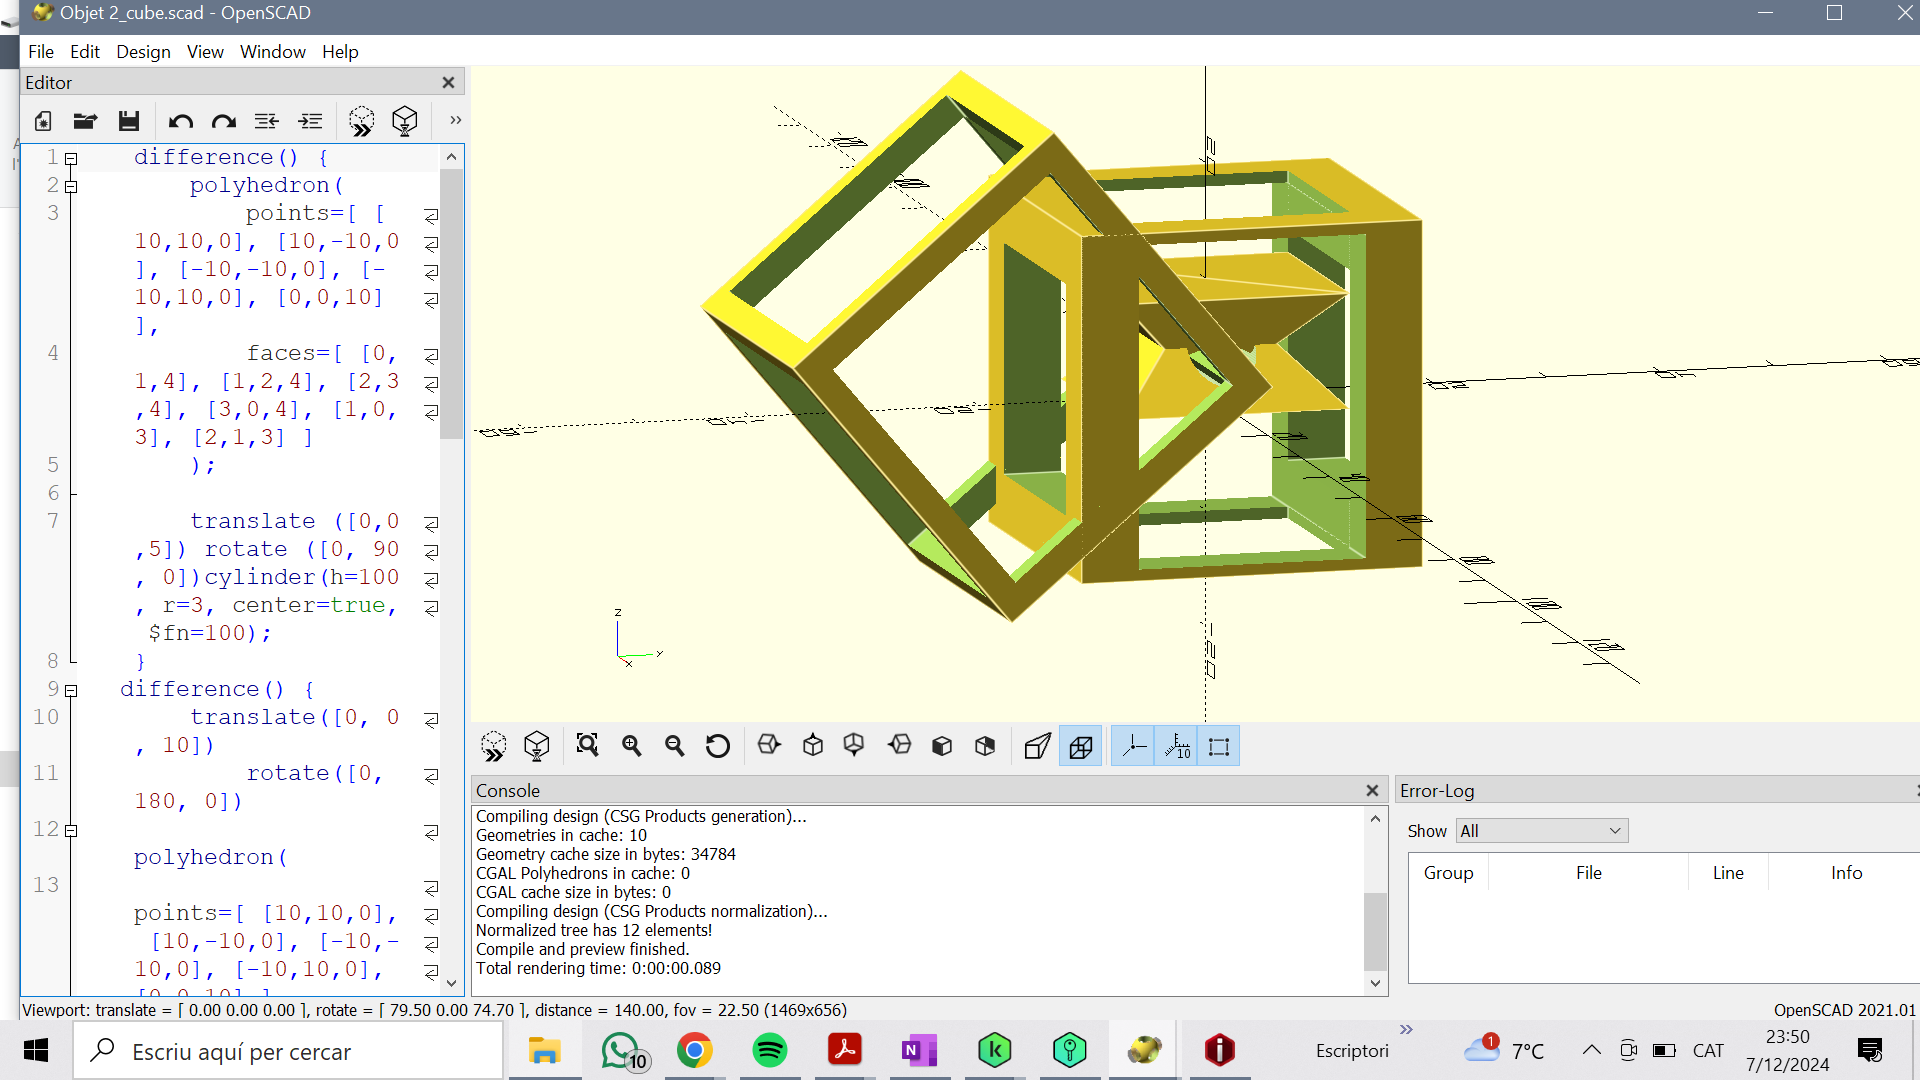](https://wiki.fablab.sorbonne-universite.fr/BookStack/uploads/images/gallery/2024-12/2paimage.png) **Impression** [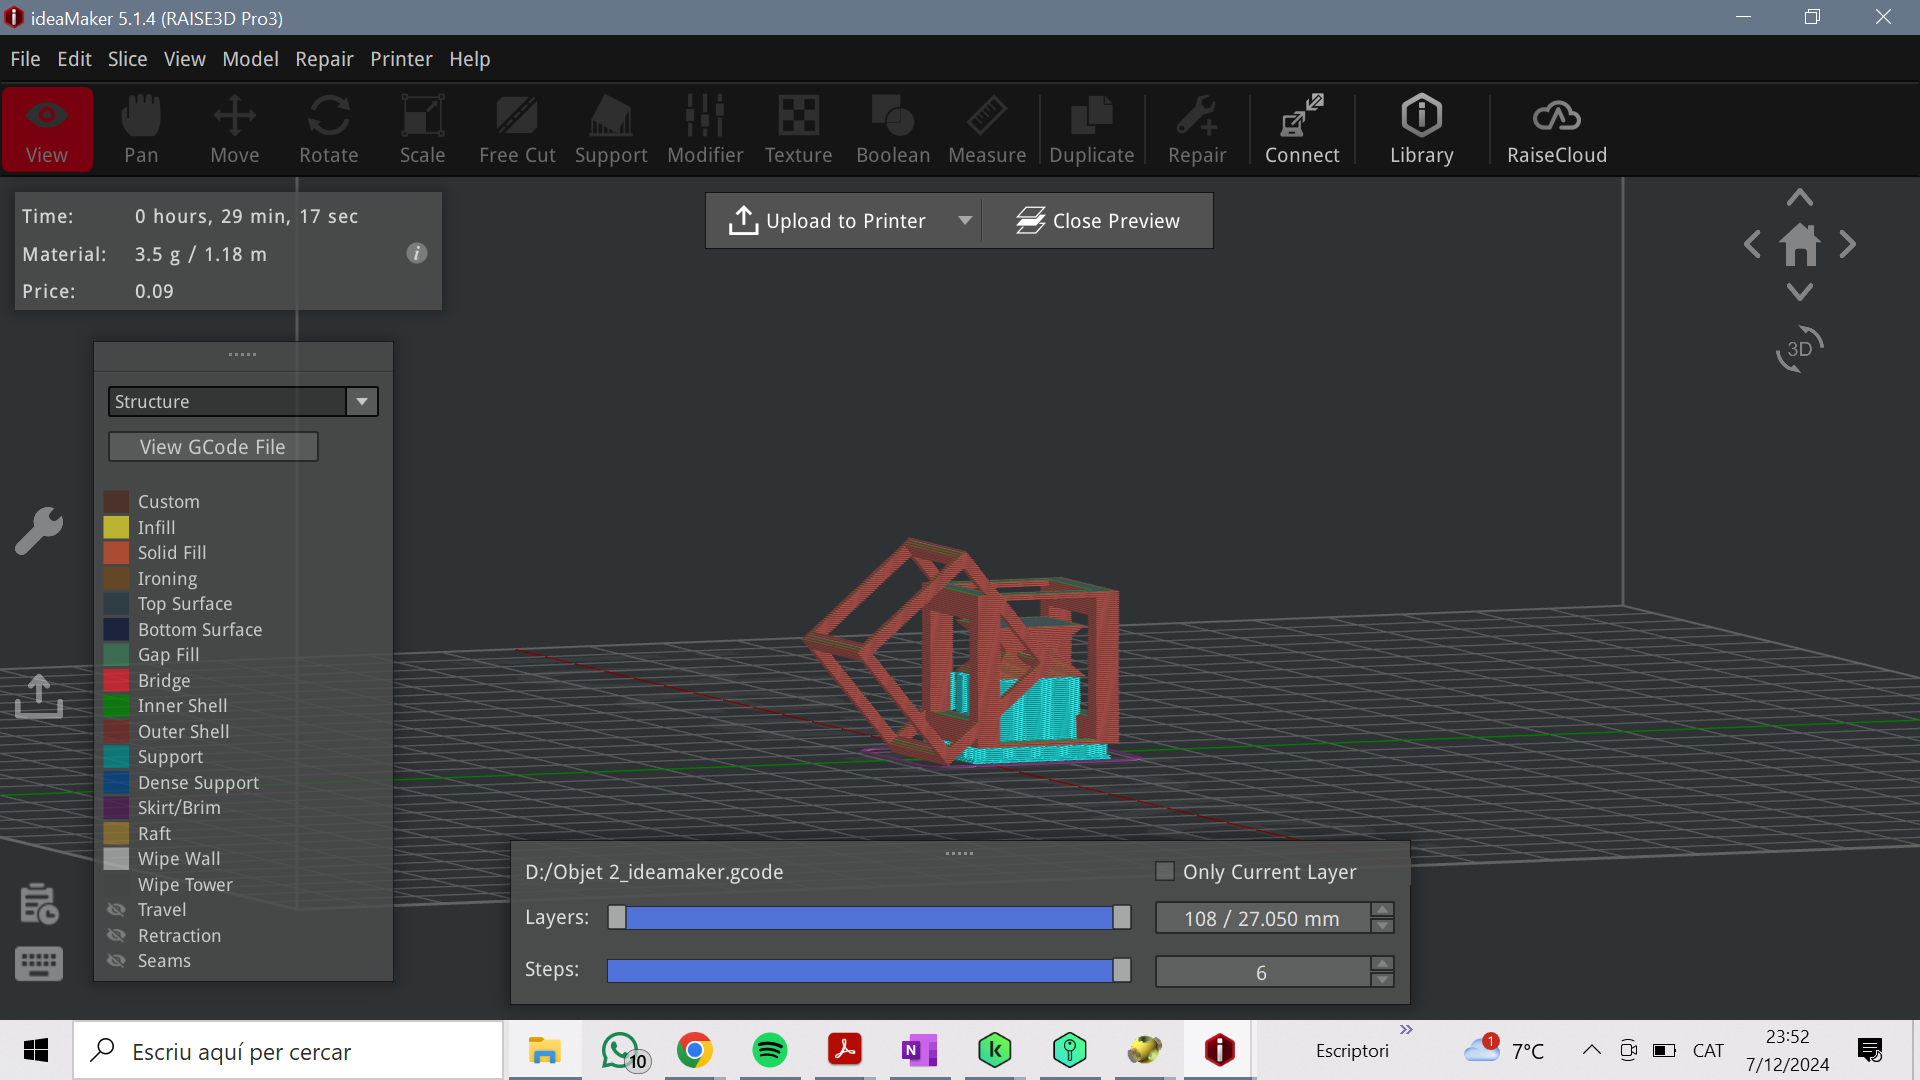](https://wiki.fablab.sorbonne-universite.fr/BookStack/uploads/images/gallery/2024-12/HpTimage.png) Avec l'application IdeaMaker, sous les paramètres suivants: - Remplissage: 15% - Filament: Prusa PLA 1,75 mm, couleur rouge - Support: partout Résultat final: [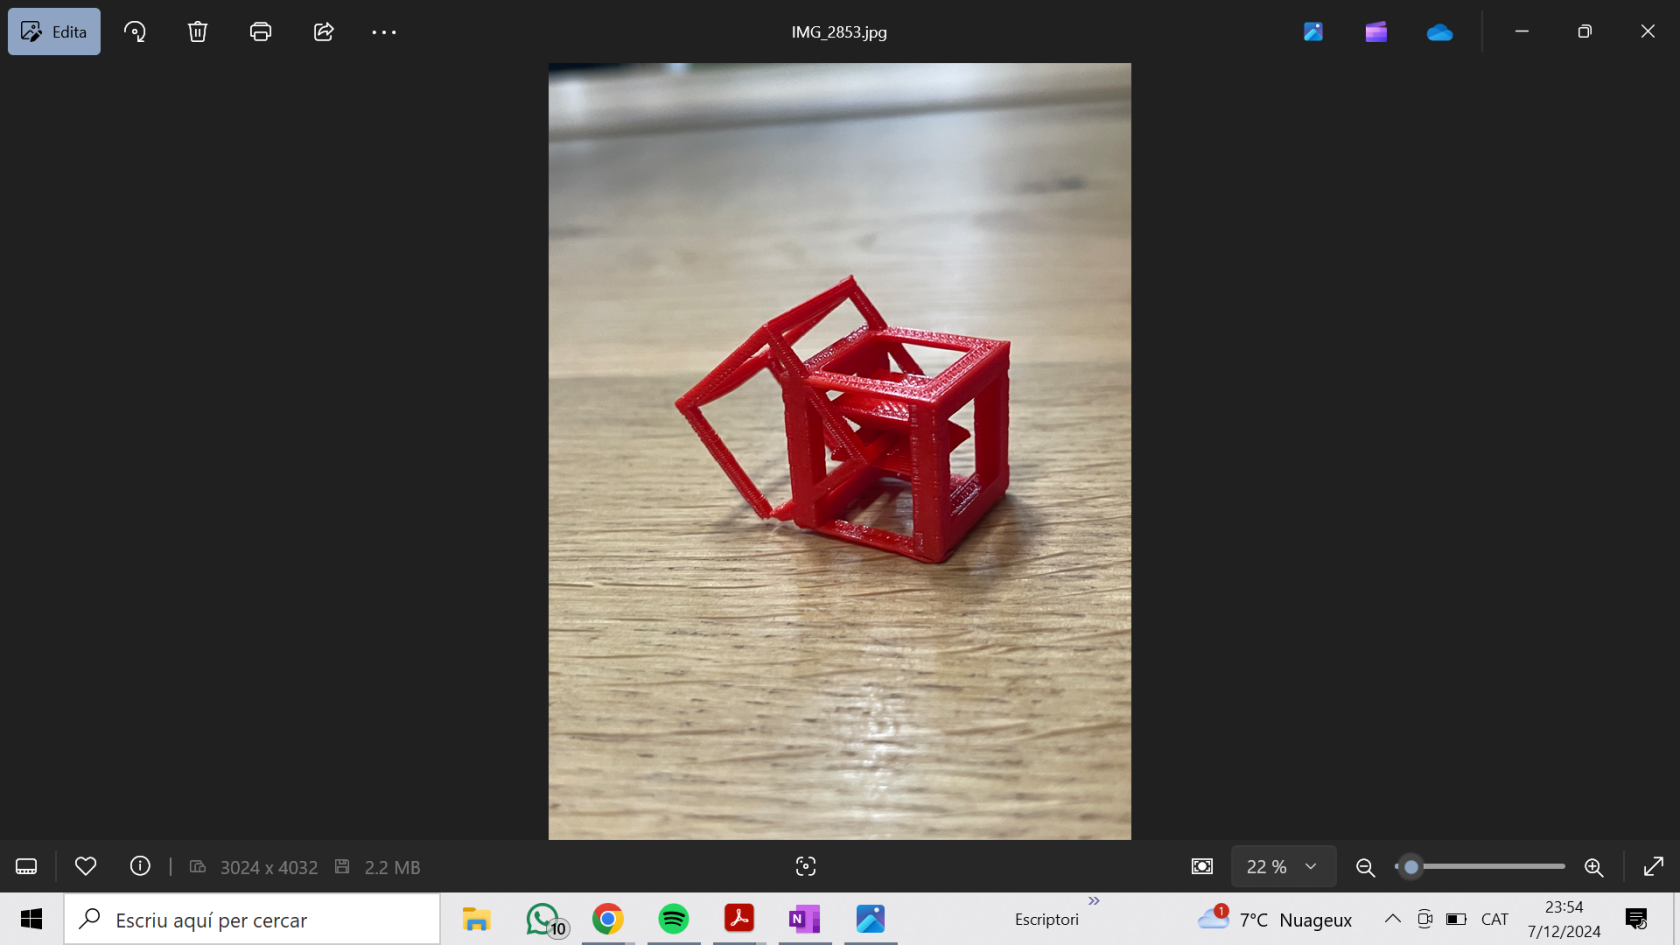](https://wiki.fablab.sorbonne-universite.fr/BookStack/uploads/images/gallery/2024-12/9b5image.png) #### **3. Object avec une pause pendant l'impression:** Pour mon projet de pause en impression 3D, j'ai choisi de créer une pièce d'échecs. À l'intérieur, j'ai intégré des éléments en plastique qui produisent du bruit lorsqu'on la manipule. **Le résultat avec OpenSCAD:** [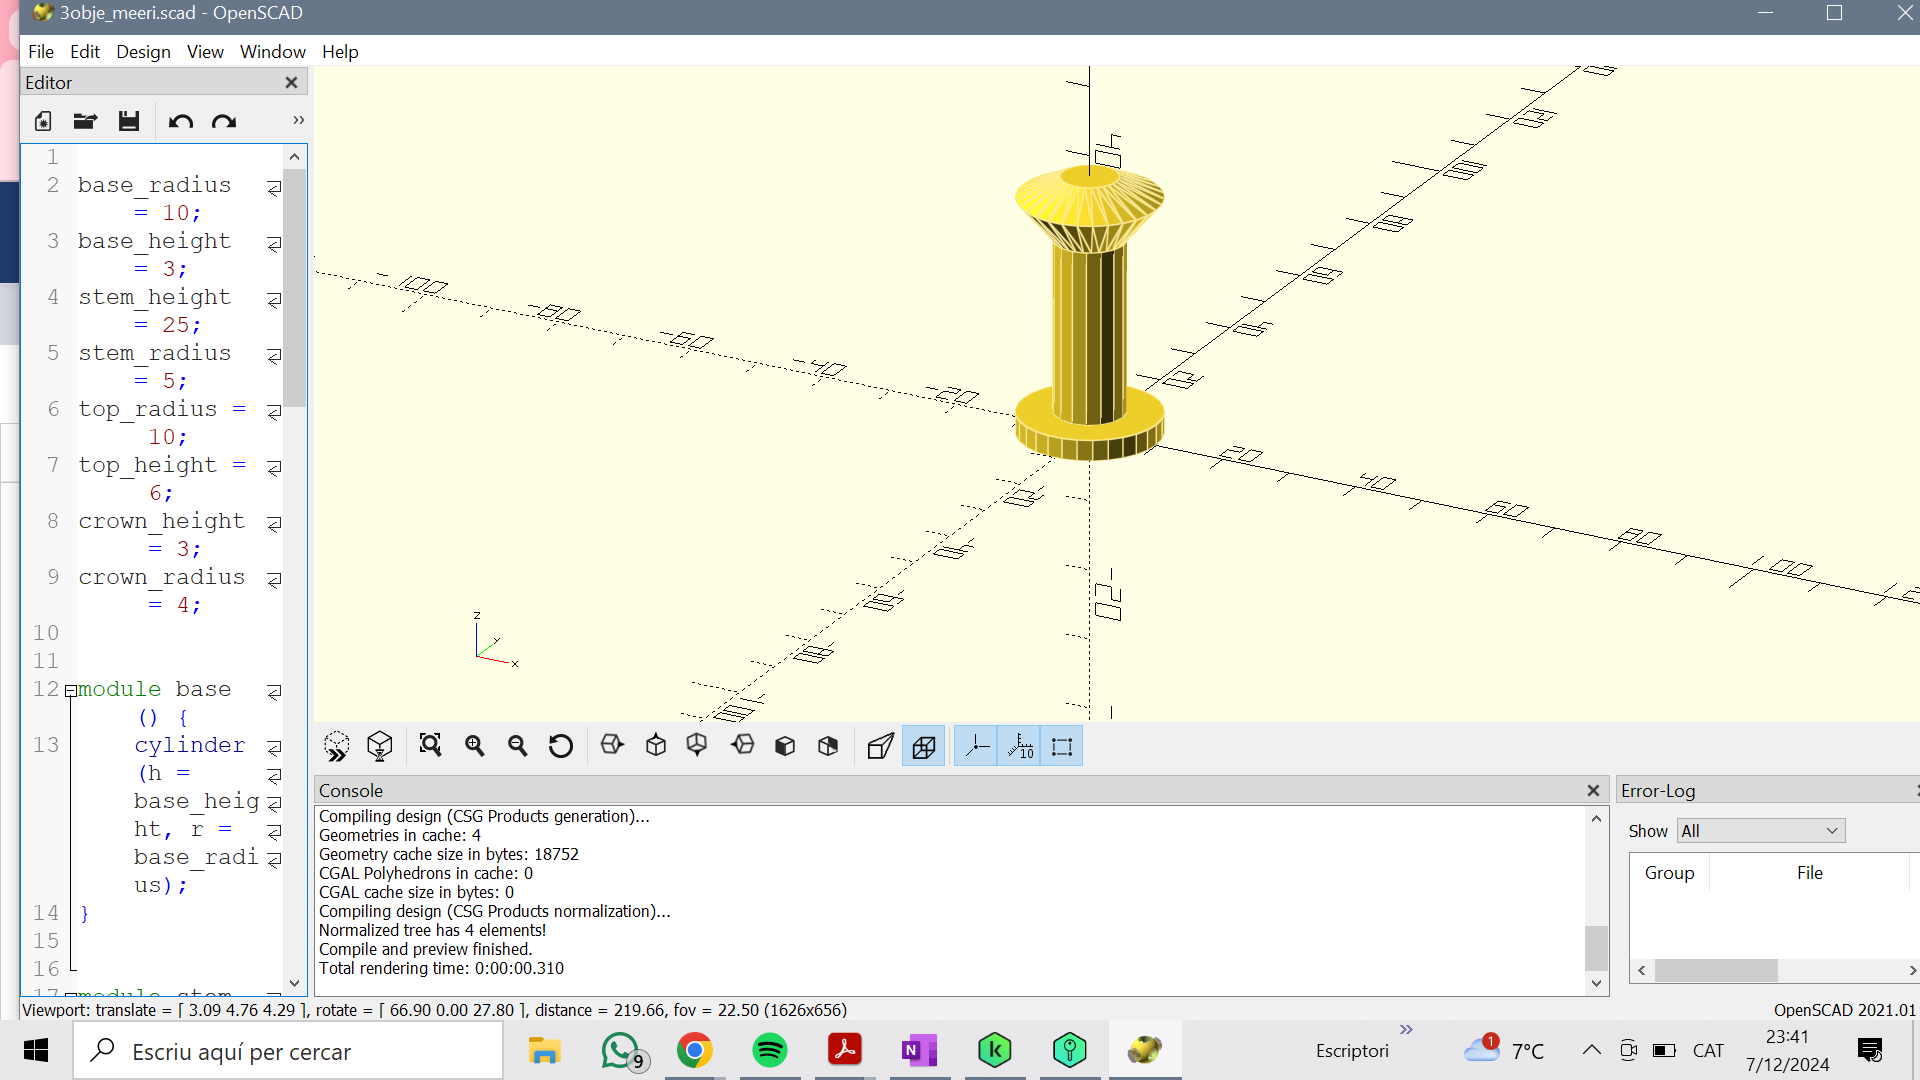](https://wiki.fablab.sorbonne-universite.fr/BookStack/uploads/images/gallery/2024-12/IdVimage.png) **Impression 3D:** Pour la phase d'impression 3D, j'ai utilisé le logiciel IdeaMaker. J'ai ajouté un support à la base de la pièce et défini un taux de remplissage de 15 %, filament Prusa PLA 1,75 mm, couleur rouge. J'ai programmé une pause de l'impression à une hauteur de 20 mm. [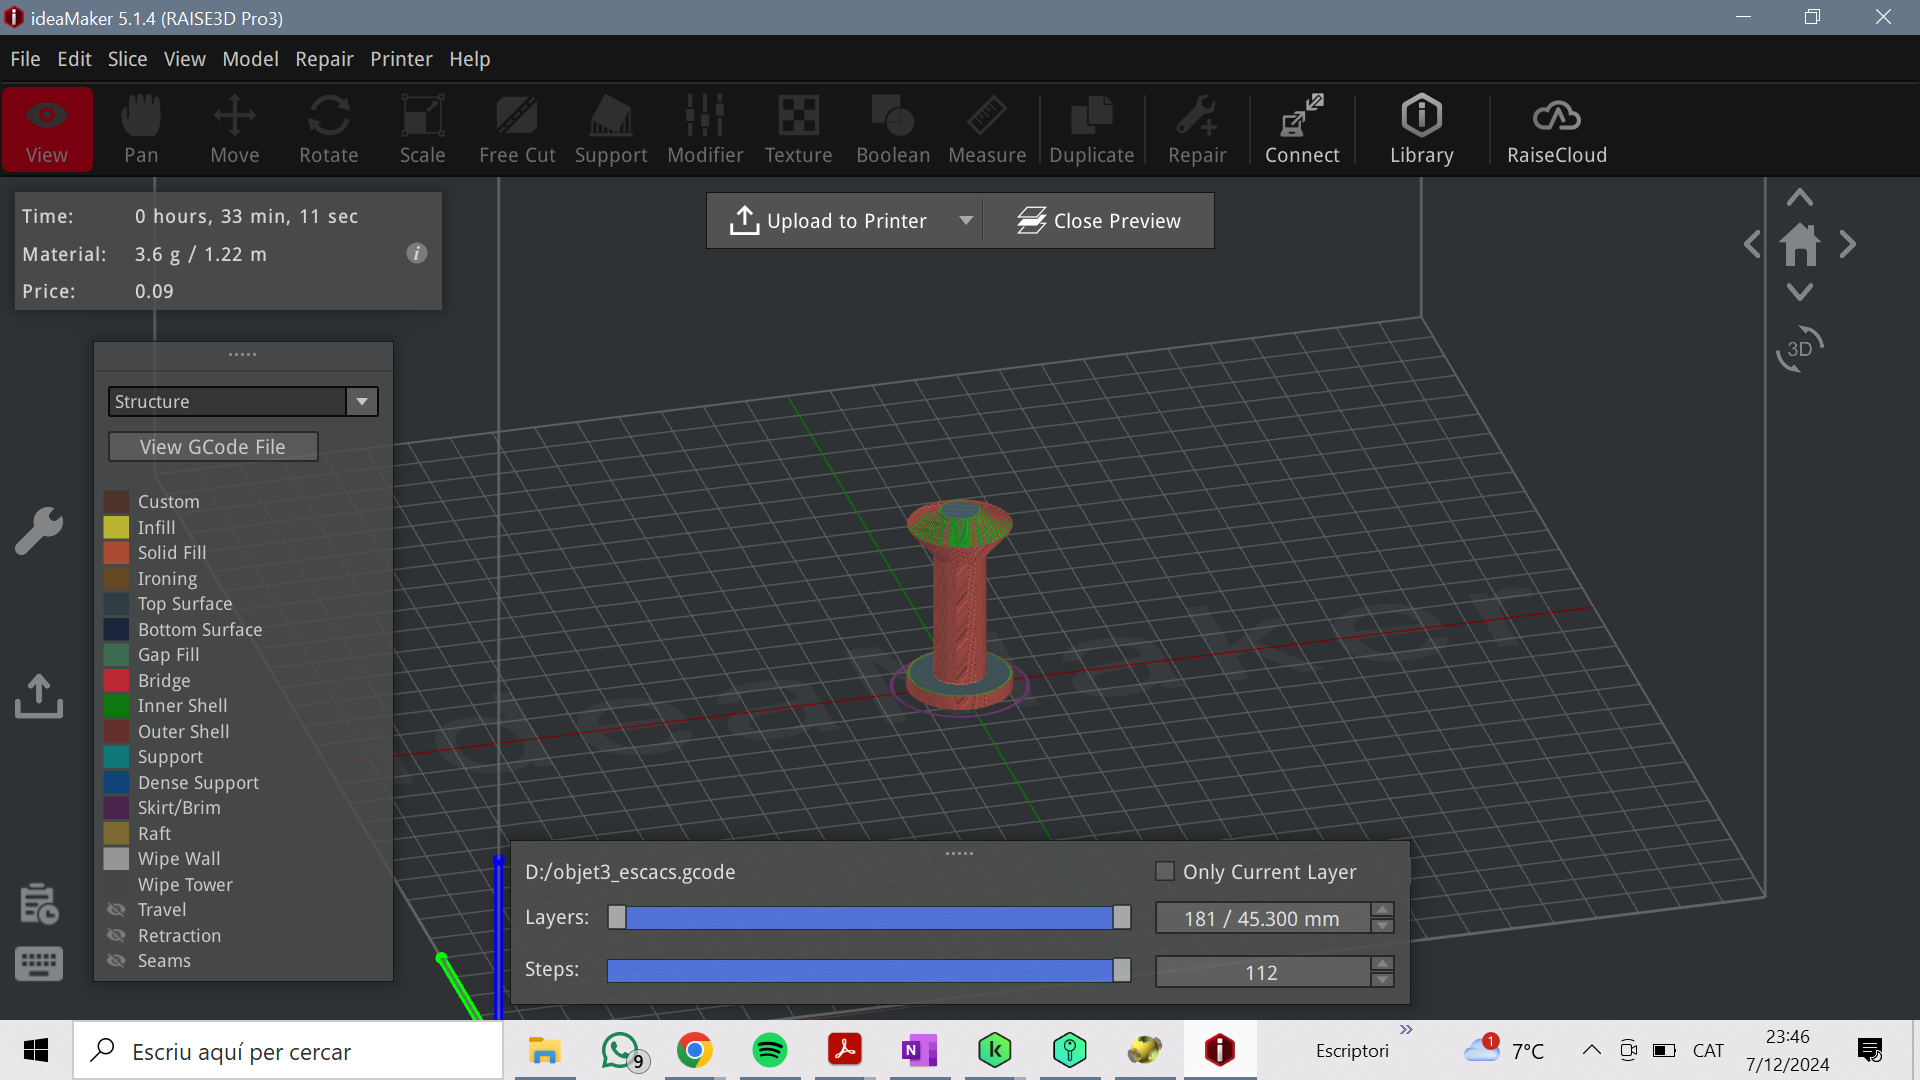](https://wiki.fablab.sorbonne-universite.fr/BookStack/uploads/images/gallery/2024-12/ny3image.png) Résultat final: [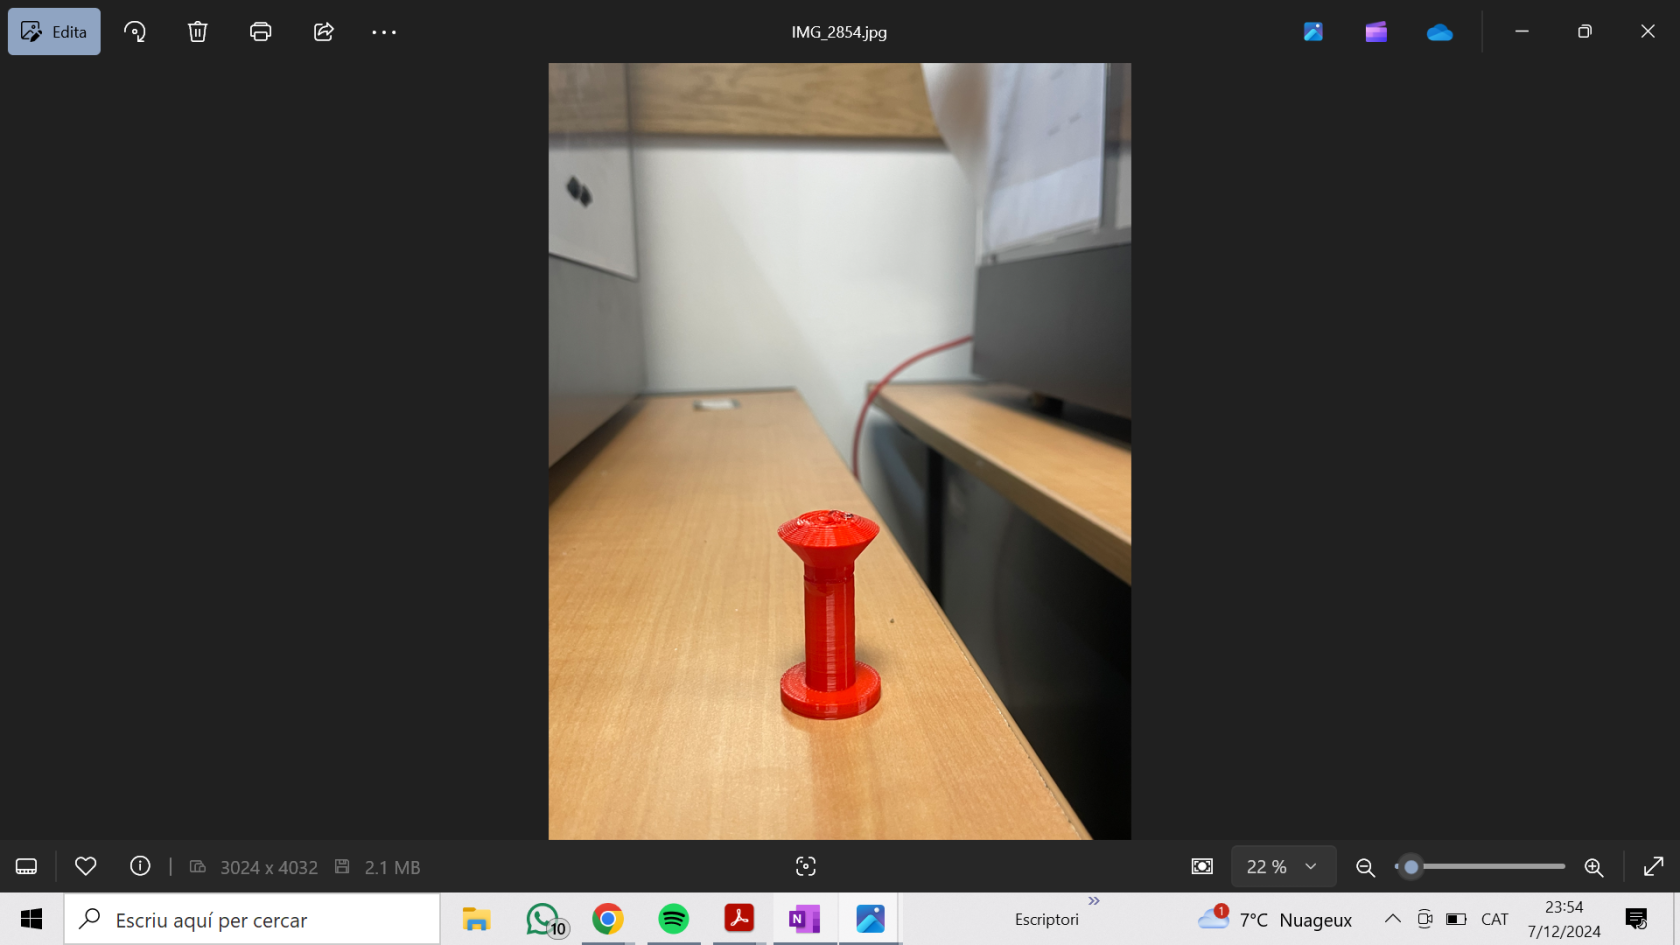](https://wiki.fablab.sorbonne-universite.fr/BookStack/uploads/images/gallery/2024-12/47limage.png) # Gilles SAVIGNAC LEMONNIER ### **Objet 1: Fonctionnel** **Description objet :** Dès de jeu à 6 faces de 1.6cm (taille standard) **Fonction:** Permet de tirer aléatoirement un nombre parmi 6 possibilités. **Description du projet:** J'ai utilisé le logiciel Openscad. L'objet doit pouvoir rouler un certain nombre de fois sur une surface plane afin d'assurer un résultat aléatoire. J'ai donc définie une sphère (taille définis arbitrairement) circonscrite à l'intérieur d'un cube et utilisé la fonction de d'intersection afin de réaliser des bord arrondis et de m'assurer que le dé roule, même sur une surface plane. Pour les chiffres j'ai trouvé un modèle sur internet car je ne souhaitais pas perdre de temps sur une tâche répétitive. j'ai positionné les chiffres de manière à ce qu'ils creusent d'1.6mm le dès. **Paramètres d’impression:** - - **Échelle :** L=l=H=16mm - **Buse** : 230°C - **Plateau** : 60°C - **Filament** : Prusa PLA, 1,75 mm de diamètre - **Supports** : non nécessaire - **Remplissage** : 50% - **Réglages d’impression** : paramètres par défaut de PrusaSlicer (qualité standard, épaisseur de couche classique) **Temps d’impression:** ~16 minutes **Résultat** : - - Dé fonctionnel ##### **code:** ```openscad $fn=100; module de(){ intersection(){ sphere(7.5); cube(10,true); }; }; module chiffres(){ rotate([0,0,0]) translate([0,0,4]) linear_extrude(height=2) text("1",size=5, halign = "center", valign = "center"); rotate([0,180,0]) translate([0,0,4]) linear_extrude(height=2) text("6",size=5, halign = "center", valign = "center"); rotate([90,0,0]) translate([0,0,4]) linear_extrude(height=2) text("2",size=5, halign = "center", valign = "center"); rotate([-90,0,0]) translate([0,0,4]) linear_extrude(height=2) text("5",size=5, halign = "center", valign = "center"); rotate([0,-90,0]) translate([0,0,4]) linear_extrude(height=2) text("3",size=5, halign = "center", valign = "center"); rotate([0,90,0]) translate([0,0,4]) linear_extrude(height=2) text("4",size=5, halign = "center", valign = "center"); } difference(){ de(); chiffres(); }; ``` ##### **Photo réalisation du dé:** ##### [](https://wiki.fablab.sorbonne-universite.fr/BookStack/uploads/images/gallery/2024-12/img-2957.JPEG) ### **Objet 2: Uniquement faisable en 3D** **Description objet :** une boule emprisonnée dans un anneau par un axe centrale **Description du projet:** Pour cet objet aucune limite de fonctionnalité. J'ai donc souhaité réaliser un "fidget toy". Pour cela, j'ai utilisé le logiciel de modélisation 3D "fusion 360". Ce logiciel est plus simple, à prendre en main car j'ai déjà eu de l'experience avec des logiciels similaire et il ne nécessite pas l'utilisation de code, de coordonnées, ect... . Pour réaliser mon objet j'ai tout simplement créé dans un premier temps la sphère centrale à la quelle j'ai ajouté 2 cylindres extrudés de par et d'autre de la boule selon un sur axe central. Au bout de chacun des cylindres j'ai reliés 2 plus petites boules. Ensuite, à coté dans le rèpère j'ai créé l'anneau avec un diamètre suffisamment grand pour accueillir la boule centrale. en fonction des dimensions de l'axe j'ai crée 2 troue symétriques que j'ai percé de par et d'autre en laissant ~1mm de jeu pour l'axe central. J'ai ensuite déplacé l'anneau au centre du repère de mon espace 3D où se trouvait le 1er module. **Paramètres d’impression:** - - **Échelle :** L=6cm - **Buse** : 230°C - **Plateau** : 60°C - **Filament** : Prusa PLA, 1,75 mm de diamètre - **Supports** : Partout - **Remplissage** : 40% - **Réglages d’impression** : paramètres par défaut de PrusaSlicer (qualité standard, épaisseur de couche classique) **Temps d’impression:** ~32 minutes **Résultat** : - - Fidget toy fonctionnel. L'anneau tourne autour de l'axe central ##### **Conception 3D:** **[](https://wiki.fablab.sorbonne-universite.fr/BookStack/uploads/images/gallery/2024-11/capture-decran-2024-11-28-125056.png)[](https://wiki.fablab.sorbonne-universite.fr/BookStack/uploads/images/gallery/2024-11/capture-decran-2024-11-28-125116.png)** ##### **Photo réalisation:** [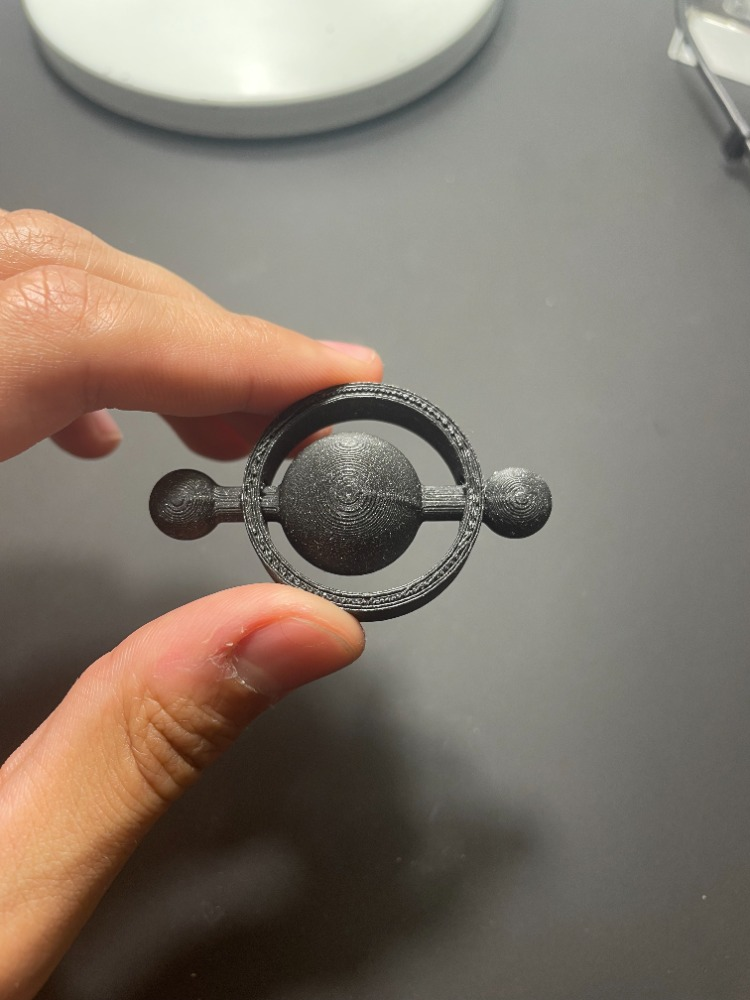](https://wiki.fablab.sorbonne-universite.fr/BookStack/uploads/images/gallery/2024-12/ikPimage.png) ### **Objet 3: Avec Pause dans l'impression** **Description objet :** Dès de jeu à 6 faces **pipé**! (2cm de cotés) **Fonction:** Permet de tirer (très peu) aléatoirement un nombre parmi 6 possibilités. **Description du projet:** J'ai tout de suite pensé à réutiliser le code mon objet 1 pour lui donner une nouvelle fonction en ajoutant du poids à l'intérieur. de celui-ci à l'opposé de la face 6. Pour ce faire, l'idée m'est venue d'utiliser une pièce d'1 centime pour augmenter le poids de mon dé départ car elle vaut peu et se trouve facilement. En revanche, elle ne convient pas tout à fait aux dimensions d'un dé standard (16mm) car elle même fait 16.25mm de diamètre pour 16mm d'épaisseur. J'ai donc augmenté les dimensions des arrêtes de mon dé à 20mm (cf photo). Ainsi j'ai pu creuser un trou cylindrique d'exactement 17mm de diamètre pour 1.7mm de hauteur au dessous de la face 1 afin de pouvoir y glisser la pièce lors de l'impression. J'ai fais une première tentative raté d'impression car j'ai configuré ma pause trop tôt dans l'impression du troue où se loge la pièce et lorsque je l'ai inséré, la buse s'y est heurtée et cela a déréglé l'impression. Lors de ma deuxième tentative j'ai donc configuré ma pause à la fin du trou cylindrique afin que la buse ne fasse qu'effleurer la surface de la pièce à l'intérieur, pour déposer de la matière au dessus et la sellé. Cependant, lors de la conception du dé je n'ai pas prévu une grande marge entre la pièce et la face intérieur du chiffre 1. On peut donc apercevoir la couleur de la pièce à l'intérieur du chiffre 1 (cf photo). **Paramètres d’impression:** - - **Échelle :** L=l=H= 20cm - **Buse** : 230°C - **Plateau** : 60°C - **Filament** : Prusa PLA, 1,75 mm de diamètre - **Supports** : Partout - **Remplissage** : 40% - **Réglages d’impression** : paramètres par défaut de PrusaSlicer (qualité standard, épaisseur de couche classique) **Temps d’impression:** ~16 minutes **Résultat** : Le poids du dé est donc composé de 6g de matière PLA et des 2.3g de la pièce de monnaie. Ainsi la pièce de 1 centime représente ~1/4 du poids total du dé, résultant en un dé déséquilibré et une probabilité plus élevé de tomber sur la face "6". ##### **code:** ```sca $fn=100; module de(){ intersection(){ sphere(14.5); cube(20,true); }; }; module chiffres(){ rotate([0,0,0]) translate([0,0,9]) linear_extrude(height=2) text("1",size=10, halign = "center", valign = "center"); rotate([0,180,0]) translate([0,0,9]) linear_extrude(height=2) text("6",size=10, halign = "center", valign = "center"); rotate([90,0,0]) translate([0,0,9]) linear_extrude(height=2) text("2",size=10, halign = "center", valign = "center"); rotate([-90,0,0]) translate([0,0,9]) linear_extrude(height=2) text("5",size=10, halign = "center", valign = "center"); rotate([0,-90,0]) translate([0,0,9]) linear_extrude(height=2) text("3",size=10, halign = "center", valign = "center"); rotate([0,90,0]) translate([0,0,9]) linear_extrude(height=2) text("4",size=10, halign = "center", valign = "center"); } difference(){ de(); chiffres(); translate ([0,0,7]) circle(d=16.25) linear_extrude(1.7);} ``` ##### **Photo réalisation du dé:** *intérieur du dé avec le trou qui accueille la pièce* [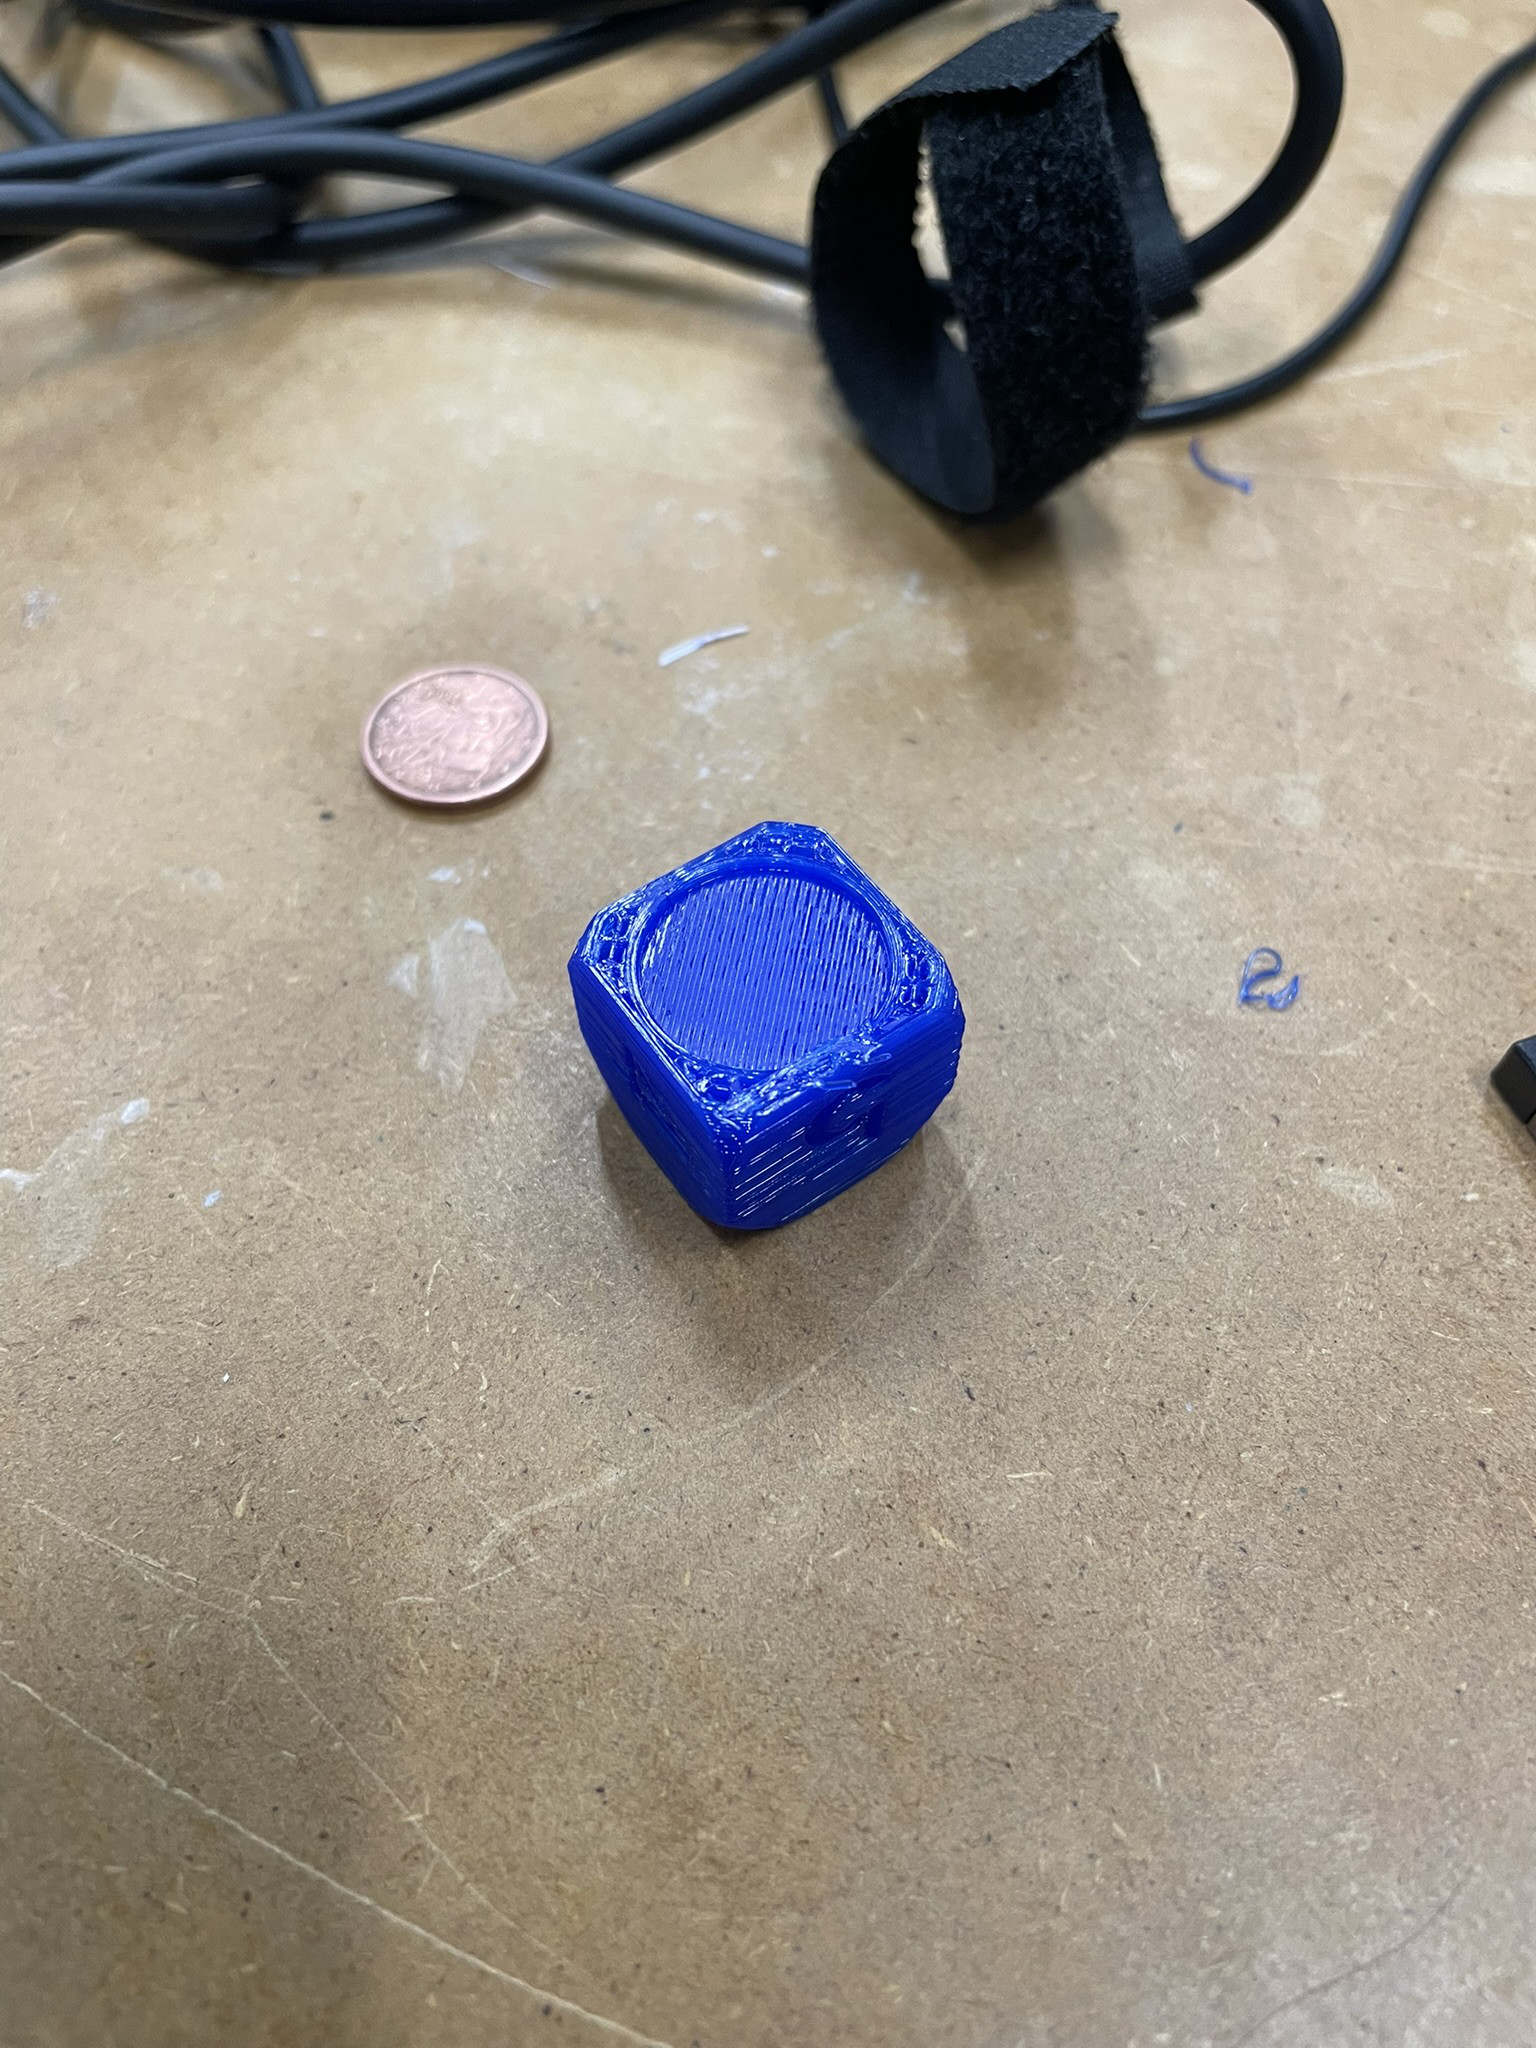](https://wiki.fablab.sorbonne-universite.fr/BookStack/uploads/images/gallery/2024-12/img-3036.JPEG)[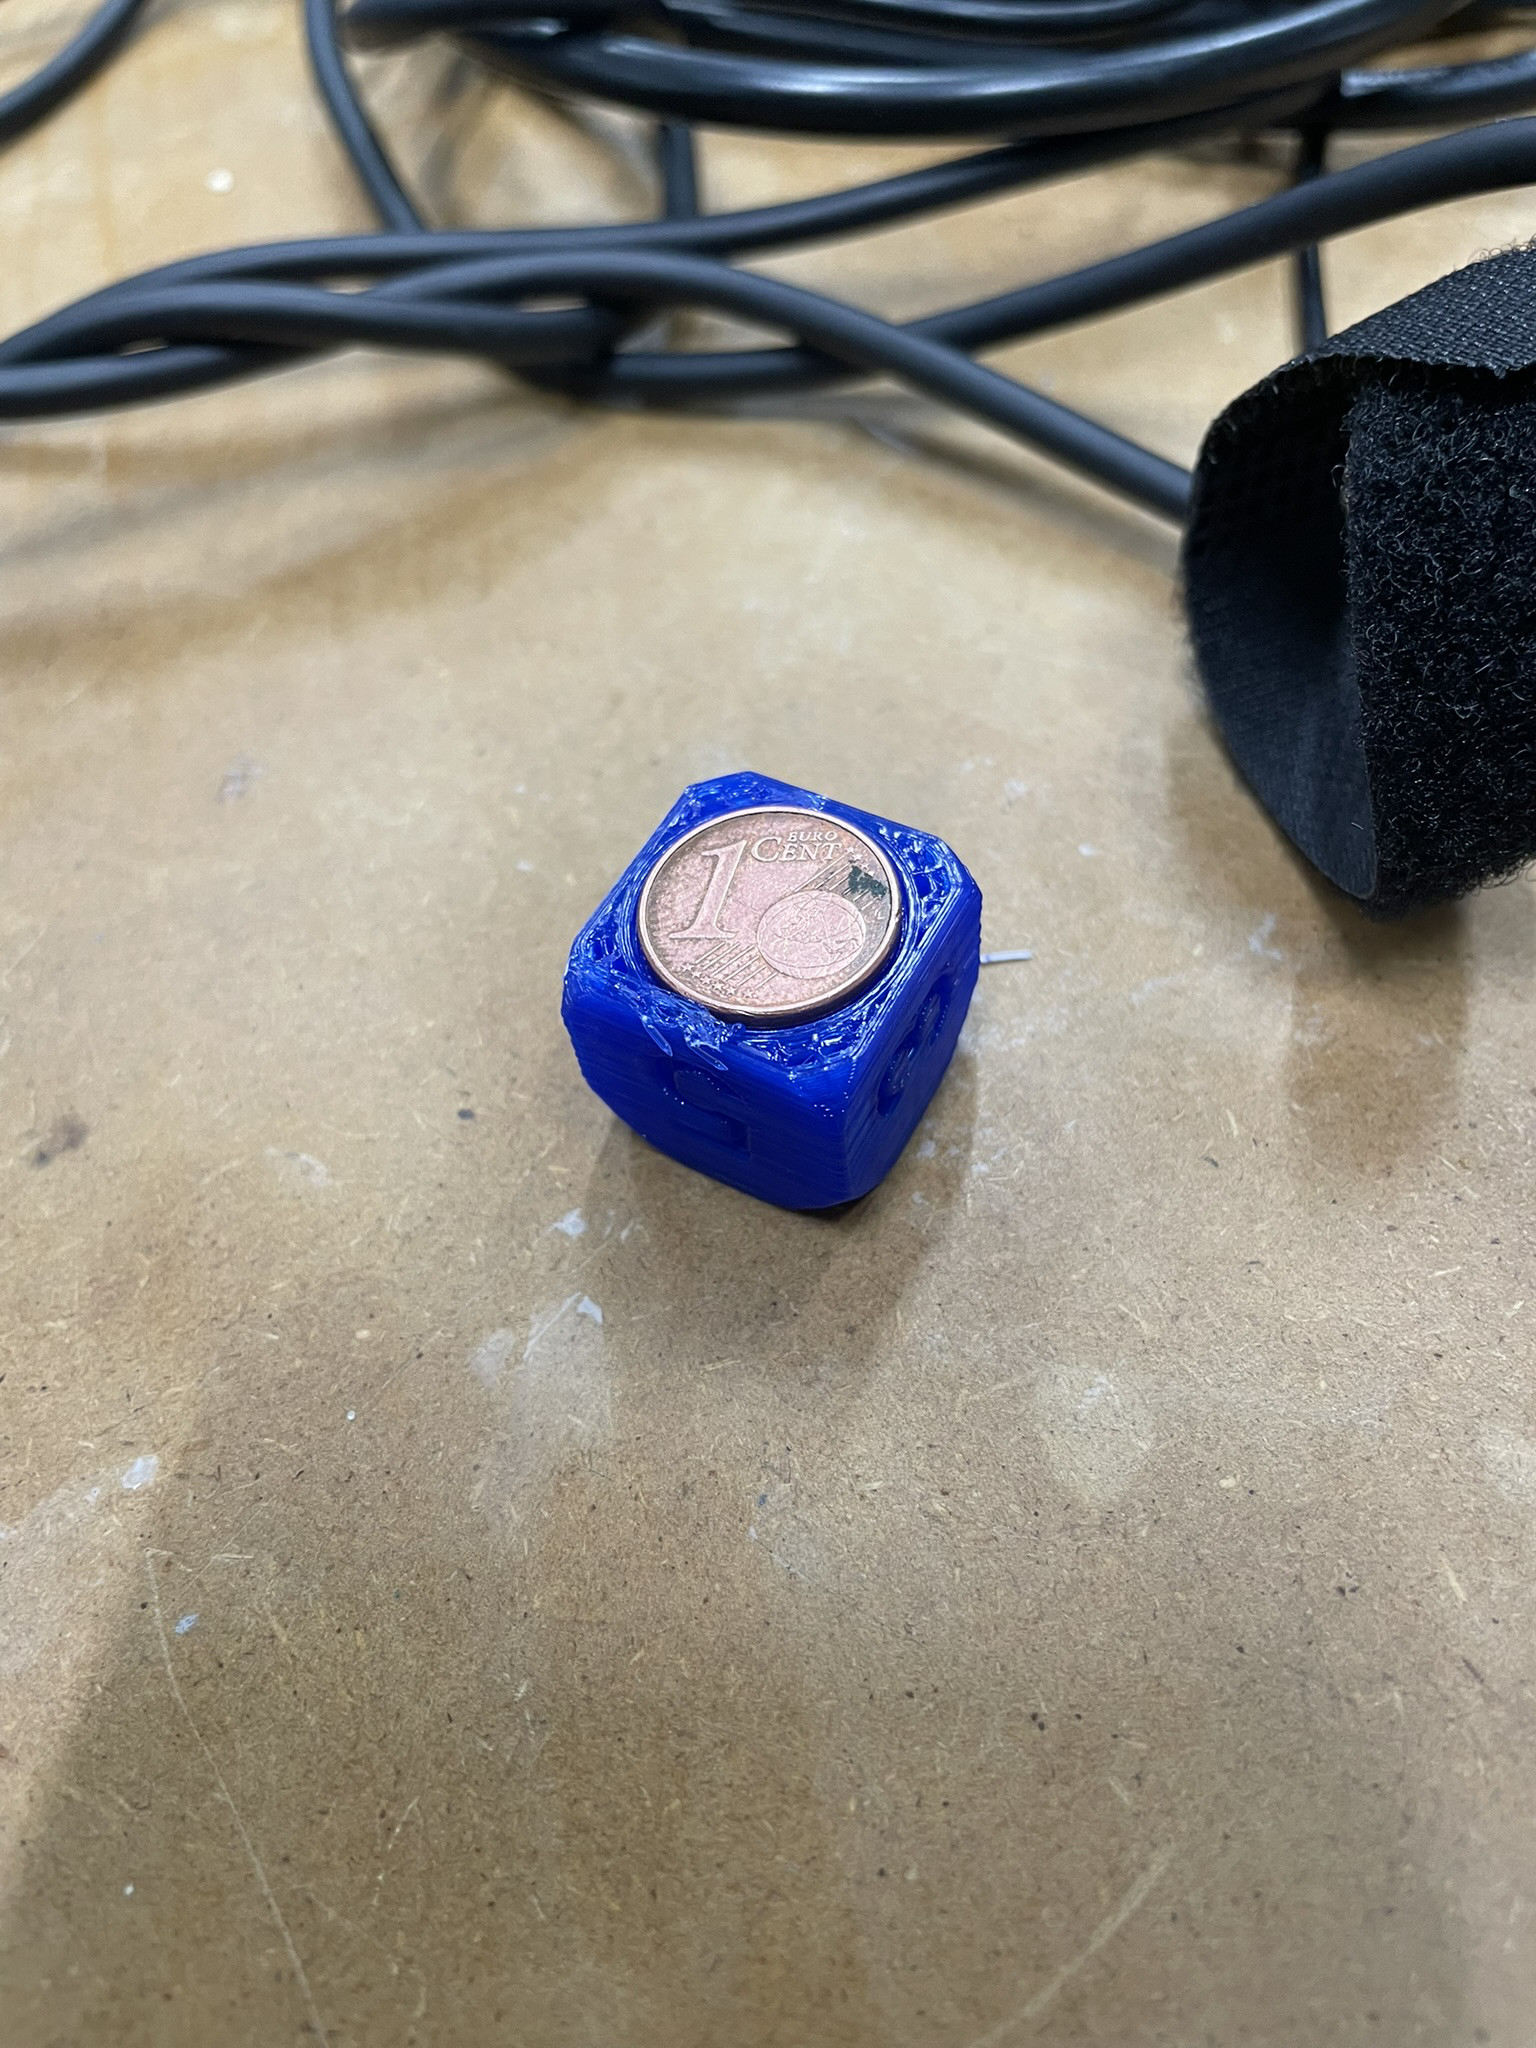](https://wiki.fablab.sorbonne-universite.fr/BookStack/uploads/images/gallery/2024-12/img-3037.JPEG) *dé avec la couleur de la pièce intérieur qui ressort* [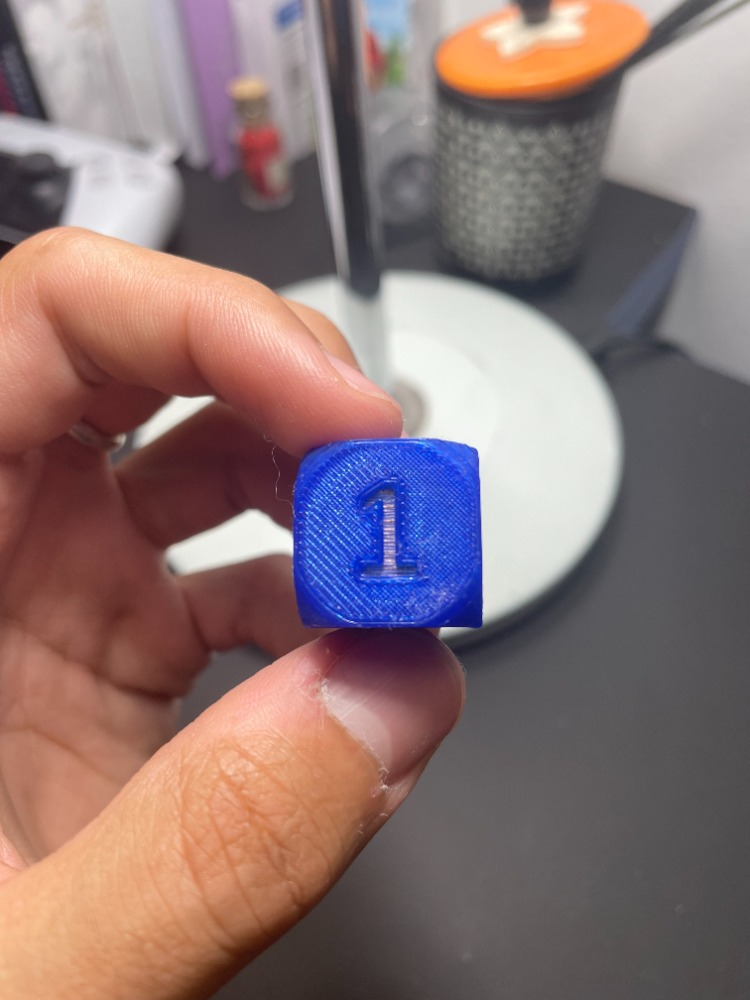](https://wiki.fablab.sorbonne-universite.fr/BookStack/uploads/images/gallery/2024-12/dezimage.png) # Defne Su Kurtoglu **Un vase:** Un vase sert à contenir des fleurs et de l’eau, tout en apportant une touche décorative. Les dimensions proposées (rayon extérieur de 50 mm, intérieur d’environ 40 mm, hauteur de 250 mm) offrent une grande capacité et une bonne stabilité. Avec une épaisseur de paroi d’environ 10 mm, ce design est robuste et bien adapté à une impression 3D solide et durable. [defne vase.scad](https://wiki.fablab.sorbonne-universite.fr/BookStack/attachments/982)